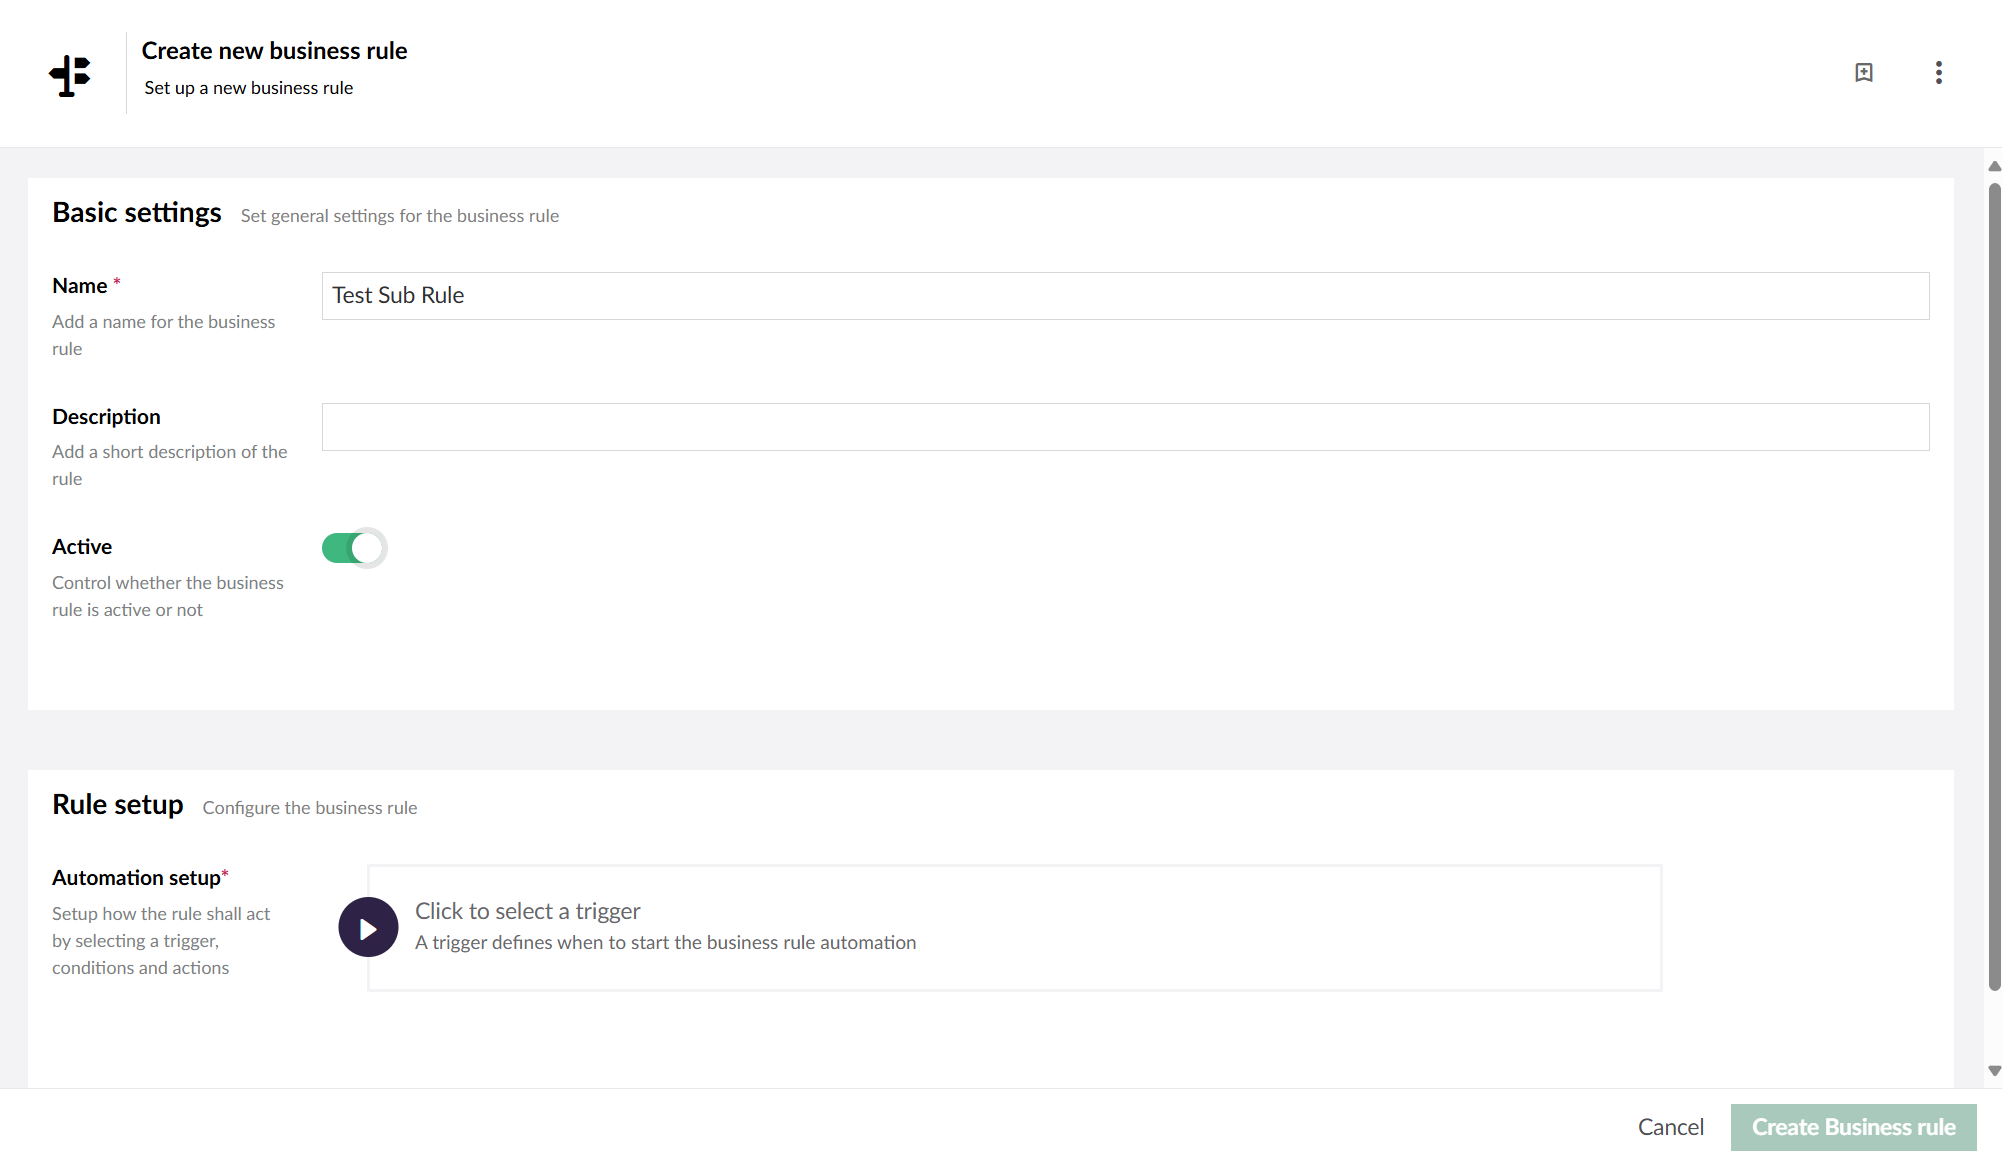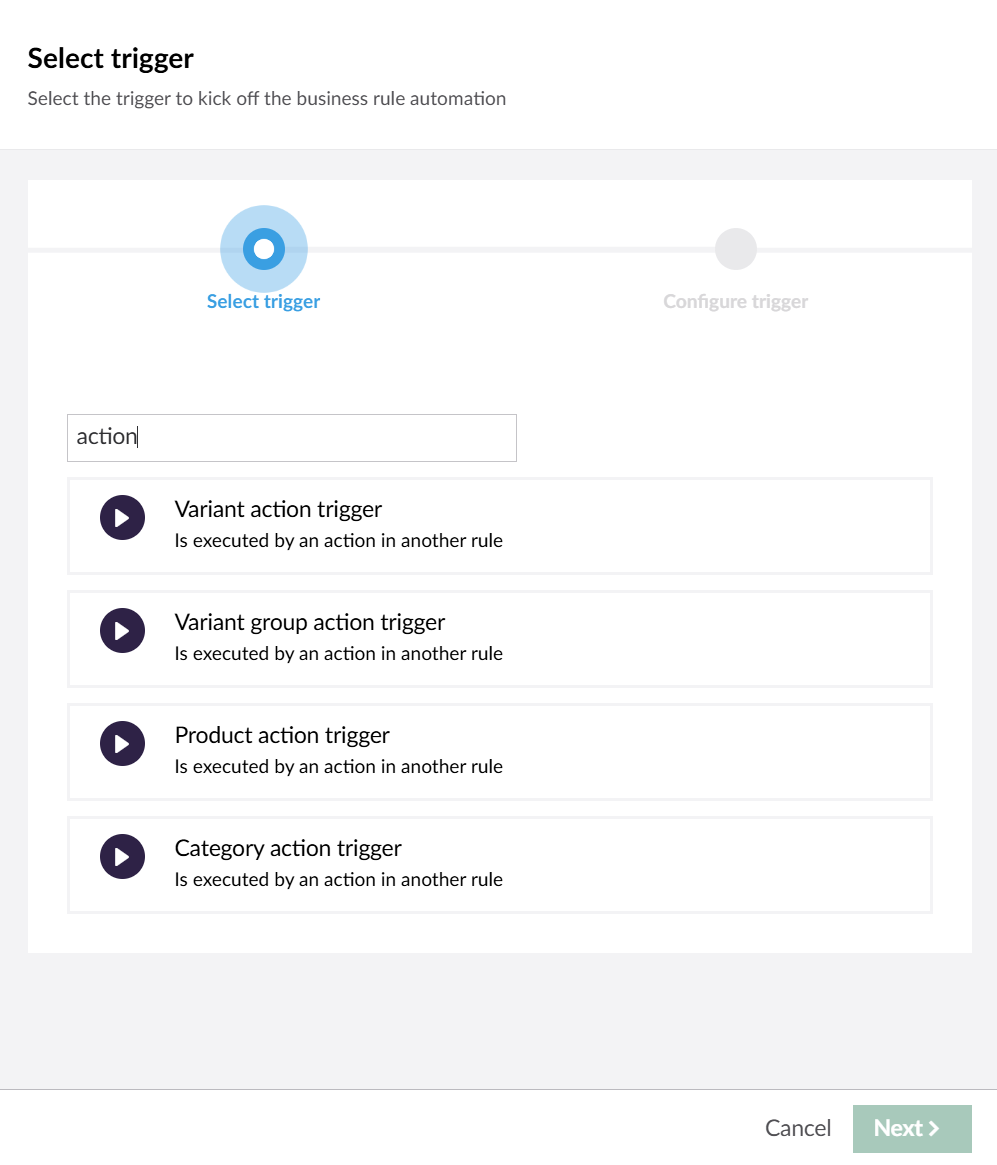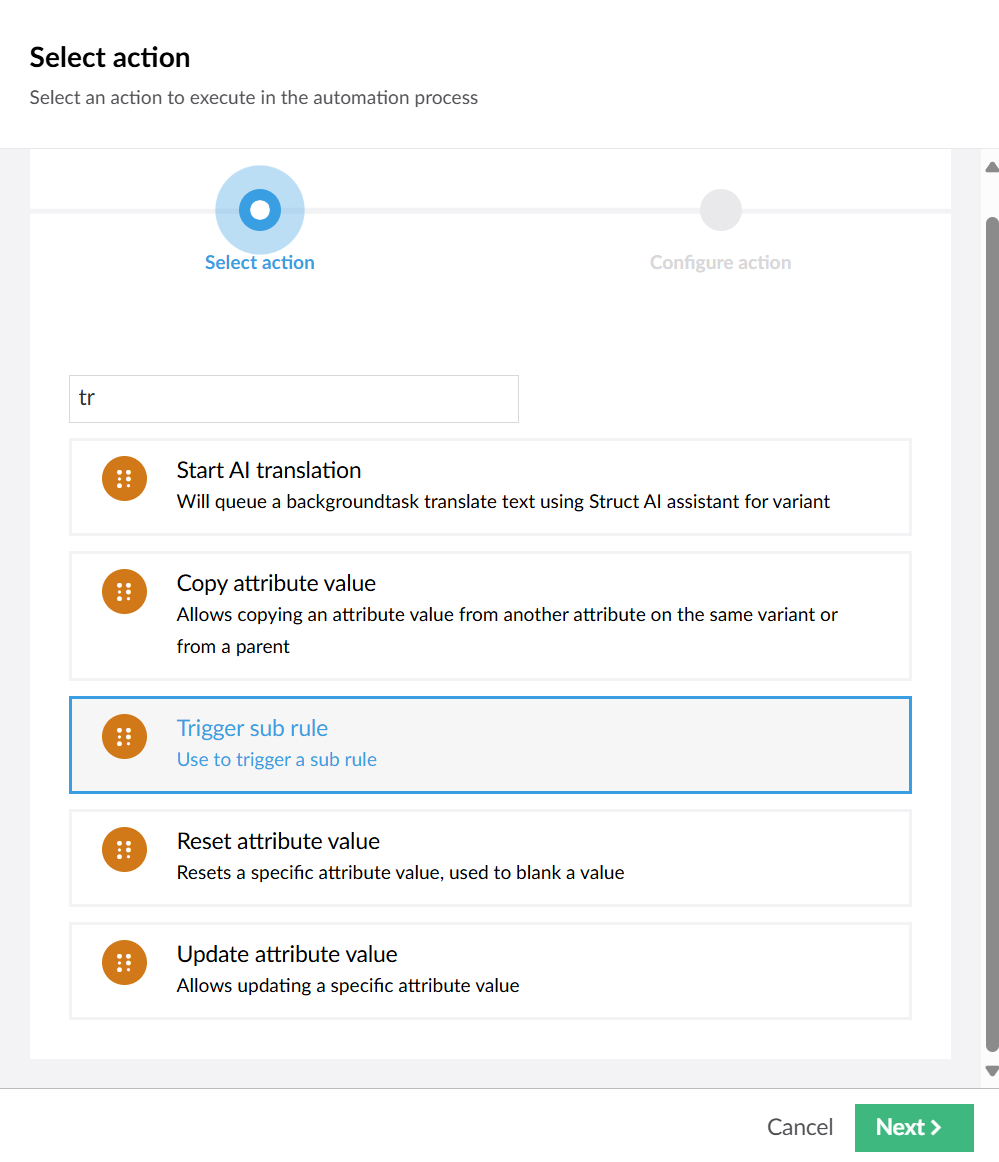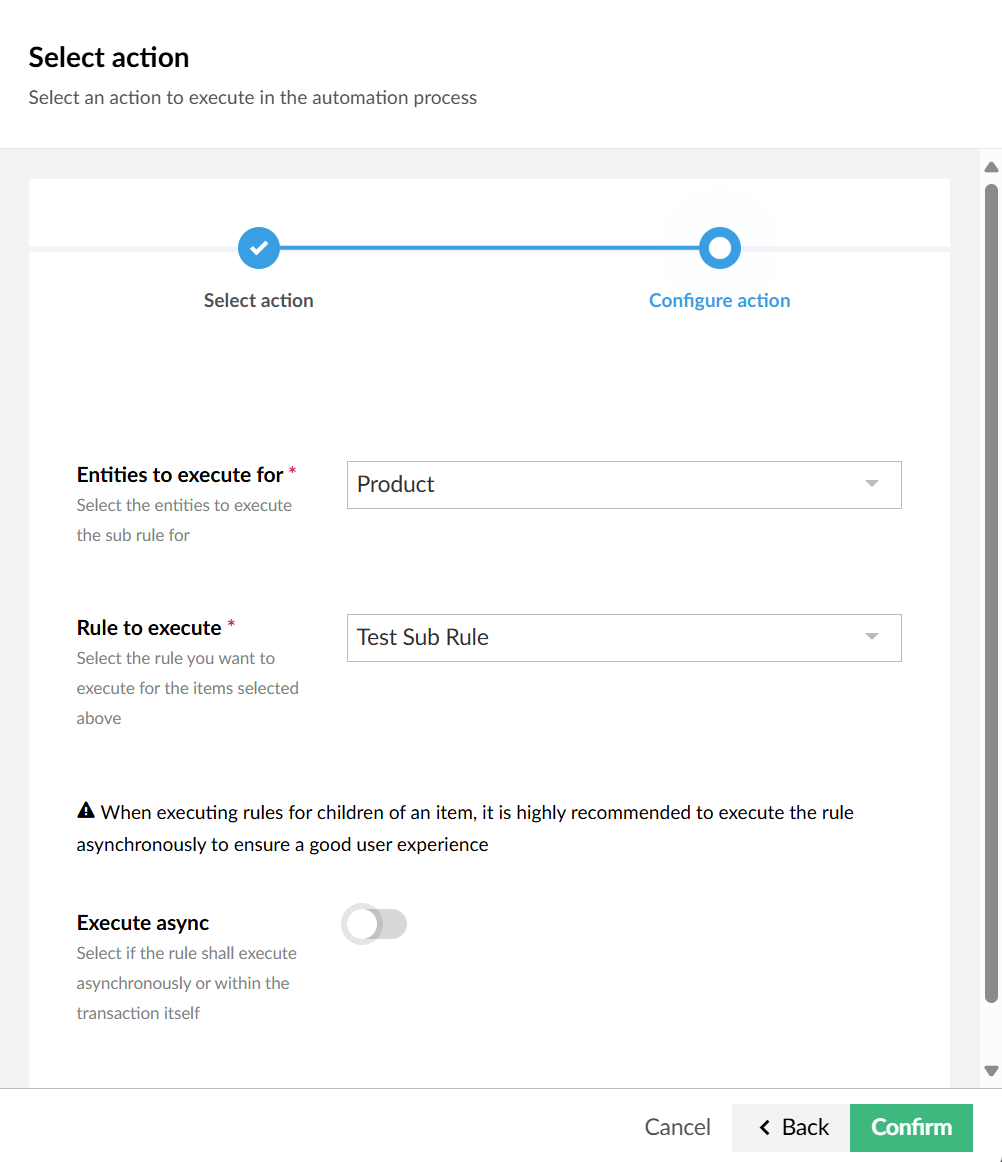
# Struct PIM Documentation

Build integrations, extend and learn how to configure Struct PIM.

{% hint style="danger" %}
Note that Struct PIM 3 has End of Life at the end of December 2026. More information will come soon.
{% endhint %}

Struct PIM combines state-of-the-art architecture and flexibility with a really good user experience that not only makes it easy to adapt the platform to your business, but also makes it extremely user-friendly to work with - both for you and your colleagues.

Learn more about Struct PIM and why it is the #1 user-friendly PIM system on [struct.com](https://struct.com/).

<table data-view="cards" data-full-width="false"><thead><tr><th></th><th></th><th></th><th data-hidden data-card-target data-type="content-ref"></th><th data-hidden data-card-cover data-type="files"></th></tr></thead><tbody><tr><td><strong>Fundamentals</strong></td><td>Learn the concepts of Struct PIM</td><td></td><td><a href="/pim3/fundamental-concepts/get-familiar-with-struct-pim">Fundamental concepts</a></td><td><a href="https://3609403033-files.gitbook.io/~/files/v0/b/gitbook-x-prod.appspot.com/o/spaces%2FZJAMIKVcqchSDbt4A7DE%2Fuploads%2F1F9le7QTtDPoy4FK8l79%2Ffundamentals_v2.png?alt=media&amp;token=5a697697-09dd-41f2-978a-4eb2a1792488">fundamentals_v2.png</a></td></tr><tr><td><strong>Reference</strong></td><td>Learn how to configure and use Struct PIM. </td><td></td><td><a href="/pim3/reference/how-to-use-struct-pim">Reference</a></td><td><a href="https://3609403033-files.gitbook.io/~/files/v0/b/gitbook-x-prod.appspot.com/o/spaces%2FZJAMIKVcqchSDbt4A7DE%2Fuploads%2FBbvBtnMm6GIQY5KKBRtU%2Freference_v2.png?alt=media&amp;token=be3c7817-fcde-4fbb-9e29-6389760c56a3">reference_v2.png</a></td></tr><tr><td><strong>API</strong></td><td>The API of Struct PIM is the go to for all integrations, whether the integration updates data in the system or simply gets data from the system.</td><td></td><td><a href="https://techdoc.struct.com/api-reference/">https://techdoc.struct.com/api-reference/</a></td><td><a href="https://3609403033-files.gitbook.io/~/files/v0/b/gitbook-x-prod.appspot.com/o/spaces%2FZJAMIKVcqchSDbt4A7DE%2Fuploads%2FpdmdibWaXGfB4K54vpVl%2Fapi_v2.png?alt=media&amp;token=08563e9e-12ef-49a8-873a-7279a319c002">api_v2.png</a></td></tr><tr><td><strong>Changelog</strong></td><td>See releases of Struct PIM and the changes made between each release</td><td></td><td><a href="https://techdoc.struct.com/changelog/v3/changelog-v3/">https://techdoc.struct.com/changelog/v3/changelog-v3/</a></td><td><a href="https://3609403033-files.gitbook.io/~/files/v0/b/gitbook-x-prod.appspot.com/o/spaces%2FZJAMIKVcqchSDbt4A7DE%2Fuploads%2F3sZlOzHAtpivA3tiNyUa%2Fchangelog_v2.png?alt=media&amp;token=6714671c-a416-4257-9e0d-c0940f20c51d">changelog_v2.png</a></td></tr><tr><td><strong>Tutorials</strong></td><td>Helpful guides for you to get setup with Struct.PIM quickly and easily.</td><td></td><td><a href="/pim3/tutorials/helpful-guides">Tutorials</a></td><td><a href="https://3609403033-files.gitbook.io/~/files/v0/b/gitbook-x-prod.appspot.com/o/spaces%2FZJAMIKVcqchSDbt4A7DE%2Fuploads%2FYXMXQbOZaIZs0CZKVVSO%2Ftutorials_v2.png?alt=media&amp;token=bf1efd02-7a61-4e8f-a8de-4204b827b8d7">tutorials_v2.png</a></td></tr><tr><td><strong>Integration</strong></td><td>Struct PIM provides tools for smooth integration with any system. Get familiar with the concepts here.</td><td></td><td><a href="/pim3/integration/integrate-with-struct-pim">Integration</a></td><td><a href="https://3609403033-files.gitbook.io/~/files/v0/b/gitbook-x-prod.appspot.com/o/spaces%2FZJAMIKVcqchSDbt4A7DE%2Fuploads%2F80QeIjMNgdP26jNuh4RZ%2Fintegrations_v2.png?alt=media&amp;token=294ee3a4-51b7-473b-8786-ddf2a58bc098">integrations_v2.png</a></td></tr></tbody></table>

***

## Get Started

We've put together some helpful guides for you to get setup with Struct.PIM quickly and easily.

{% content-ref url="/pages/fg5n3nLaFK2WY03KVZ6i" %}
[How to use Import](/pim3/tutorials/helpful-guides/how-to-use-import)
{% endcontent-ref %}

{% content-ref url="/pages/p6LYUAwV2Yz5ZyTiPcIz" %}
[How to use Business rules](/pim3/tutorials/helpful-guides/how-to-use-business-rules)
{% endcontent-ref %}

{% content-ref url="/pages/GosIGP6hbRU8howTZJtT" %}
[How to use product models](/pim3/tutorials/helpful-guides/how-to-use-product-models)
{% endcontent-ref %}

{% content-ref url="/pages/F5XYH3hN3RfelbRZQOEB" %}
[How to use product catalogues](/pim3/tutorials/helpful-guides/how-to-use-product-catalogues)
{% endcontent-ref %}

{% content-ref url="/pages/4mncGPFfeSLXeWWWLFXZ" %}
[How to use enrichment insights](/pim3/tutorials/helpful-guides/how-to-use-enrichment-insights)
{% endcontent-ref %}

***

### Frequently asked questions

<details>

<summary><strong>Do everyone really need access to make changes in PIM?</strong></summary>

Definitely not!&#x20;

[Read more about security here.](/pim3/reference/settings/security)

</details>

<details>

<summary><strong>Oops, I just bulk updated 100 products by mistake</strong></summary>

Do not worry, we got your (roll)back.&#x20;

[Read more about our rollback feature here.](/pim3/reference/product-model-setup/changelog#rollback-transaction-change)

</details>

<details>

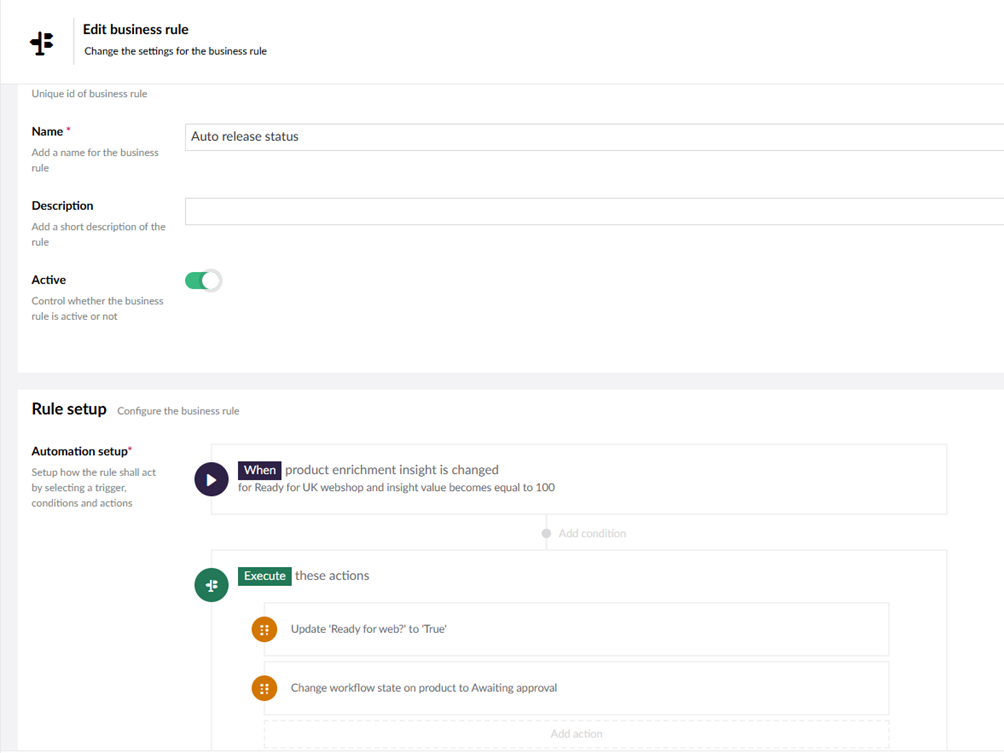
<summary><strong>It would be nice if we did not have to manually change product to active when Enrichment reaches 100%</strong></summary>

Automate processes by using Business rules.&#x20;

[Click here to learn more.](/pim3/reference/product-model-setup/business-rules)

</details>


# Latest updates in Documentation

### 27 March: Media format

Read how to format assets directly through the use of querystring parameters.

{% content-ref url="/pages/FLty5MkEqvEsaLBK8rLr" %}
[Media format](/pim3/integration/media-format)
{% endcontent-ref %}

### 12 March: How to use Import and Business rules

Read our latest tutorials on how to easily create or update entities in Import and automate processes through the use of Business rules.

{% content-ref url="/pages/fg5n3nLaFK2WY03KVZ6i" %}
[How to use Import](/pim3/tutorials/helpful-guides/how-to-use-import)
{% endcontent-ref %}

{% content-ref url="/pages/p6LYUAwV2Yz5ZyTiPcIz" %}
[How to use Business rules](/pim3/tutorials/helpful-guides/how-to-use-business-rules)
{% endcontent-ref %}


# Get familiar with Struct PIM

Get familiar with the basic concepts in Struct PIM, so you know what they mean and the context they are used in.


# Catalogues & categories

This article explains the concepts of catalogues and categories and how they are used to organize your products

### What are catalogues <a href="#what-are-catalogues" id="what-are-catalogues"></a>

Catalogues are root elements in category structures used for organizing products logically in categories.

### What are categories <a href="#what-are-categories" id="what-are-categories"></a>

Categories are used to create hierarchical structures within a catalogue. Categories serves as a means for structuring products in meaningful classifications.

Categories can be organized in a nested structure to form the desired hierarchical structure. There are no limitations to the number of categories and depth of category structure in the system.

### Standard category

Standard categories allows classifying products and variant groups manually.

### Dynamic category

Dynamic categories allows you to automatically classify products and variant groups, which meet certain criteria.


# Products & variants

This article describes the basic concepts around products and variants and how they relate to each other

### Product and variant models <a href="#product-and-variant-models" id="product-and-variant-models"></a>

In Struct PIM, product and variant entities are the central elements of the whole system. Every product and variant in the system uses a data model, which defines the data fields available on each of them. These data models are defined in what we call [product structures](/pim3/reference/product-model-setup/product-structures).

Products are the basic entity in the system. In some cases, no variations of a product exist. In such cases, no variants will exist either.

In cases where a product can be bought in different variations, such as clothing, a variant of that product will exist for each color and size variations of the clothe. In such cases, the product will hold general information, that is common to all variations, such as Name, Description etc., whereas each variant will hold the data specific to each one, such as the SKU, color, size etc.

{% hint style="info" %}
Every variant is connected to a product entity. A variant cannot exist without a connection to a product. However, a product does not need to have any variants.
{% endhint %}

### Classifications <a href="#classifications" id="classifications"></a>

Products are classified in one or categories. These categories can span multiple catalogues. When a product is classified in one or more categories, a reference is made between them. Thus the product only exist once, but is placed within multiple categories. Updates to the product will thus be available in all catalogues and categories.

If a product is classified in a category within the master catalogue, it must have a primary category as well. If the product is only placed within one category, this will naturally be the primary category as well, but if it is placed in multiple, one must be marked as the primary.

The system supports setting up attributes on categories in the maste catalogue, which must be available to all products classified within that category. When a product is placed within multiple categories, the primary category defines the category attributes available to the product.

### Variation definitions <a href="#variation-definitions" id="variation-definitions"></a>

Variation definitions is a concept used for managing the multitude of different variations that might exist for different types of products.

{% hint style="info" %}
**Example:** For clothing, variations exist per color and size, but for a piece of wood, variations might exist for different lengths.
{% endhint %}

A variation definition defines what the *"defining attributes"* are for a specific product. In the case of clothing, the defining attributes will be color and size, whereas on a piece of wood, it would be the length.

A variation definition is selected on a product, to tell the system what attibutes are specific to the variants of that product. This information is passed along with the products' data in the API, which enables generic variant selectors on E-commerce solutions etc.


# Attributes

Attributes are one of the core concepts in the system and function as the building blocks of products, variants, categories and global lists

### What are attributes <a href="#what-are-attributes" id="what-are-attributes"></a>

An attribute is a definition of a field in the system. Attributes are used to define the type of field (ie. numbers, texts, dropdowns) and if the data in the field shall be localized or even segmented on a specific dimension. Attributes can be attached to Product models, Variant models, Category models and definesdata structures on Global lists.

{% hint style="info" %}
**Note:** Attributes for products, variants and categories are defined globally and attached to the different models. This means that attributes can be reused across different models.
{% endhint %}

### The different attribute types <a href="#the-different-attribute-types" id="the-different-attribute-types"></a>

Struct PIM has a range of different attribute types, ranging from simple Text attributes to more advanced Complex attributes, which makes it possible to build any data model by combining these.

The different types of attributes are:

* Text\
  A text attribute defines a free text input and can be configured to allow unformatted text or rich text
* Number\
  A number attirbute defines a number input field
* Boolean\
  A boolean attribute defines a true/false selection box
* Date\
  A date attribute defines a date or date and time input field
* Media\
  A media attribute defines a media selector, which can be configured to allow selection of files, folders and/or images
* GlobalListValue\
  A global list value attribute defines a dropdown selection box that is configured to allow selection of one or multiple items from a global list ([What are Global Lists](/pim3/fundamental-concepts/global-lists))
* ProductReference\
  A product reference attribute defines a selector of references to products in the system and can be configured to allow single or multiple selections
* VariantReference\
  A variant reference attribute defines a selector of references to variants in the system and can be configured to allow single or multiple selections
* CategoryReference\
  A category reference attribute defines a selector of references to categories in the system and can be configured to allow single or multiple selections (This is not the same as classifications of products in categories)
* AttributeReference\
  An attribute reference attribute defines a selector of other attributes (or sub attributes) in the system and can be configured to allow single or multiple selections
* CollectionReference\
  A collection reference attribute defines a selector of references to collections in the system and can be configured to allow single or multiple selections ([What are collections](/pim3/fundamental-concepts/collections))
* Complex\
  A complex attribute defines a data model consisting of multiple data fields, each defined by an attribute of any type. A complex attribute has a subattribute for each data field that comprises the complex attribute data model
* List\
  A list attribute defines a list of values. The data in each row of values is defined by a template attribute of any type. Using a Complex attribute as the template attribute allows for multiple fields in each row of the list

### Attribute groups <a href="#attribute-groups" id="attribute-groups"></a>

Attribute groups are used to group attributes for visual presentation on different channels. An attribute can be attached to 0 to 1 attribute groups.

### Attribute scopes <a href="#attribute-scopes" id="attribute-scopes"></a>

Attribute scopes defines a technical grouping of attributes, that can be used to ease the programmical management of attributes.

If for example a range of attributes must be shown in a table view of technical specifications for a product on an E-commerce solution, these attributes must be marked in some way in order to know exactly which attributes to show. For this purpose, attribute scopes can be used. If all technical specification attributes are placed within the same attribute scope, the website can easily know exactly which attributes to display in the table.


# Product structures

Product structures in Struct PIM define tabs, sections, and attributes, customizable in the UI for effective data handling of products and variants.

### What are product structures <a href="#what-are-product-structures" id="what-are-product-structures"></a>

Product structures are the blueprints for products and variants in the system. A product structure defines tabs, sections and attributes that are available to products and variants using that product structure.

Product structures can be created and updated directly in the UI of Struct PIM, which allows for easy configuration of the underlying data models of products and variants.

### Product- and variant data models <a href="#product--and-variant-data-models" id="product--and-variant-data-models"></a>

A product structure can be configured with a product model and if needed a variant model. These models define the tabs, sections and attributes of that product structure and how they present themselves to the editor.

Furthermore, identifiers are configured on product structures as well as thumbnail settings, name settings, workflows etc.


# Identifiers

Identifiers in Struct PIM link external keys to internal IDs, enabling efficient updates and retrievals using known external identifiers.

### What are identifiers <a href="#what-are-identifiers" id="what-are-identifiers"></a>

Identifiers are used to create indexes of values of attributes that can be used from the API to find products, variants or categories based on a unique identifier in an external system.

As any update request to Struct PIM requires the internal id of the resource being updated, a mechanism must exist to resolve this internal id based on a known key. For this, implementors will create identifiers in Struct PIM defning the maps between externally known keys and the internal id of the resource in Struct PIM.

{% hint style="info" %}
**Example:** In an ERP system, a product has a SKU, which is used to uniquely identify the product. An integration job created the product in Struct PIM and the SKU is written to a "SKU" attribute on the product. Later, when the integration job runs again, it needs to update the product. In order to update an existing product, the internal id assigned to the product in Struct PIM must be known, but the integration job only knows the SKU from the ERP system.\
\
Because an identifier has been setup on the SKU attribute in Struct PIM, the integration job can request the internal id of the product based on the SKU it knows from the ERP system. From the internal id it is able to update the product in Struct PIM
{% endhint %}


# Global lists

Global lists is a key element of Struct PIM and one of the building blocks that enable the definition of any data model

### What are global lists <a href="#what-are-global-lists" id="what-are-global-lists"></a>

Global lists are used to create predefined lists of entities that can be referenced on products, variants, categories or even other global lists.

The data model of a Global list is defined by an underlying attribute. By using Complex attributes, values in a global list can become entities themselves which has a number of data fields. Global list values can even be configured to reference other global list values by using a GlobalListValue attribute within the definition of a global list.

{% hint style="info" %}
**Example:** A list of brands is defined by a global list, so a brand can be selected on products in the system. Each brand has a name, a localized description and a logo. These 3 data fields are all defined on the global list and maintained here. On the product structure an attribute is attached that is configured to allow selection of 1 entity from the global list of brands.
{% endhint %}


# Collections

### What are collections <a href="#whare-are-collections" id="whare-are-collections"></a>

Collections are dynamic categories, which associates products or variants based on a search query. Whenever a product or variant matches a search query defining a collection, the product or variant is attached to this collection. If a product or variant is updated and no longer matches the query, it is automatically removed again.


# Security management

### Users <a href="#users" id="users"></a>

Any number of users can be created for Struct PIM. Each user has an email and a password, which they login with (if no SSO is configured), and has the languages and segments associated which they have access to. Each assigned language or segment can be set as readonly or editable.

A user can be placed within one or more user groups.

### User groups <a href="#user-groups" id="user-groups"></a>

User groups are used to group users and assign permissions to them. Each user group has a range of permissions assigned, which apply to the users that are placed in the user group.

If a user is placed within multiple user groups, that user will have the sum of all permissions assigned to those user groups

### Permissions & permission groups <a href="#permissions-and-permission-groups" id="permissions-and-permission-groups"></a>

A range of permissions exist by default in Struct PIM, and they are divided in permission groups. A permission defines an access right described by its name ranging from access to viewing products to configuring data models.

In configurations of global lists, catalogues and product structures, new permissions can be defined to limit users' access to a specific part of the data models.


# Localization & segmentation

Data fields on categories, products, variants, global lists can be localized and even segmented to enable multidimensional data entries for a specific field.

### Localization <a href="#localization" id="localization"></a>

Struct PIM supports any number of languages. Each user is assigned one or more languages which they can view and perhaps edit.

Every attribute type, except Complex and GlobalListValue attributes in the system can be localized. Enabling localization on an attribute adds a dimension to the data entry of that field, allowing for separate data for each language created in the system.

### Dimensions & segments <a href="#dimensions-and-segments" id="dimensions-and-segments"></a>

Besides localization, Struct PIM supports the concept of dimensions with segments. Dimensions are created in the system and segments of that dimension is added to it.

When a dimension is created in the system, implementors get the option of making attributes dimension specific to one of the dimensions created in the system. When an attribute is made dimensionspecific, the attribute field allows for separate data for each segment in the dimension.

{% hint style="info" %}
**Example:** A company wants to be able to create targeted descriptions of products for each of their sales channel. In this case, a Dimension called "Sales channels" is created and a segment is added to that dimension for each sales channel eg. "Google" and "Amazon". Now, when the "Description" attribute is created, it is configured to be dimensionspecific to the Sales channels dimension. This allows for separate texts in the "Description" data field on products for Google and Amazon respectively.
{% endhint %}


# Revisions & changelog

### About revisions <a href="#about-revisions" id="about-revisions"></a>

Every time a change is made on products, variants, categories or global list values, new revision is registered for the entity with the associated changes. Thus, a full history log is recorded for each of these entity types.

The tracking of revision changes can be disabled altogether, on specific product structures or on specific attributes.

### Changelog <a href="#changelog" id="changelog"></a>

From the registered revisions on each entity, a complete changelog is available through the UI of Struct PIM, in which all changes can be visually seen. From the changelog, revisions can be rolled back, if the changed made in a specific revision supports rollback.


# Dashboard

The dashboard in Struct PIM plays a key role in users day to day work in the system

### The user dashboard <a href="#the-user-dashboard" id="the-user-dashboard"></a>

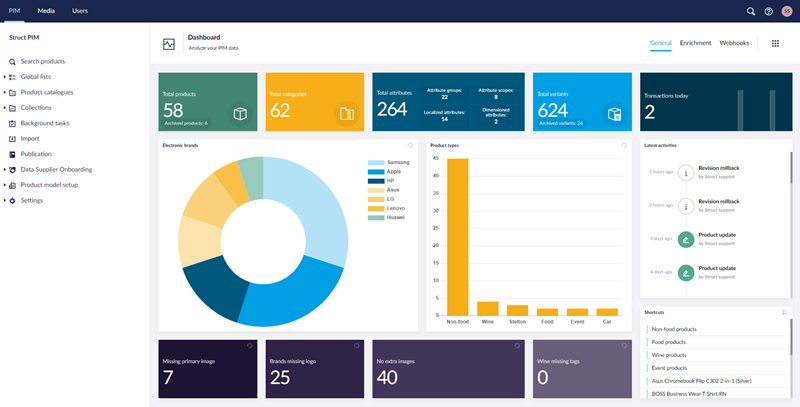
Every user has a dashboard on their frontpage of Struct PIM. The dashboard is personal to the user and can easily be configured by the user itself.

The dashboard consist of widgets, which are layed out according to the users preferences. Each widget type offers special functionality, that allows the user important insight into a specific area of the system.

A user can have multiple tabs on their dashboard, and given to correct permissions, users can share dashboard tabs with other users, allowing them to reuse a dashboard tab that is managed centrally.

<figure><img src="https://3609403033-files.gitbook.io/~/files/v0/b/gitbook-x-prod.appspot.com/o/spaces%2FZJAMIKVcqchSDbt4A7DE%2Fuploads%2F4h7ph090NA3v6gD87JEB%2Fdashboard.png?alt=media&amp;token=3fd5312c-eead-44e2-a63a-d4958aadb960" alt=""><figcaption><p>PIM Dashboard</p></figcaption></figure>


# Publications

### What are publications <a href="#what-are-publications" id="what-are-publications"></a>

The publications module of Struct PIM allows building autogenerated PDF's based on predefined templates in the system or XML exports of product data InDesign productions.

### Types of publications <a href="#types-of-publications" id="types-of-publications"></a>

Overall, 2 types of publications can be made in Struct PIM - PDF and XML.

* PDF publications are used for autogenerating PDF per product, for example a product sheet or a Multi page with frontpage, backside, index pages for a range of products.
* XML publications are used for autogenerating XML files with product data and asset references that can be imported to InDesign to aid the production of catalogues in InDesign


# Supplier onboarding portal

### What is the Supplier Onboarding Portal <a href="#what-is-the-supplier-onboarding-portal" id="what-is-the-supplier-onboarding-portal"></a>

The Supplier onboarding portal is a separate web application to Struct PIM, to which one or more data suppliers can be assigned acess to a range of products and a range of fields on those products.

When users access the Supplier onboarding portal they can view the products they have been granted access to, and enter changes to fields they have access to change. Once they have made changes to one or more products, they can send these change proposals to the PIM owners. An Import request is made from the Supplier onboarding portal, which can be reviewed and accepted or declined in an import process within Struct PIM.

### Different types of change requests <a href="#different-types-of-change-requests" id="different-types-of-change-requests"></a>

Besides the option to make change changes to fields directly in the Supplier onboarding portal, users can also upload files and assets through it, and send these to the PIM owners. Both methods will result in an import request being made in Struct PIM, which allows the PIM owners to validate the changes coming from the file uploads or the user interface of the Supplier onboarding portal.


# Helpful guides

Helpful guides for you to get setup with Struct.PIM quickly and easily.


# How to use product models

Product models are one of the most powerful aspects of Struct PIM. Using the built-in no-code interface you can build any product data model you need by adding attributes one by one

{% embed url="<https://vimeo.com/770641299/7dd27762e8>" %}
Product models (duration 3:11 min)
{% endembed %}

Read more about how to setup product models [here](/pim3/reference/product-model-setup/product-structures).


# How to use product catalogues

Get an overview of the catalogue tree structure in Struct PIM and how it can be used to organize products according to external channel requirements.

{% embed url="<https://vimeo.com/770641383/727674aa90>" %}
Product catalogues (duration 02:43 min)
{% endembed %}

Read more about how to setup product catalogues [here](/pim3/reference/product-catalogues).


# How to use enrichment insights

Enrichment insights allow you to measure and track the enrichment progress of individual products based on the completion of specific fields. They can be customized as needed.

{% embed url="<https://vimeo.com/770641323/45b481f0a6>" %}
Enrichment insights (duration 2:15 min)
{% endembed %}


# How to use Import

The Import-feature makes it easy to create or update entities in bulk

## What is Import?

Import allows you to import data into the system by mapping data from the columns of an Excel spreadsheet to data fields on [products, variants](/pim3/fundamental-concepts/products-and-variants), variant groups, [categories](/pim3/fundamental-concepts/catalogues-and-categories) or [global lists](/pim3/fundamental-concepts/global-lists).

Knowing how to use the import feature will allow you to quickly update and create new [products, variants](/pim3/fundamental-concepts/products-and-variants), variant groups, [categories](/pim3/fundamental-concepts/catalogues-and-categories) and [global lists](/pim3/fundamental-concepts/global-lists) or efficiently import data into list properties.

You can find the import tab in the Struct PIM sidebar under Import.

## Guides covering Import

* [How to import products](/pim3/tutorials/helpful-guides/how-to-use-import/how-to-import-products)
* [How to import data into a list property on entities](/pim3/tutorials/helpful-guides/how-to-use-import/how-to-import-data-into-a-list-property-on-entities)
* [How to import categories](/pim3/tutorials/helpful-guides/how-to-use-import/how-to-import-categories)
* [How to import with media](/pim3/tutorials/helpful-guides/how-to-use-import/how-to-import-with-media)
* [How to use File mappings](/pim3/tutorials/helpful-guides/how-to-use-import/how-to-use-file-mappings)
* [How to use Validation rules during import](/pim3/tutorials/helpful-guides/how-to-use-import/how-to-use-validation-rules-during-import)
* [How to use Transformation during import](/pim3/tutorials/helpful-guides/how-to-use-import/how-to-use-transformation-during-import)


# How to import products

Learn how to import products from beginning to end

## Before importing

A prerequisite to importing any entities is having an excel spreadsheet with the data organized in named columns. For this tutorial we have a made a simple spreadsheet containing information about clothing.

<figure><img src="https://3609403033-files.gitbook.io/~/files/v0/b/gitbook-x-prod.appspot.com/o/spaces%2FZJAMIKVcqchSDbt4A7DE%2Fuploads%2FMNYBHw0nY5p7UZdRTNGg%2Fimage.png?alt=media&amp;token=25e9711e-6d44-45f7-ac99-6e59d6c59dde" alt=""><figcaption><p>Excel spreadsheet with headers and data</p></figcaption></figure>

## Starting the import

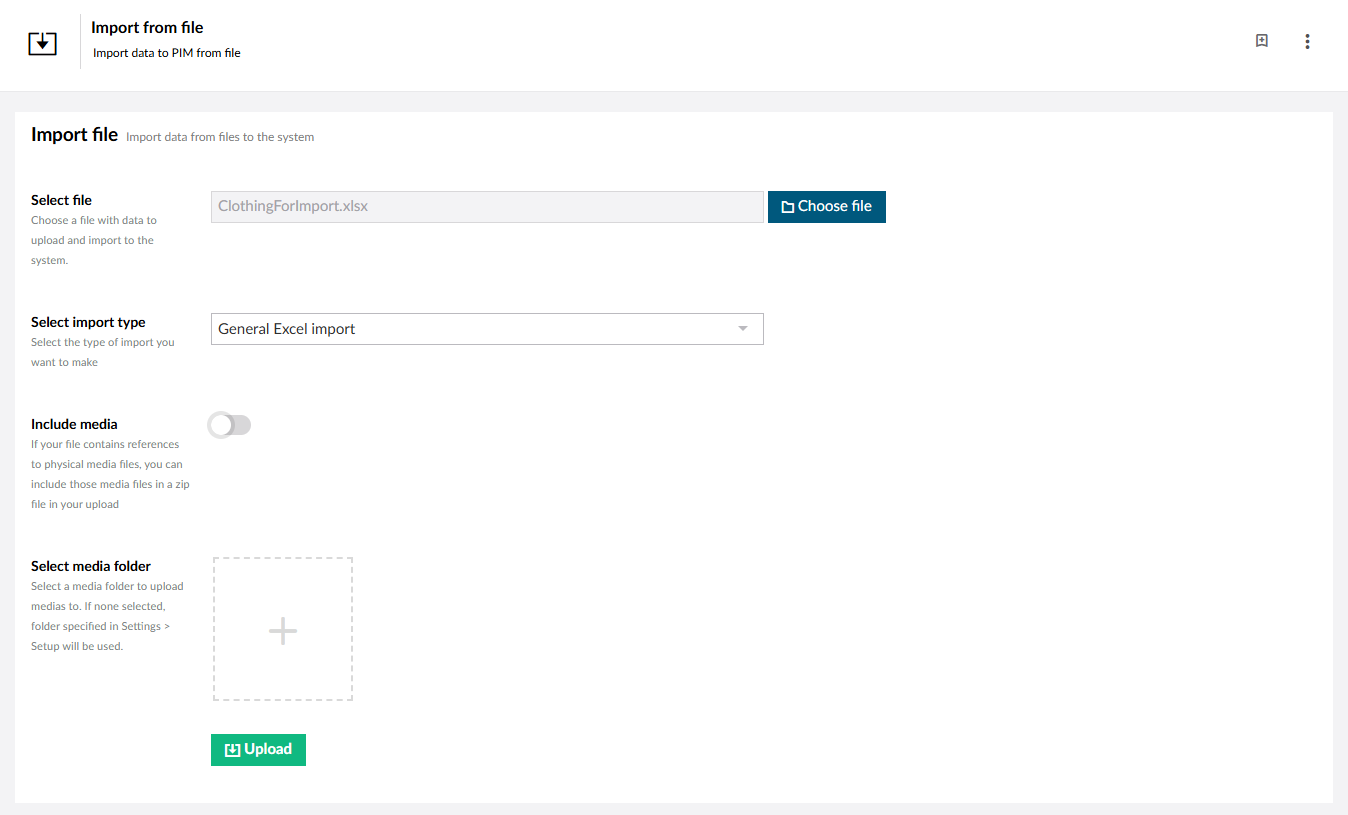
To start importing you choose the excel spreadsheet with the data you want to import, in this tutorial the spreadsheet is called "ClothingForImport.xlsx".

Next you need to choose the correct Import type. When importing [categories](/pim3/fundamental-concepts/catalogues-and-categories), [products, variants](/pim3/fundamental-concepts/products-and-variants), variant groups or [global lists](/pim3/fundamental-concepts/global-lists) the 'General Excel Import' type is used.

While it is possible to include media assets when importing, this will not be covered in this guide. For this reason we leave 'Include media' unticked and 'Select media folder' empty.

<figure><img src="https://3609403033-files.gitbook.io/~/files/v0/b/gitbook-x-prod.appspot.com/o/spaces%2FZJAMIKVcqchSDbt4A7DE%2Fuploads%2FlsieAQGf51XFSWVldrUg%2Fimage.png?alt=media&amp;token=eee0dbe2-de6a-4faf-bcf5-5f08a13d3320" alt=""><figcaption><p>Import page</p></figcaption></figure>

Having chosen the correct file and import type you can click the "Upload"-button to start the import.

## Mapping your data

Having clicked the "Upload"-button you are presented with a new page. This is where you will map your excel columns to data fields on entities.

You will need to choose the correct Entity type; [Categories](/pim3/fundamental-concepts/catalogues-and-categories), [Products, Variants](/pim3/fundamental-concepts/products-and-variants), Variant groups or [Global list](/pim3/fundamental-concepts/global-lists) values.

In this guide we are importing [products](/pim3/fundamental-concepts/products-and-variants), so we choose 'Products' in the 'Entity type' dropdown, but the process for all entities are almost entirely similar from here.

<figure><img src="https://3609403033-files.gitbook.io/~/files/v0/b/gitbook-x-prod.appspot.com/o/spaces%2FZJAMIKVcqchSDbt4A7DE%2Fuploads%2FuOYEdENaKjnhZyufNmQ0%2Fimage.png?alt=media&amp;token=7e8781f1-b78c-4801-b8f9-078132e8f5a2" alt=""><figcaption><p>Data mapping</p></figcaption></figure>

Next is mapping the actual data. The import function will try to automap the data from the file by matching the name of the excel column to the name of an [attribute](/pim3/fundamental-concepts/attributes) in the PIM.

This is not always possible or what you want, in which case you can manually select the correct [attribute](/pim3/fundamental-concepts/attributes) to map to in the 'Select field' dropdown in the 'Map to' column.

<figure><img src="https://3609403033-files.gitbook.io/~/files/v0/b/gitbook-x-prod.appspot.com/o/spaces%2FZJAMIKVcqchSDbt4A7DE%2Fuploads%2FXICwFBRhbW6VLtCKOntO%2Fimage.png?alt=media&amp;token=7ba8be45-988c-448f-948e-8c700b7e8ab6" alt=""><figcaption><p>Data mapping</p></figcaption></figure>

Having finished the mapping, you need to choose one or more keys. These key(s) will act as keys to match existing entities in the system. If the key(s) match a [product](/pim3/fundamental-concepts/products-and-variants) in the system, that [product](/pim3/fundamental-concepts/products-and-variants) will be updated with the data from the excel spreadsheet.

If the key does not exist, a new [product](/pim3/fundamental-concepts/products-and-variants) with the data from the excel spreadsheet will be created.

{% hint style="info" %}
If you know you will be using this mapping often, you can save it by clicking 'Save mapping' and giving it a name. This way you can always load your mapping again when using a similar excel spreadsheet.
{% endhint %}

Having chosen one or more keys you can click "Next" in the right-bottom corner.&#x20;

## The file contains new products

As mentioned in the last section, if a key does not already exist in the PIM, a new [product](/pim3/fundamental-concepts/products-and-variants) will be created. If the excel spreadsheet contains new [products](/pim3/fundamental-concepts/products-and-variants) you will be prompted to choose a [Product structure](/pim3/fundamental-concepts/product-structures) to use for the new [products](/pim3/fundamental-concepts/products-and-variants).&#x20;

<figure><img src="https://3609403033-files.gitbook.io/~/files/v0/b/gitbook-x-prod.appspot.com/o/spaces%2FZJAMIKVcqchSDbt4A7DE%2Fuploads%2FG6Vx3jDTi7PYBZGv8GKQ%2Fimage.png?alt=media&amp;token=87010edd-6ce8-4204-bcb1-ec8f1b08e8d3" alt=""><figcaption><p>The file contains new products</p></figcaption></figure>

In this guide we are importing clothing, so the 'Clothing' [product structure](/pim3/fundamental-concepts/product-structures) is chosen.

Click the "Next"-button in the right-bottom corner to continue.

## Approve changes

At this point you are shown a 'Review changes'-page. This page will show you the amount of new and updated items. New items will be denoted by having a blue 'New'-tag in the key column whereas existing [products](/pim3/fundamental-concepts/products-and-variants) will show their current value.

[Attributes](/pim3/fundamental-concepts/attributes) that will be changed are colored green to easily distinguish between [attributes](/pim3/fundamental-concepts/attributes) that will remain the same and [attributes](/pim3/fundamental-concepts/attributes) that will change.

<figure><img src="https://3609403033-files.gitbook.io/~/files/v0/b/gitbook-x-prod.appspot.com/o/spaces%2FZJAMIKVcqchSDbt4A7DE%2Fuploads%2FXaNq9jkH0axgNn7Xmv2p%2Fimage.png?alt=media&amp;token=54071792-1b52-48f1-8028-654c490614a4" alt=""><figcaption><p>Review changes</p></figcaption></figure>

Having reviewed the changes you can choose to approve the changes you are satisfied with. Only approved records will be commited.

When you have approved the records you want to keep, click the "Commit Import"-button in the bottom-right corner to finalize the import.


# How to import data into a list property on entities

Learn how to swiftly import list data

## Import data

In a previous tutorial, [How to import products](/pim3/tutorials/helpful-guides/how-to-use-import/how-to-import-products), we imported a collection of jackets. This time around we want to populate a List property on these [products](/pim3/fundamental-concepts/products-and-variants) with new data.

To do this we will be using the excel spreadsheet shown below. The first line contains the headers ProductName, Color, Color Area and Writing which will be used to map to the [product](/pim3/fundamental-concepts/products-and-variants) and List property.

<figure><img src="https://3609403033-files.gitbook.io/~/files/v0/b/gitbook-x-prod.appspot.com/o/spaces%2FZJAMIKVcqchSDbt4A7DE%2Fuploads%2Fdau7wQa9jngE537j74zE%2Fimage.png?alt=media&amp;token=b6476dc4-cd9b-4a9b-90b9-14a93091026e" alt=""><figcaption><p>Excel spreadsheet with headers and data</p></figcaption></figure>

## Starting the import

To start importing you choose the excel spreadsheet with the data you want to import, in this tutorial the spreadsheet is called "ColorListImportForJackets.xlsx".

Next you need to choose the correct Import type. When importing data into list properties on [products](/pim3/fundamental-concepts/products-and-variants), [variants](/pim3/fundamental-concepts/products-and-variants), variant groups or [categories](/pim3/fundamental-concepts/catalogues-and-categories) the 'List property import' type is used.

While it is possible to include media assets when importing, this will not be covered in this guide. For this reason we leave 'Include media' unticked and 'Select media folder' empty.

<figure><img src="https://3609403033-files.gitbook.io/~/files/v0/b/gitbook-x-prod.appspot.com/o/spaces%2FZJAMIKVcqchSDbt4A7DE%2Fuploads%2FvOclJkekX4q26PbqMxiL%2Fimage.png?alt=media&amp;token=07378bab-8558-4d15-92f0-b26b5b0f0695" alt=""><figcaption><p>Import page</p></figcaption></figure>

Having chosen the correct file and import type you can click the "Upload"-button to start the import.

## Mapping your data

Having clicked the "Upload"-button you are presented with a new page. This is where you will map your excel columns to data fields on entities.

You will need to choose the correct Entity type; Categories, Products, Variants or Variant groups.

In this guide we are importing data into List properties on [products](/pim3/fundamental-concepts/products-and-variants), so we choose 'Products' in the 'Entity type' dropdown, but the process for all entities are almost entirely similar from here.

<figure><img src="https://3609403033-files.gitbook.io/~/files/v0/b/gitbook-x-prod.appspot.com/o/spaces%2FZJAMIKVcqchSDbt4A7DE%2Fuploads%2FQqQYiyEAanlGCoLQMRVL%2Fimage.png?alt=media&amp;token=13b9084d-e8aa-4686-a9b5-6a10dab239f7" alt=""><figcaption><p>Data mapping</p></figcaption></figure>

Choose the List [attribut](/pim3/fundamental-concepts/attributes)e you are importing data into, in this tutorial we are importing data into 'Design'.

Now you have to choose the import action, you can choose between:

* Replace - Replace all rows with the rows in your file
* Add/update - Update existing rows in the data or add new ones that are not already there
* Delete matches - Delete rows that match the selected row key(s) (No rows are updated or added)

In this tutorial we want to add new ones from our file, so we choose 'Add/update'.

For Product Key(s) you need to choose the column in the excel spreadsheet which is used to identify the [product](/pim3/fundamental-concepts/products-and-variants) each row in the sheet maps to. In this tutorial we map from the 'ProductName' column to the 'ProductName' data field.

It is possible to add extra keys if needed.

Having added the keys you need you can click the green "Next"-button in the bottom-right corner.

## Map to the correct field(s)

Having clicked the "Next"-button you are presented with the final mapping page. This is where excel columns are mapped to the [attributes](/pim3/fundamental-concepts/attributes) in the list.

<figure><img src="https://3609403033-files.gitbook.io/~/files/v0/b/gitbook-x-prod.appspot.com/o/spaces%2FZJAMIKVcqchSDbt4A7DE%2Fuploads%2FpkK3S1lnO3vbE2cmaK7Q%2Fimage.png?alt=media&amp;token=3a136d4f-1bad-4d3f-b0bc-cb5a6e3f517e" alt=""><figcaption><p>Mapping column to list attributes</p></figcaption></figure>

In this tutorial we have three column, each corresponding to an attribute in a complex list [attribute](/pim3/fundamental-concepts/attributes).

As we have chosen the import action 'Add/update', we need to choose the columns to use for matching existing rows. In this tutorial we choose that 'Color' and 'Color Area' together is the key, so we choose them as our row keys.

What this means in practice is that, if another row in the list contains the same value for Color and Color Area as a row in the excel spreadsheet, this row will be updated with a new value in the Writing property.

## Approve changes

At this point you are shown a 'Review changes'-page. This page will show you the amount of new and updated list [attributes](/pim3/fundamental-concepts/attributes).

Subattributes that will be changed are colored green to easily distinguish between [attributes](/pim3/fundamental-concepts/attributes) that will remain the same and [attributes](/pim3/fundamental-concepts/attributes) that will change.

<figure><img src="https://3609403033-files.gitbook.io/~/files/v0/b/gitbook-x-prod.appspot.com/o/spaces%2FZJAMIKVcqchSDbt4A7DE%2Fuploads%2FmlwOeyTkU72DV4UscGwd%2Fimage.png?alt=media&amp;token=74ec4210-605f-4476-9b8a-3f93ad0c93f3" alt=""><figcaption><p>Review changes</p></figcaption></figure>

Having reviewed the changes you can choose to approve the changes you are satisfied with. Only approved records will be commited.

When you have approved the records you want to keep, click the "Commit Import"-button in the bottom-right corner to finalize the import.


# How to import categories

Learn how to import categories from beginning to end

## Before importing

A prerequisite to importing [categories](/pim3/fundamental-concepts/catalogues-and-categories) is having an excel spreadsheet with the data organized in named columns. For this tutorial we have a made a simple spreadsheet containing information about a clothing [category](/pim3/fundamental-concepts/catalogues-and-categories) tree.

<figure><img src="https://3609403033-files.gitbook.io/~/files/v0/b/gitbook-x-prod.appspot.com/o/spaces%2FZJAMIKVcqchSDbt4A7DE%2Fuploads%2F3TcueN49TItpw3DPCT6z%2Fimage.png?alt=media&amp;token=3e95ef34-6bb1-441c-8587-07713f5c07e0" alt=""><figcaption><p>Excel spreadsheet with headers and data</p></figcaption></figure>

In addition, if you want to import a tree structure, you need to give the system a way of identifying parent [categories](/pim3/fundamental-concepts/catalogues-and-categories) when importing. One way of doing this is adding an [identifier](/pim3/fundamental-concepts/identifiers) to the [catalogue](/pim3/fundamental-concepts/catalogues-and-categories) you are importing the [category](/pim3/fundamental-concepts/catalogues-and-categories) tree under.

<figure><img src="https://3609403033-files.gitbook.io/~/files/v0/b/gitbook-x-prod.appspot.com/o/spaces%2FZJAMIKVcqchSDbt4A7DE%2Fuploads%2FTrheJco5JKdX1Xy6ybUL%2Fimage.png?alt=media&amp;token=d560f3b6-bbab-4735-aff1-019687c5ebf5" alt=""><figcaption><p>Identifier on catalogue</p></figcaption></figure>

In this example we have created an identifier called 'ClothingCategoryId' with pattern '{0}' using the property 'CategoryAlias'. In short this means the identifier will have the same value as 'CategoryAlias'.

{% hint style="info" %}
Read more about creating identifiers on catalogues here: [Identifier details](/pim3/reference/product-catalogues/product-catalogue-details/identifiers/identifier-details)
{% endhint %}

## Starting the import

To start importing you choose the excel spreadsheet with the data you want to import, in this tutorial the spreadsheet is called "CategoryImportFile.xlsx".

Next you need to choose the correct Import type. When importing [categories](/pim3/fundamental-concepts/catalogues-and-categories), [products, variants](/pim3/fundamental-concepts/products-and-variants), variant groups or [global lists](/pim3/fundamental-concepts/global-lists) the 'General Excel Import' type is used.

While it is possible to include media assets when importing, this will not be covered in this guide. For this reason we leave 'Include media' unticked and 'Select media folder' empty.

<figure><img src="https://3609403033-files.gitbook.io/~/files/v0/b/gitbook-x-prod.appspot.com/o/spaces%2FZJAMIKVcqchSDbt4A7DE%2Fuploads%2FQzciihCvcoOWxGDEDS7G%2Fimage.png?alt=media&amp;token=3e00ae3f-9f51-4412-91f4-9935019a0b2e" alt=""><figcaption><p>Import page</p></figcaption></figure>

Having chosen the correct file and import type you can click the "Upload"-button to start the import.

## Mapping your data

Having clicked the "Upload"-button you are presented with a new page. This is where you will map your excel columns to data fields on [categories](/pim3/fundamental-concepts/catalogues-and-categories).

As we are importing categories we choose 'Categories' in the Entity type dropdown.

<figure><img src="https://3609403033-files.gitbook.io/~/files/v0/b/gitbook-x-prod.appspot.com/o/spaces%2FZJAMIKVcqchSDbt4A7DE%2Fuploads%2FuxNjmCv6p6yurbwkMXvS%2Fimage.png?alt=media&amp;token=b9f59fcd-3305-422a-bb1f-5736c1477f55" alt=""><figcaption><p>Data mapping</p></figcaption></figure>

Next is mapping the actual data. In this tutorial we map our 'Reference' column to 'Category Alias' as this is the [attribute](/pim3/fundamental-concepts/attributes) we are using as [identifier](/pim3/fundamental-concepts/identifiers) that will identify which [categories](/pim3/fundamental-concepts/catalogues-and-categories) are parents of which child [categories](/pim3/fundamental-concepts/catalogues-and-categories). This is also used as key as it uniquely identifies the [category](/pim3/fundamental-concepts/catalogues-and-categories).

The 'Name' column is mapped to 'Name (en-GB)', this is the [attribute](/pim3/fundamental-concepts/attributes) we use as Display name for the [category](/pim3/fundamental-concepts/catalogues-and-categories).

We leave 'Product reference' empty, as this [attribute](/pim3/fundamental-concepts/attributes) will be used to map child [categories](/pim3/fundamental-concepts/catalogues-and-categories) to their parents and is not an [attribute](/pim3/fundamental-concepts/attributes) that exists on the [categories](/pim3/fundamental-concepts/catalogues-and-categories).

## The file contains new categories

If no [categories](/pim3/fundamental-concepts/catalogues-and-categories) with the key exists, new [categories](/pim3/fundamental-concepts/catalogues-and-categories) will be created for each unique key you are trying to import. If the excel spreadsheet contains new [categories](/pim3/fundamental-concepts/catalogues-and-categories) you will be prompted to map their parent-child relations and choose the [catalogue](/pim3/fundamental-concepts/catalogues-and-categories) to create them under.

<figure><img src="https://3609403033-files.gitbook.io/~/files/v0/b/gitbook-x-prod.appspot.com/o/spaces%2FZJAMIKVcqchSDbt4A7DE%2Fuploads%2FfRvXPzA4jr1z7KPciZlC%2Fimage.png?alt=media&amp;token=098675f9-cacc-4f03-9ebf-96e79995f900" alt=""><figcaption><p>The file contains new categories</p></figcaption></figure>

We are keeping the reference to the parent in the column 'Parent reference' and want to map it to the unique [identifier](/pim3/fundamental-concepts/identifiers) 'ClothingCategoryId' that exists on the [catalogue](/pim3/fundamental-concepts/catalogues-and-categories) 'Product'.

Click the "Next"-button in the right-bottom corner to continue.

## Approve changes

At this point you are shown a 'Review changes'-page. This page will show you the amount of new and updated [categories](/pim3/fundamental-concepts/catalogues-and-categories). New [categories](/pim3/fundamental-concepts/catalogues-and-categories) will be denoted by having a blue 'New'-tag in the key column whereas existing [categories](/pim3/fundamental-concepts/catalogues-and-categories) will show their current value.

[Attributes](/pim3/fundamental-concepts/attributes) that will be changed are colored green to easily distinguish between [attributes](/pim3/fundamental-concepts/attributes) that will remain the same and [attribute](/pim3/fundamental-concepts/attributes) that will change.

<figure><img src="https://3609403033-files.gitbook.io/~/files/v0/b/gitbook-x-prod.appspot.com/o/spaces%2FZJAMIKVcqchSDbt4A7DE%2Fuploads%2FMnr1ZO98rTvV4uHpQeTQ%2Fimage.png?alt=media&amp;token=8c28ef90-584b-49ed-b50d-8acde9c4b517" alt=""><figcaption><p>Approve changes</p></figcaption></figure>

In this tutorial we are importing all new [categories](/pim3/fundamental-concepts/catalogues-and-categories), so everything is shown as green.&#x20;

Having reviewed the changes you can choose to approve the changes you are satisfied with. Only approved records will be commited.

When you have approved the records you want to keep, click the "Commit import"-button in the bottom-right corner to finalize the import.

{% hint style="danger" %}
You can not approve a child category without approving its parent. Doing this will cause the import to fail as it cannot correctly identify where to put the child.
{% endhint %}

## Resulting category tree

The import from this tutorial will result in the following [category](/pim3/fundamental-concepts/catalogues-and-categories) tree under the [catalogue](/pim3/fundamental-concepts/catalogues-and-categories) 'Product'.

<figure><img src="https://3609403033-files.gitbook.io/~/files/v0/b/gitbook-x-prod.appspot.com/o/spaces%2FZJAMIKVcqchSDbt4A7DE%2Fuploads%2FIdVPzp36dw8mx8Bh8kc1%2Fimage.png?alt=media&amp;token=48f08b7d-432d-4f3c-b146-db8e2c5e7040" alt=""><figcaption><p>Category tree</p></figcaption></figure>


# How to import with media

Learn how to include media when importing

## Before importing

A prerequisite when importing media is having a zip-file with all of the mediafiles you wish to import. The zip-file must only contain the media files. No folders or subfolders.

Additionally you must have an excel spreadsheet with information as though you would normally import

<figure><img src="https://3609403033-files.gitbook.io/~/files/v0/b/gitbook-x-prod.appspot.com/o/spaces%2FZJAMIKVcqchSDbt4A7DE%2Fuploads%2FeRyjSPcgWeJVnRpmPzc7%2Fimage.png?alt=media&amp;token=e84eee5a-398b-41ee-a03c-07be714c23aa" alt=""><figcaption><p>Excel spreadsheet with headers and data</p></figcaption></figure>

Importantly you must have a column with the name of the media attribute as header and filenames that correspond to the files in your zip-file, including their file extension, e.g. pdf.

## Starting the import

To start importing you choose the excel spreadsheet with the data you want to import, in this tutorial the spreadsheet is called "import\_with\_media.xlsx".

Next you need to choose the correct Import type. Choose the one that fits what you need to import. In this tutorial we are importing to a list so we choose 'List property import'.

To include media toggle the 'Include media' option. This reveals a new selectize, 'Select media file'. Clicking the 'Select .zip file'-button will open a file explorer and allow you to choose your zip-file.

<figure><img src="https://3609403033-files.gitbook.io/~/files/v0/b/gitbook-x-prod.appspot.com/o/spaces%2FZJAMIKVcqchSDbt4A7DE%2Fuploads%2FU5m6ApFFZv5zJljsKwDI%2Fimage.png?alt=media&amp;token=3aae16fb-0a90-453a-a71f-a2219e02aca1" alt=""><figcaption><p>Import page</p></figcaption></figure>

Finally you can choose the media folder to upload your media to. If you leave it empty, the media will be uploaded to the folder specified in Settings > Setup.

If you click the '+'-icon to select a specific media folder you are presented with the 'Select media'-page.

<figure><img src="https://3609403033-files.gitbook.io/~/files/v0/b/gitbook-x-prod.appspot.com/o/spaces%2FZJAMIKVcqchSDbt4A7DE%2Fuploads%2FqyW7oSLNe5izZ9l3YZs5%2Fimage.png?alt=media&amp;token=133ddb6f-e85e-4658-8363-7ab5f3cb1669" alt=""><figcaption><p>Select media page</p></figcaption></figure>

You can navigate into a folder by clicking the folder or choose the folder you wish to upload to by clicking the 'OK'-icon. In this case we have chosen the folder named 'Import'. Having chosen a folder we click 'Select' to return to the import page.

## Mapping your data

Mapping data works the exact same way as it does without media.

If you are uncertain on how to do this you can follow read more about this in earlier import-tutorials:

Mapping with General excel import: [How to import products](/pim3/tutorials/helpful-guides/how-to-use-import/how-to-import-products#mapping-your-data)\
Mapping with List property import: [How to import data into a list property on entities](/pim3/tutorials/helpful-guides/how-to-use-import/how-to-import-data-into-a-list-property-on-entities#mapping-your-data)

## Approve changes

When approving data you should be able to see the media files being attached to your entity.

<figure><img src="https://3609403033-files.gitbook.io/~/files/v0/b/gitbook-x-prod.appspot.com/o/spaces%2FZJAMIKVcqchSDbt4A7DE%2Fuploads%2F3jX9drPAjjabpvPKVGsB%2Fimage.png?alt=media&amp;token=536e9434-3395-4a63-9cd4-0e3ba4e98bd1" alt=""><figcaption><p>Approve changes</p></figcaption></figure>

If you are happy with the changes, click 'Commit import' to finalize the import.


# How to use File mappings

File mappings allow you to save predefined mappings, making it easier if you frequently import the same structures.

## Navigating to File mappings

You can find File mappings through Settings -> File mappings in the Struct PIM sidebar.

Clicking 'File mappings' will present you with an overview of all file mappings currently in the system.

To create a new File mapping click the green "Create new"-button in the top-right corner.

## Setting up the basics

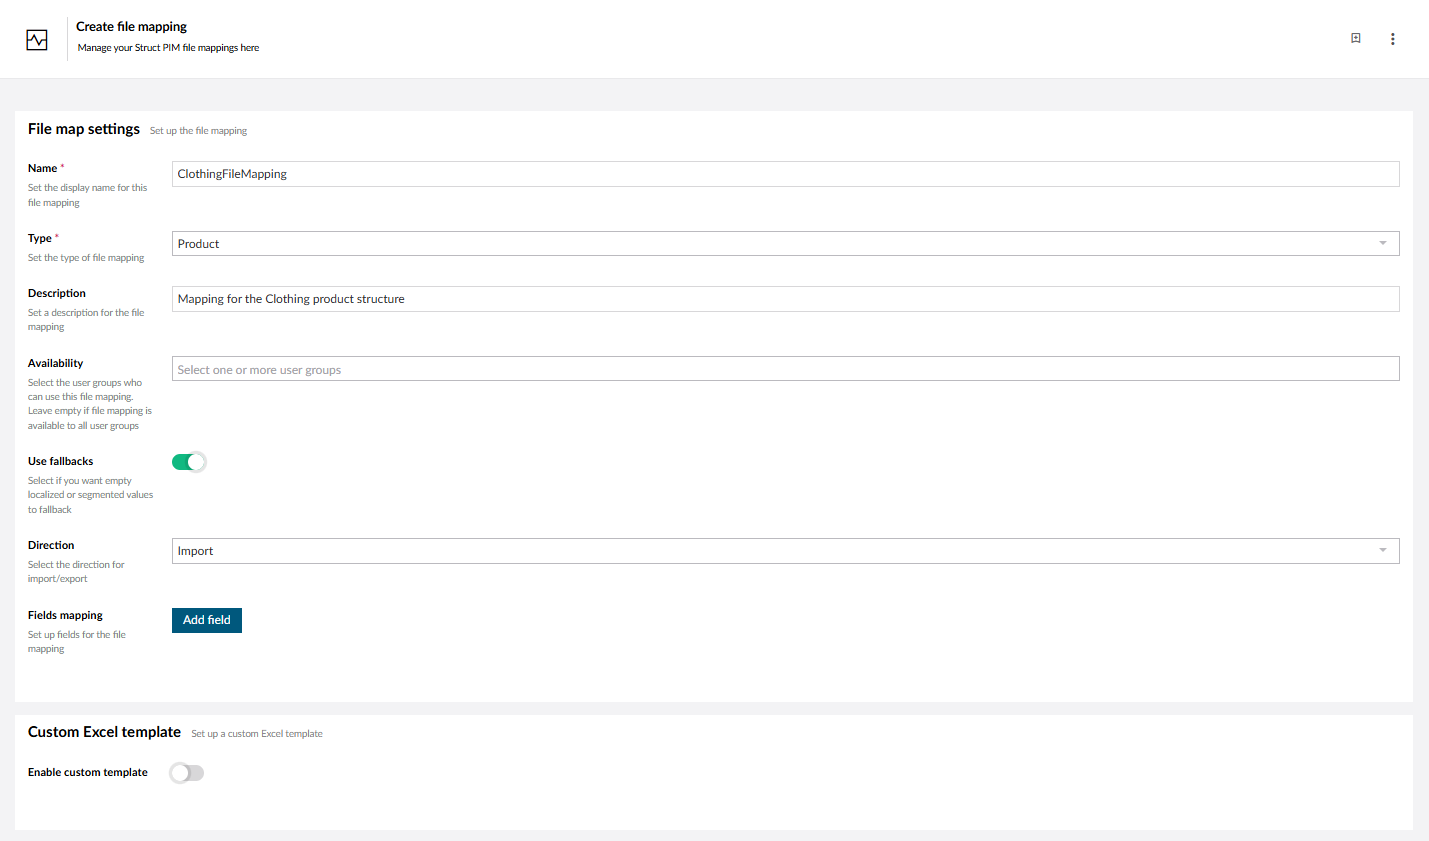
Having clicked "Create new" you are presented with the 'Create file mapping'-page.

We start by setting up the basics, like name, type of the entity you wish to import and an optional description.

Next we have the option of limiting the file mapping to only certain user groups by adding them under 'Availability'. In this tutorial we have elected to allow all user groups to use the file mapping.

<figure><img src="https://3609403033-files.gitbook.io/~/files/v0/b/gitbook-x-prod.appspot.com/o/spaces%2FZJAMIKVcqchSDbt4A7DE%2Fuploads%2FCM9qp941xVLNtqJSYCXw%2Fimage.png?alt=media&amp;token=f7f48263-ded1-4dd7-868f-af77d1ee1c17" alt=""><figcaption><p>Create file mapping</p></figcaption></figure>

You can choose to enable 'Use fallbacks' if you want empty localized or segmented values to fallback and finally you can choose the direction for the import/export.

For direction you have three options:

* Import - This file mapping only works when importing
* Export - This file mapping only works when exporting
* Import/Export - This file mapping works for importing and exporting.

For this tutorial we only want the file mapping to work when importing.

## Setting up the mappings

Under 'Fields mapping' you can click the "Add field"-button to add a field mapping, this field represents the mapping of a column to an [attribute](/pim3/fundamental-concepts/attributes) in the PIM. You can add as many as you wish.

<figure><img src="https://3609403033-files.gitbook.io/~/files/v0/b/gitbook-x-prod.appspot.com/o/spaces%2FZJAMIKVcqchSDbt4A7DE%2Fuploads%2FZtuEFtqFua7sEzbHs8Jc%2Fimage.png?alt=media&amp;token=8094c896-1e89-49a1-8227-5e9f9d7958b2" alt=""><figcaption><p>Fields mapping with one column to attribute field added</p></figcaption></figure>

For this tutorial we need three fields.&#x20;

The 'Field name'-field represents the name of a column in the excel spreadsheet and the 'Map to PIM field'-field represents an [attribute](/pim3/fundamental-concepts/attributes) in the PIM.&#x20;

The excel spreadsheet we are using in this tutorial has the headers 'ProductName', 'Brand' and 'Price'. They map to 'ProductName', 'Brand (en-GB)' and 'Price DKK' respectively.

<figure><img src="https://3609403033-files.gitbook.io/~/files/v0/b/gitbook-x-prod.appspot.com/o/spaces%2FZJAMIKVcqchSDbt4A7DE%2Fuploads%2FYnfhXjxYwfkqLVmpZ9RI%2Fimage.png?alt=media&amp;token=34dad2b4-bcdc-43a0-91d2-3ac0567a8fc8" alt=""><figcaption><p>Fields mapping with three columns and mapping filled in</p></figcaption></figure>

Having finished the mapping, you need to choose one or more keys. These key(s) will act as keys to match existing entities in the system. If the key(s) match a [product](/pim3/fundamental-concepts/products-and-variants) in the system, that [product](/pim3/fundamental-concepts/products-and-variants) will be updated with the data from the excel spreadsheet.

You have now created a file mapping. To finalize the creation click the "Save changes"-button in the bottom-right corner now to save your file mappings.

{% hint style="info" %}
**Custom Excel template** is only for exporting, so it is not relevant for this tutorial.
{% endhint %}

## Where do I find my file mappings when importing

Next time you import entities for which you have a File mapping, you can click "Load mapping" on the data mapping page.&#x20;

<figure><img src="https://3609403033-files.gitbook.io/~/files/v0/b/gitbook-x-prod.appspot.com/o/spaces%2FZJAMIKVcqchSDbt4A7DE%2Fuploads%2FLSXmhXQltKFF1AcBCClI%2Fimage.png?alt=media&amp;token=157df6ea-7c33-4b18-a324-486fc22a02ff" alt=""><figcaption><p>Data mapping page</p></figcaption></figure>

This will reveal a dropdown showing all of the file mappings available to you. Choose your File mapping in the dropdown and click "Load".

<figure><img src="https://3609403033-files.gitbook.io/~/files/v0/b/gitbook-x-prod.appspot.com/o/spaces%2FZJAMIKVcqchSDbt4A7DE%2Fuploads%2FXHmqhWDYZNLc0NNIQ2ri%2Fimage.png?alt=media&amp;token=183a022b-f7e1-49a8-b558-0474314cbb47" alt=""><figcaption><p>Data mapping - loading File mapping</p></figcaption></figure>

Now your File mapping is loaded and you can cherish the time you saved mapping and click "Next" to continue importing.


# How to use Validation rules during import

By using Validation rules during import you can validate the correctness of incoming data

{% hint style="info" %}
**Prerequisite:** This tutorial assumes you know the basics of the import feature. If this is not the case you can learn the basics in other guides here: [How to use import](/pim3/tutorials/helpful-guides/how-to-use-import)\
\
The tools this tutorial goes through are all found on the data mapping page of import
{% endhint %}

## Validation rules

When importing Text [attributes](/pim3/fundamental-concepts/attributes) you can choose to add validation rules on the incoming values.

You can add these validation rules on a column by column basis. If you wish to add a validation rule to a column you can click the 'Validation Rules (0)' text to the right of the data mapping.

<figure><img src="https://3609403033-files.gitbook.io/~/files/v0/b/gitbook-x-prod.appspot.com/o/spaces%2FZJAMIKVcqchSDbt4A7DE%2Fuploads%2F6HKoEfdiwYB6EtgpC8Zc%2Fimage.png?alt=media&amp;token=62ee1bf5-1436-4296-bf9f-24628e246e36" alt=""><figcaption><p>Data mapping during import</p></figcaption></figure>

Clicking the 'Validation Rules (0)' text will open a new tab. In this tab you can add one or more validation rules to the specified [attribute](/pim3/fundamental-concepts/attributes).&#x20;

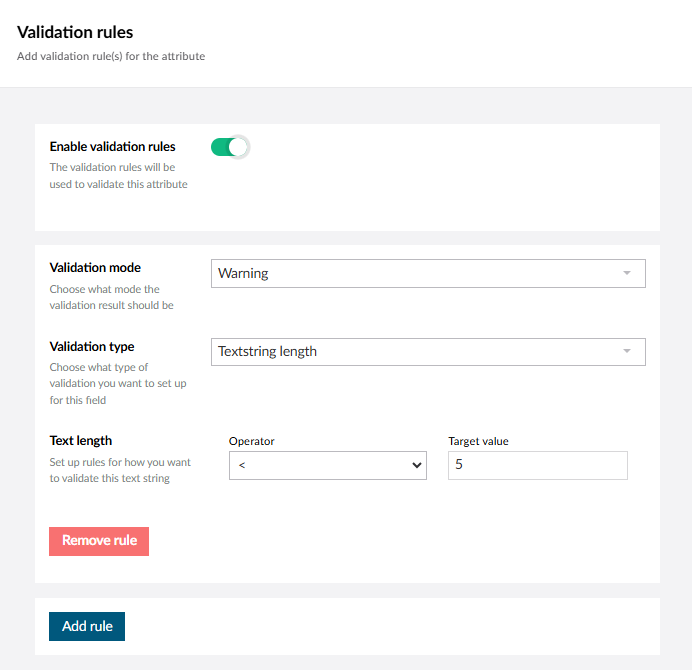
Your first choice is the kind of Validation mode you wish to use. You have two choices:

* Error - If validation rule does not hold for a row, it will show in the change cell and the [attribute](/pim3/fundamental-concepts/attributes) will be ignored during import
* Warning - If validation rule does not hold for a row, a warning will be shown in that change cell.

This choice will determine how the system tells you a validation rule does not hold for a row.

<figure><img src="https://3609403033-files.gitbook.io/~/files/v0/b/gitbook-x-prod.appspot.com/o/spaces%2FZJAMIKVcqchSDbt4A7DE%2Fuploads%2FJrqIZGb1LglkMOrGmNAa%2Fimage.png?alt=media&amp;token=3fd367ef-bee2-4f8d-b3e9-05091ae263ac" alt=""><figcaption><p>Validation rule will warn if incoming text length is not less than 5</p></figcaption></figure>

Next choice is the Validation type you wish to use. Once again you have two choices:

* Textstring length - How many symbols are in the text.
* Regular expression - If a regex pattern matches

Third you choose the condition, the condition will depend on the Validation type.

Having succesfully created a rule you can choose to add another rule to the column or click the green "Update rules"-button in the bottom-left corner.

## Warning & Error

Underneath is shown images of what it looks like if a Validation rule does not hold for warning and error respectively:

<figure><img src="https://3609403033-files.gitbook.io/~/files/v0/b/gitbook-x-prod.appspot.com/o/spaces%2FZJAMIKVcqchSDbt4A7DE%2Fuploads%2FHqtcNajmGeA73rfEuO5h%2Fimage.png?alt=media&amp;token=fb7532f9-0a36-44a0-b5e2-a02b6e90da70" alt=""><figcaption><p>Left: Warning, Right: Error</p></figcaption></figure>


# How to use Transformation during import

By using Transformation during import you can easily manipulate data to your liking

{% hint style="info" %}
**Prerequisite:** This tutorial assumes you know the basics of the import feature. If this is not the case you can learn the basics in other guides here: [How to use import](/pim3/tutorials/helpful-guides/how-to-use-import)\
\
The tools this tutorial goes through are all found on the data mapping page of import
{% endhint %}

## Transformation

When importing Text or Number [attributes](/pim3/fundamental-concepts/attributes) you can choose to do Transformation on the incoming values. This is done by clicking the 'Transform' text to the right of the data mapping.

<figure><img src="https://3609403033-files.gitbook.io/~/files/v0/b/gitbook-x-prod.appspot.com/o/spaces%2FZJAMIKVcqchSDbt4A7DE%2Fuploads%2F8z8ynQuyBNhfj1o9jyxL%2Fimage.png?alt=media&amp;token=25f6b38a-9861-4505-99b8-ca66b957cbec" alt=""><figcaption></figcaption></figure>

Whether you click 'Transformation' for a Text [attribute](/pim3/fundamental-concepts/attributes) or Number [attribute](/pim3/fundamental-concepts/attributes) determines the tranformations that are eligible.

Transformation for Text has the following options:

* All caps
* All non caps
* Capitalize first letter in sentence
* Capitalize first letter in word
* Trim
* Replace
* Regex replace

These are all pretty selfexplanatory and require no other choices to be made, except Replace and Regex replace.

<figure><img src="https://3609403033-files.gitbook.io/~/files/v0/b/gitbook-x-prod.appspot.com/o/spaces%2FZJAMIKVcqchSDbt4A7DE%2Fuploads%2FIbXtj4Xszzw0KoyF6Afg%2Fimage.png?alt=media&amp;token=d9082554-4d6e-40aa-abf0-6e994ad8bc36" alt=""><figcaption><p>Replace for Text attribute</p></figcaption></figure>

Replace takes an 'Old value' and a 'New value'. In the example above all occurences of 'jacket' will be replaced with 'pillowcase' for the [attribute](/pim3/fundamental-concepts/attributes) the Transformation was added to.

Regex replace is similar, however it takes a pattern instead of an 'Old value'. This pattern is in the form of a regular expression and all occurences that fits the pattern will be replaced with the new value.

Transformation for Numbers has the following options:

* Divide
* Minus
* Multiply
* Plus

And they do exactly what they say.

<figure><img src="https://3609403033-files.gitbook.io/~/files/v0/b/gitbook-x-prod.appspot.com/o/spaces%2FZJAMIKVcqchSDbt4A7DE%2Fuploads%2Fe7J576hm4wKnZCTdSsRK%2Fimage.png?alt=media&amp;token=ebf9559d-f5c6-4227-b225-c8ff85407a93" alt=""><figcaption><p>Transformation for Number attribute</p></figcaption></figure>

Having chosen your Transformation type simply input the Number for the operation and the operation will be executed on the [attribute](/pim3/fundamental-concepts/attributes) that is imported.


# How to use Add Only during import

{% hint style="info" %}
**Prerequisite:** This tutorial assumes you know the basics of the import feature. If this is not the case you can learn the basics in other guides here: [How to use import](/pim3/tutorials/helpful-guides/how-to-use-import)\
\
The tools this tutorial goes through are all found on the data mapping page of import
{% endhint %}

## Add Only

\[Guide about Add Only]


# How to use Business rules

Business rules can help automate processes within the system.

## What is Business rules?

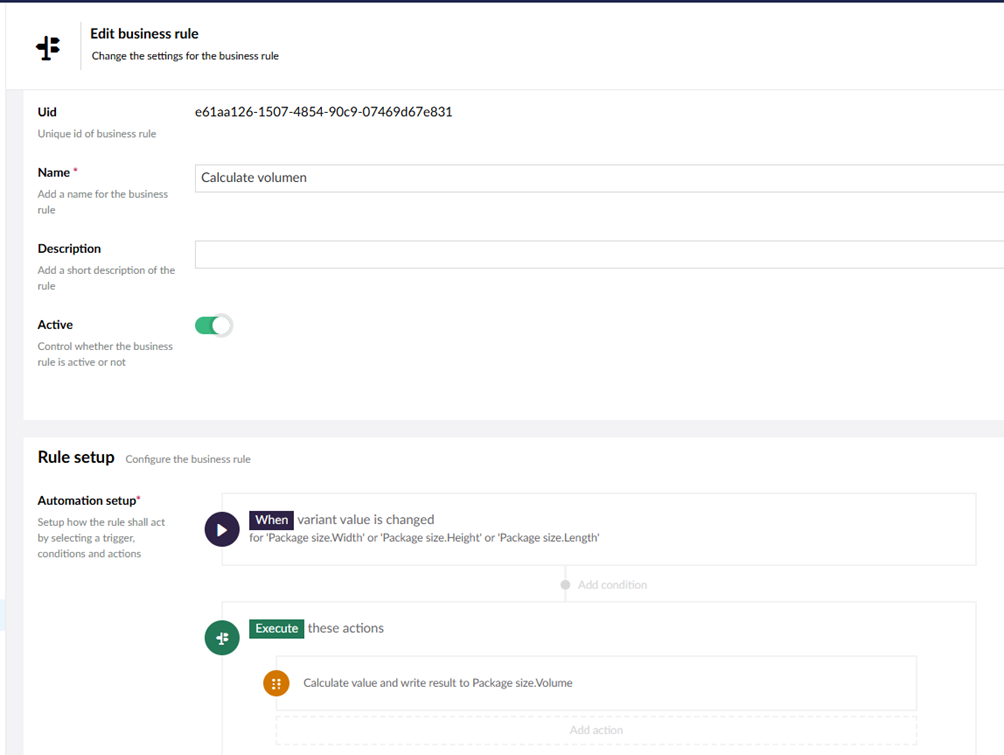
Struct PIMs business rules engine is a powerful automation tool that allows you to automate processes within the system. A business rule consists of [basic settings](/pim3/reference/product-model-setup/business-rules/business-rule-details) and [rules setup](/pim3/reference/product-model-setup/business-rules/business-rule-details#automation-setup).

[Basic settings](/pim3/reference/product-model-setup/business-rules/business-rule-details) contain the name of the business rule, a description for the business rule and its active status. Meanwhile [Rule setup](/pim3/reference/product-model-setup/business-rules/business-rule-details#automation-setup) determines how the business rule should act through [triggers](/pim3/reference/product-model-setup/business-rules/business-rule-details/triggers/trigger-details), [conditions](/pim3/reference/product-model-setup/business-rules/business-rule-details/conditions/condition-details) and [actions](/pim3/reference/product-model-setup/business-rules/business-rule-details/actions/action-details).

Business rules can be found by navigating to the [Product model setup](/pim3/reference/product-model-setup) and clicking on Business rules.

## Guides covering Business rules

* [How to set up and edit a business rule](/pim3/tutorials/helpful-guides/how-to-use-business-rules/how-to-set-up-and-edit-a-business-rule)
* [How to use conditions in a business rule](/pim3/tutorials/helpful-guides/how-to-use-business-rules/how-to-use-conditions-in-a-business-rule)
* [How to set up business rules to trigger other business rules](/pim3/tutorials/helpful-guides/how-to-use-business-rules/how-to-set-up-business-rules-to-trigger-other-business-rules)
* [How to automatically set release status](/pim3/tutorials/helpful-guides/how-to-use-business-rules/how-to-automatically-set-release-status)
* [How to automatically calculate the size of a variant](/pim3/tutorials/helpful-guides/how-to-use-business-rules/how-to-automatically-calculate-the-size-of-a-variant)
* [How to automate price conversion](/pim3/tutorials/helpful-guides/how-to-use-business-rules/how-to-automate-price-conversion)
* [How to assign documents to a product when it is created](/pim3/tutorials/helpful-guides/how-to-use-business-rules/how-to-assign-documents-to-a-product-when-it-is-created)
* [How to manage product identifiers](/pim3/tutorials/helpful-guides/how-to-use-business-rules/how-to-manage-product-identifiers)


# How to set up and edit a business rule

A guide to set up and edit a business rule

## Set up a business rule

To start setting up a new business rule click the "Create business rule"-button in the top right corner of the Business rules page.

<figure><img src="https://3609403033-files.gitbook.io/~/files/v0/b/gitbook-x-prod.appspot.com/o/spaces%2FZJAMIKVcqchSDbt4A7DE%2Fuploads%2FmJQLTV7SDY17Jjhckkcw%2Fimage.png?alt=media&amp;token=66195542-45bf-4427-a8ea-fd508f0eea0d" alt="" width="563"><figcaption><p>Business rules page</p></figcaption></figure>

<figure><img src="https://3609403033-files.gitbook.io/~/files/v0/b/gitbook-x-prod.appspot.com/o/spaces%2FZJAMIKVcqchSDbt4A7DE%2Fuploads%2FUdR1MI99xqfltBtLIAQP%2Fimage.png?alt=media&amp;token=c1d64c37-ffec-4bbd-8819-50e090230b09" alt="" width="563"><figcaption><p>Business rule setup page</p></figcaption></figure>

You must choose a name for your business rule, this name does not have to be unique because the business rule will be assigned a Uid. We suggest using explanatory and distinct names however, as this wil make it easier for everyone working in the PIM.

You can give the rule a description and choose whether the rule is active or not.&#x20;

Now you need to choose a [trigger](/pim3/reference/product-model-setup/business-rules/business-rule-details/triggers/trigger-details). To do so, click "Click to select a trigger". This will open a select trigger wizard. &#x20;

<div align="center" data-full-width="false"><figure><img src="https://3609403033-files.gitbook.io/~/files/v0/b/gitbook-x-prod.appspot.com/o/spaces%2FZJAMIKVcqchSDbt4A7DE%2Fuploads%2F1HO1idaXgITMPlrZ847V%2Fimage.png?alt=media&amp;token=fdf88e98-569e-4ec0-b09c-026b314eea21" alt="" width="375"><figcaption><p>Select trigger</p></figcaption></figure> <figure><img src="https://3609403033-files.gitbook.io/~/files/v0/b/gitbook-x-prod.appspot.com/o/spaces%2FZJAMIKVcqchSDbt4A7DE%2Fuploads%2FmkR7FtDD4Tb6vTTujfwC%2Fimage.png?alt=media&amp;token=9913d726-d06b-432c-8375-c3ed0b81a3fe" alt="" width="375"><figcaption><p>Configure trigger (Variant value changed)</p></figcaption></figure></div>

Within the wizard you must first choose a [trigger](/pim3/reference/product-model-setup/business-rules/business-rule-details/triggers/trigger-details) that determines when your rule will run. For this example 'Variant value changed' is chosen.\
\
The wizard will ask you to select any setting for the [trigger](/pim3/reference/product-model-setup/business-rules/business-rule-details/triggers/trigger-details) if applicable. In this example the wizard asks what attributes to look for. When you have chosen the necessary settings click "Confirm".&#x20;

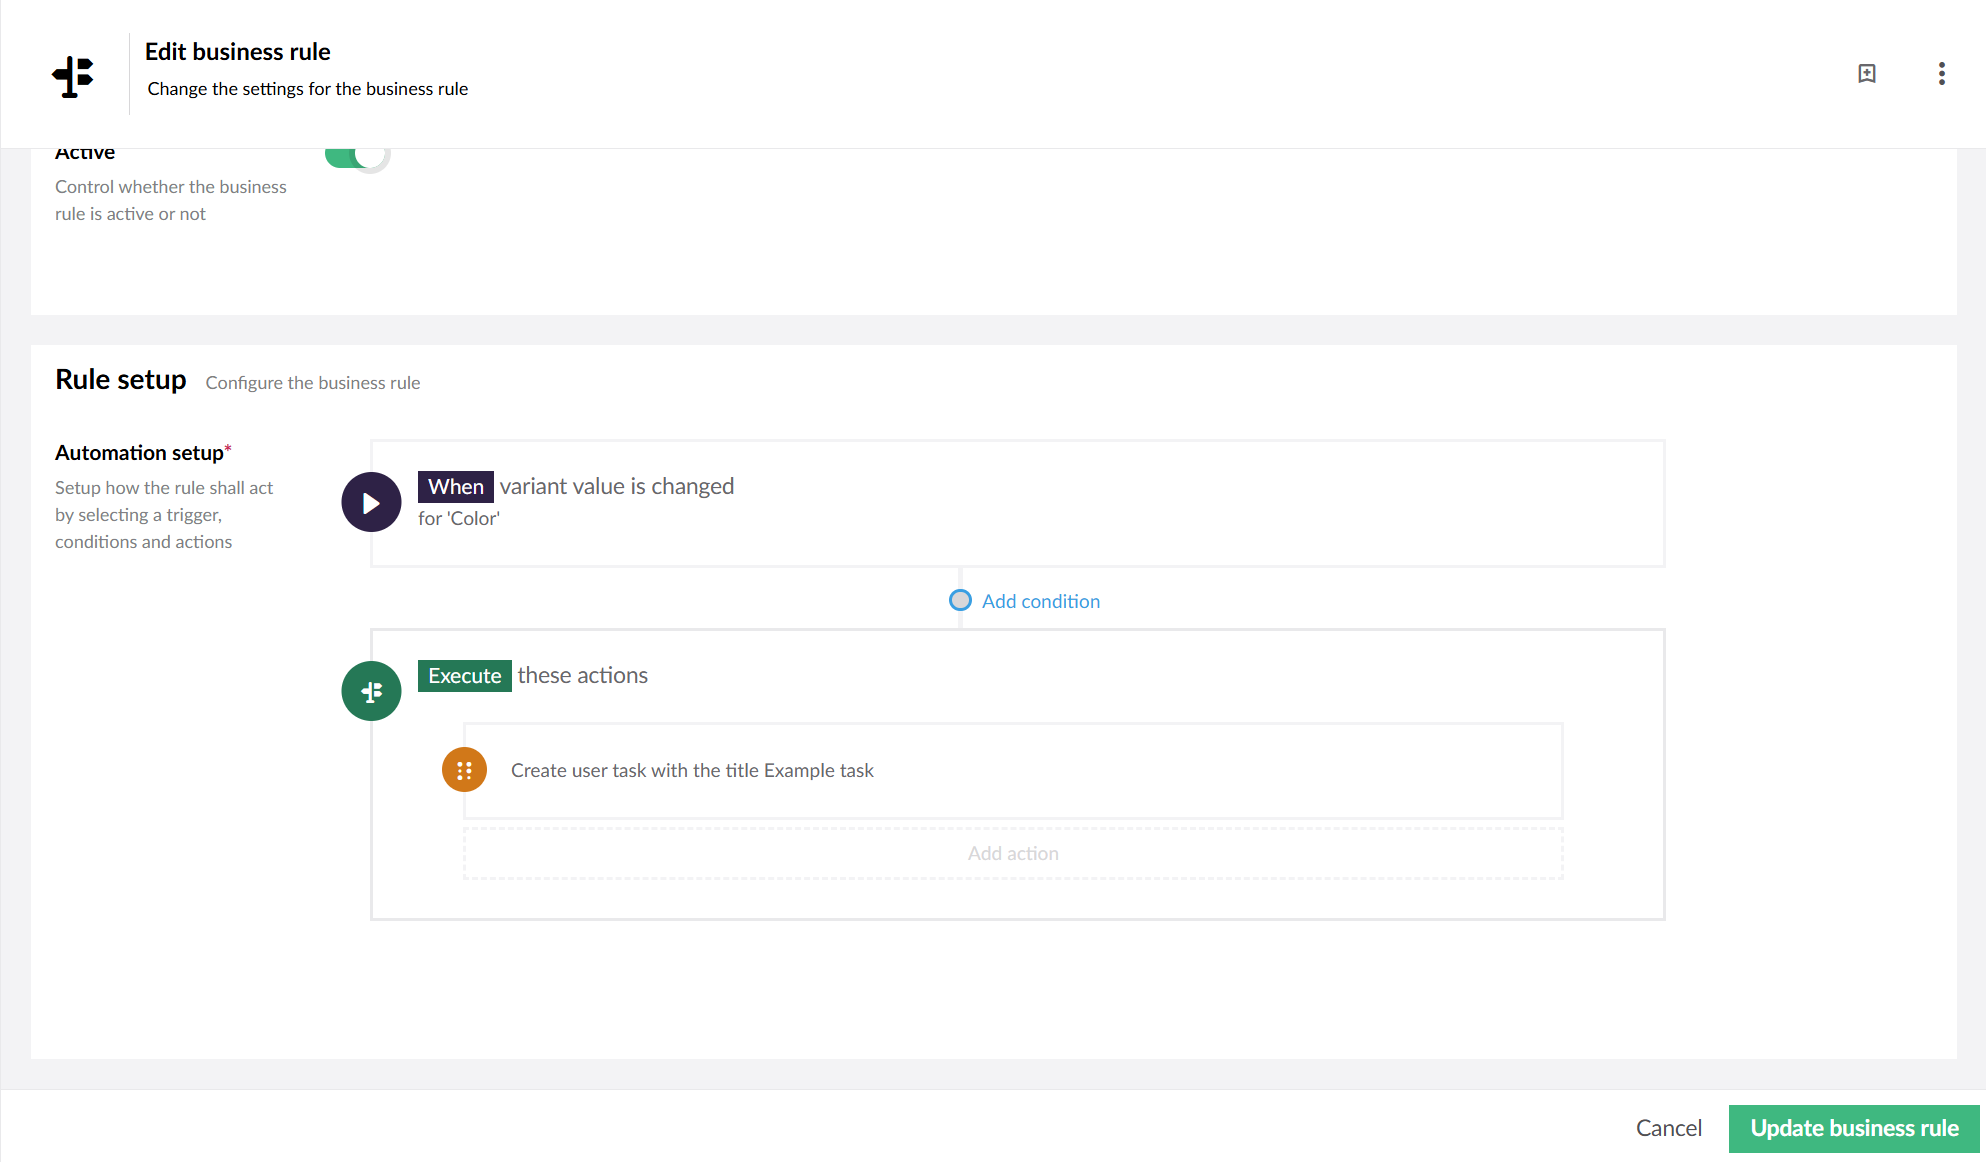
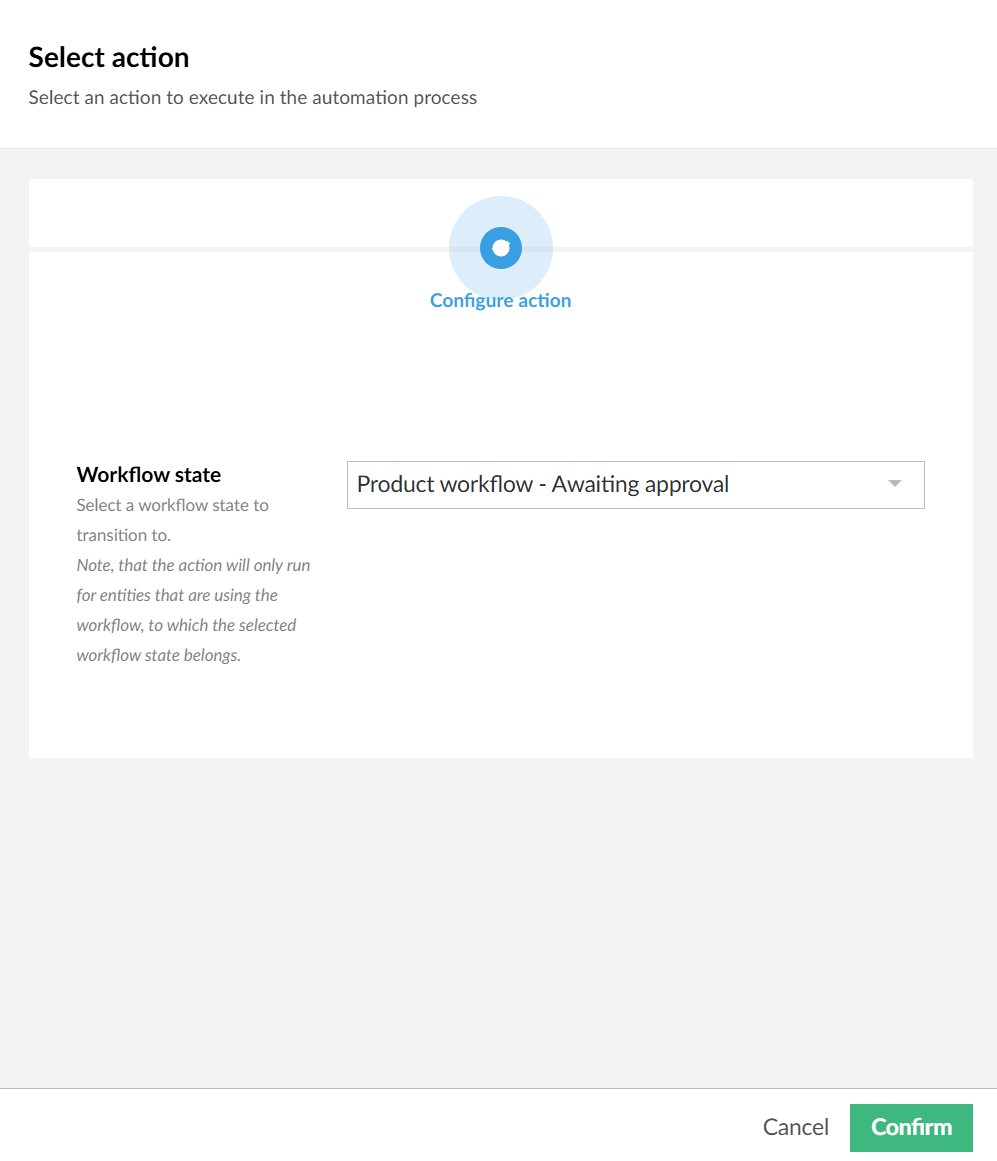
This will take you back to the business rule setup page. Under the trigger that was chosen, a box with the text "Execute these actions" will have appeared. Click "Add Action" inside the box to open up 'Select action'.&#x20;

<div><figure><img src="https://3609403033-files.gitbook.io/~/files/v0/b/gitbook-x-prod.appspot.com/o/spaces%2FZJAMIKVcqchSDbt4A7DE%2Fuploads%2FXMnSlWihVob4OM2ucDLR%2Fimage.png?alt=media&amp;token=ff495789-cf65-4f1a-ad23-f1f31ea85885" alt=""><figcaption><p>Select action</p></figcaption></figure> <figure><img src="https://3609403033-files.gitbook.io/~/files/v0/b/gitbook-x-prod.appspot.com/o/spaces%2FZJAMIKVcqchSDbt4A7DE%2Fuploads%2FfUYlnP6eccWCGDs3lLN6%2FScreenshot%202025-01-09%20140912.png?alt=media&amp;token=379131d8-d18f-4380-9308-cf42f48eeee8" alt=""><figcaption><p>Configure action (Create a task)</p></figcaption></figure></div>

Choose the [action](/pim3/reference/product-model-setup/business-rules/business-rule-details/actions/action-details) you wish for your business rule to execute. The available [actions](/pim3/reference/product-model-setup/business-rules/business-rule-details/actions/action-details) depend on the chosen [trigger](/pim3/reference/product-model-setup/business-rules/business-rule-details/triggers/trigger-details). For this example "Create a Task" is chosen.\
\
When you have chosen an [action](/pim3/reference/product-model-setup/business-rules/business-rule-details/actions/action-details), you will be asked to configure that[ action](/pim3/reference/product-model-setup/business-rules/business-rule-details/actions/action-details). In this example we need to set up a task.\
\
When you have configured your [action](/pim3/reference/product-model-setup/business-rules/business-rule-details/actions/action-details) click "Confirm". This will take you back to the business rule setup page. Note that you can add more than one [action](/pim3/reference/product-model-setup/business-rules/business-rule-details/actions/action-details) to your business rule.&#x20;

<figure><img src="https://3609403033-files.gitbook.io/~/files/v0/b/gitbook-x-prod.appspot.com/o/spaces%2FZJAMIKVcqchSDbt4A7DE%2Fuploads%2Fm02sVSfjvRUDV5DHHOET%2Fimage.png?alt=media&amp;token=2da1f574-bd30-486b-82b8-d8e5479c9aa5" alt="" width="563"><figcaption><p>Business rule setup page</p></figcaption></figure>

When you have finished setting up your business rule click "Create business rule". This will save the business rule and assign it a Uid.

To test that your business rule runs; hover your cursor over the trigger and a small "Start"-button should appear in the top right corner of the box.&#x20;

## Edit Business rule

To edit your business rule hover over the [trigger](/pim3/reference/product-model-setup/business-rules/business-rule-details/triggers/trigger-details) or [action](/pim3/reference/product-model-setup/business-rules/business-rule-details/actions/action-details) you want to edit. A ![](https://3609403033-files.gitbook.io/~/files/v0/b/gitbook-x-prod.appspot.com/o/spaces%2FZJAMIKVcqchSDbt4A7DE%2Fuploads%2FIRwyjKbMbN9pifTAUD6W%2FScreenshot%202025-01-09%20144110.png?alt=media\&token=f1ebbc91-8650-43e2-a51f-f3c3096dbbd0) symbol will appear in the top right corner. Editing an [action](/pim3/reference/product-model-setup/business-rules/business-rule-details/actions/action-details) or [trigger](/pim3/reference/product-model-setup/business-rules/business-rule-details/triggers/trigger-details) will allow you change the configuration but not the type.&#x20;

To delete an [action](/pim3/reference/product-model-setup/business-rules/business-rule-details/actions/action-details) or [trigger](/pim3/reference/product-model-setup/business-rules/business-rule-details/triggers/trigger-details) simply click the "Trash can"-icon when hovering over them. If you delete the [trigger](/pim3/reference/product-model-setup/business-rules/business-rule-details/triggers/trigger-details) you will delete the entire rule setup for your business rule.

[Actions](/pim3/reference/product-model-setup/business-rules/business-rule-details/actions/action-details) can be dragged around to change the order in which they execute.&#x20;


# How to use conditions in a business rule

A guide to setup and configure conditions in a business rule

## Why use conditions?

Conditions allow a business rule to take on multiple different kinds of behavior depending on the input. This makes it possible to make rules that are more specific and flexible depending on what is needed.&#x20;

## Set up

<figure><img src="https://3609403033-files.gitbook.io/~/files/v0/b/gitbook-x-prod.appspot.com/o/spaces%2FZJAMIKVcqchSDbt4A7DE%2Fuploads%2F09boqR4DTqVny2Wno7NB%2Fimage.png?alt=media&amp;token=414e758c-00fd-4fd9-88ee-40c535abfa12" alt="" width="563"><figcaption><p>Business rule setup page</p></figcaption></figure>

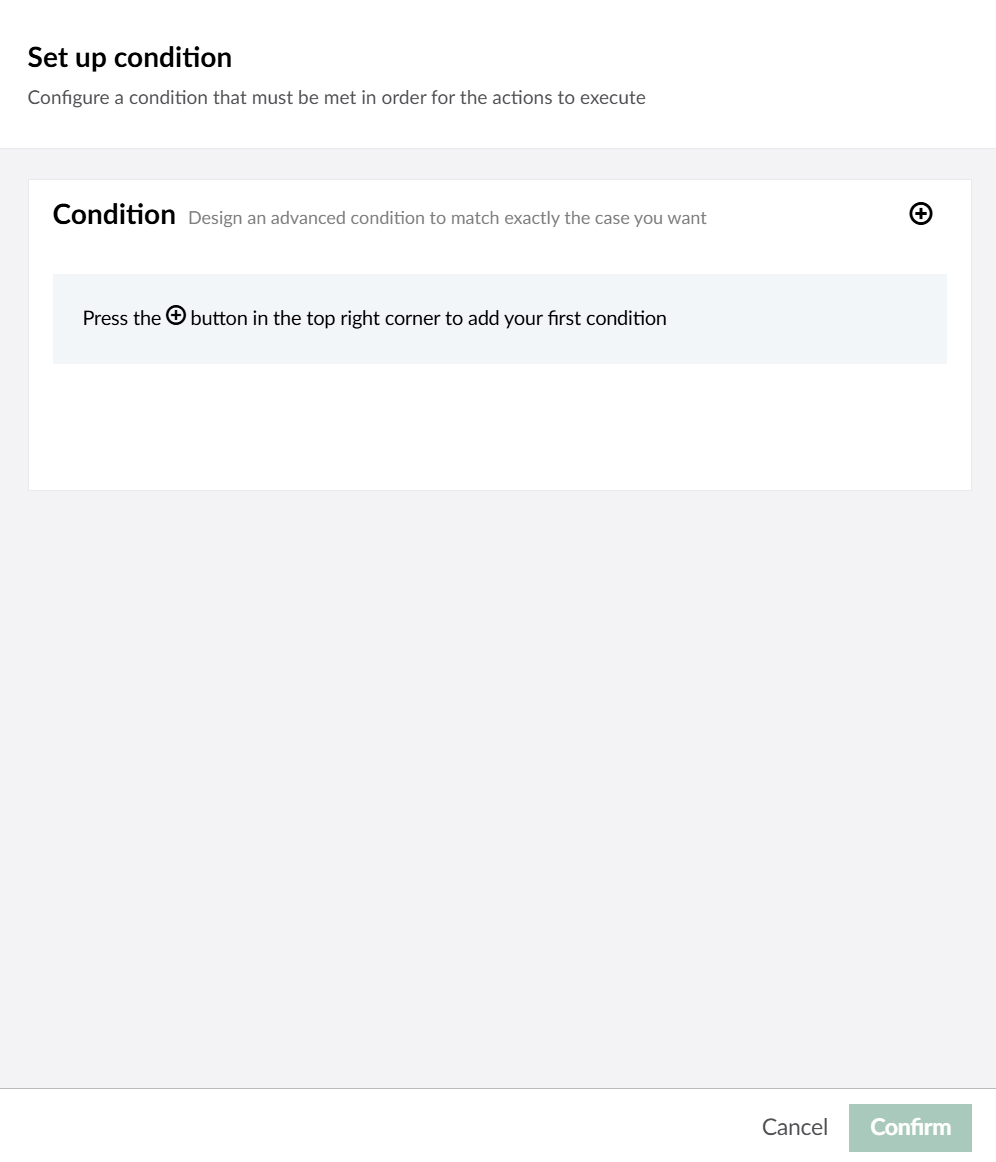
To set up a [condition](/pim3/reference/product-model-setup/business-rules/business-rule-details/conditions/condition-details) for a business rule click the small "Add condition" circle between the [trigger](/pim3/reference/product-model-setup/business-rules/business-rule-details/triggers/trigger-details) and the [actions](/pim3/reference/product-model-setup/business-rules/business-rule-details/actions/action-details). This will take you to the set up conditions page.

<figure><img src="https://3609403033-files.gitbook.io/~/files/v0/b/gitbook-x-prod.appspot.com/o/spaces%2FZJAMIKVcqchSDbt4A7DE%2Fuploads%2F3NEBzAV1c6r11IfeOhSO%2Fimage.png?alt=media&amp;token=c41d1460-6b2a-4f48-8756-a8fda063ecfd" alt="" width="375"><figcaption><p>Condition setup page</p></figcaption></figure>

On the page click the + symbol to add a [condition](/pim3/reference/product-model-setup/business-rules/business-rule-details/conditions/condition-details).

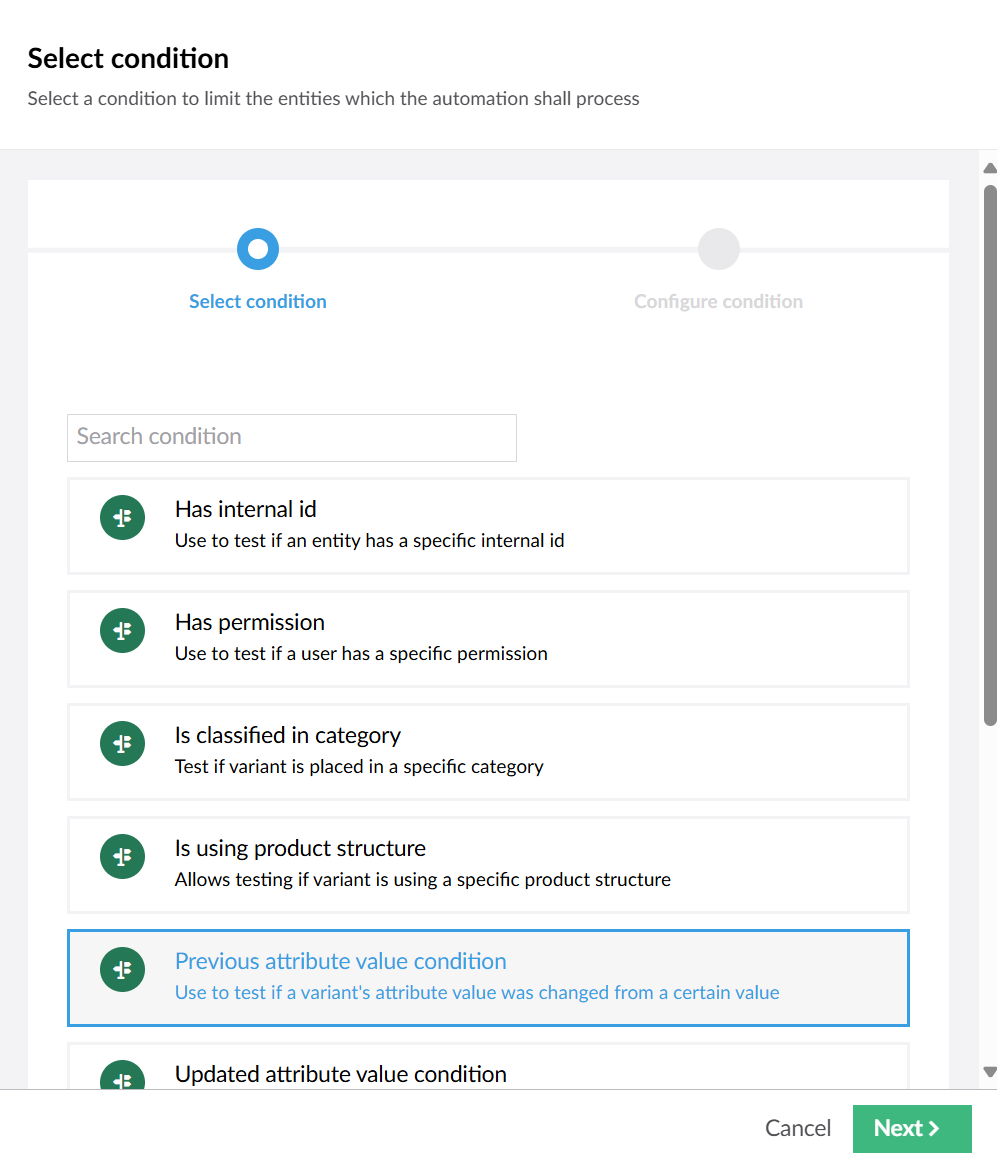
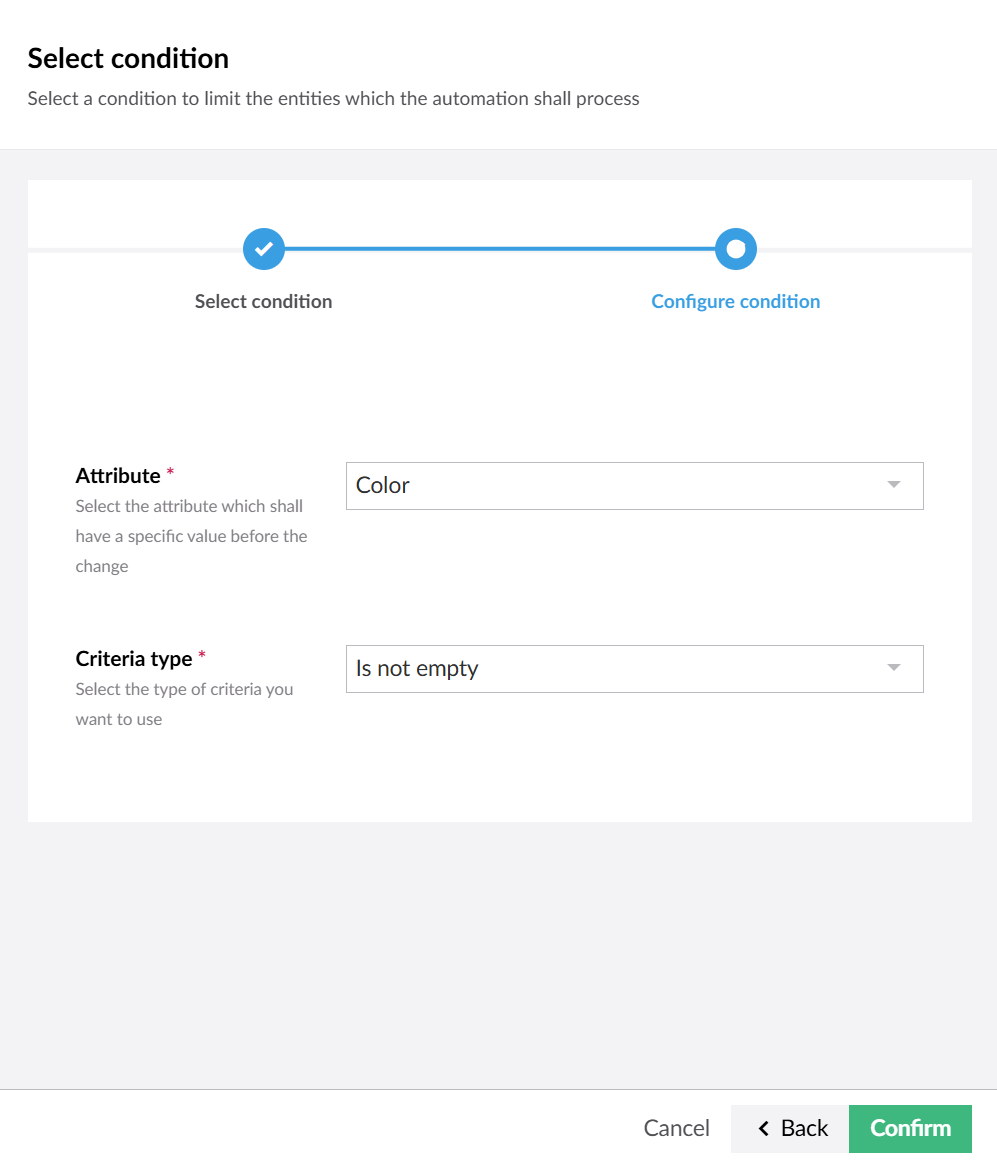
<div><figure><img src="https://3609403033-files.gitbook.io/~/files/v0/b/gitbook-x-prod.appspot.com/o/spaces%2FZJAMIKVcqchSDbt4A7DE%2Fuploads%2FZ5pryojODFoRYLjLaDoq%2Fimage.png?alt=media&amp;token=35a54867-c035-4286-8e7e-fd18df92539f" alt="" width="375"><figcaption><p>Select condition</p></figcaption></figure> <figure><img src="https://3609403033-files.gitbook.io/~/files/v0/b/gitbook-x-prod.appspot.com/o/spaces%2FZJAMIKVcqchSDbt4A7DE%2Fuploads%2FztPS7Jt3dA4mqgGiqaYp%2Fimage.png?alt=media&amp;token=57c6b3fd-173f-4d4c-b0c4-937dfa8df1c3" alt="" width="375"><figcaption><p>Configure condition</p></figcaption></figure></div>

First you need to select a [condition](/pim3/reference/product-model-setup/business-rules/business-rule-details/conditions/condition-details). For this example 'Previous attribute value condition' is chosen. \
Next you need to configure your [condition](/pim3/reference/product-model-setup/business-rules/business-rule-details/conditions/condition-details) if applicable. e.g. 'Color and is not empty'.\
\
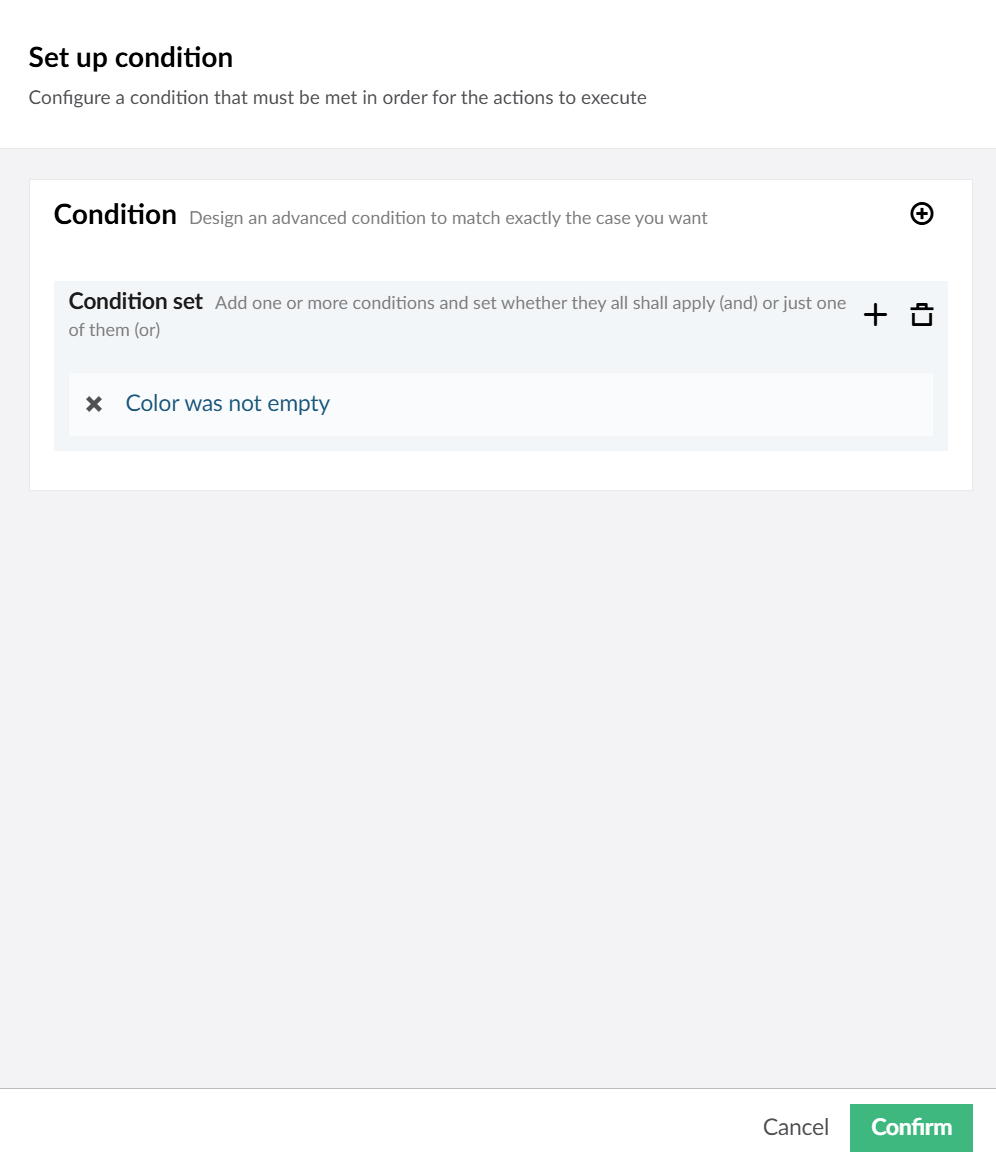
When you click confirm you have added the first [condition](/pim3/reference/product-model-setup/business-rules/business-rule-details/conditions/condition-details) to your condition set.

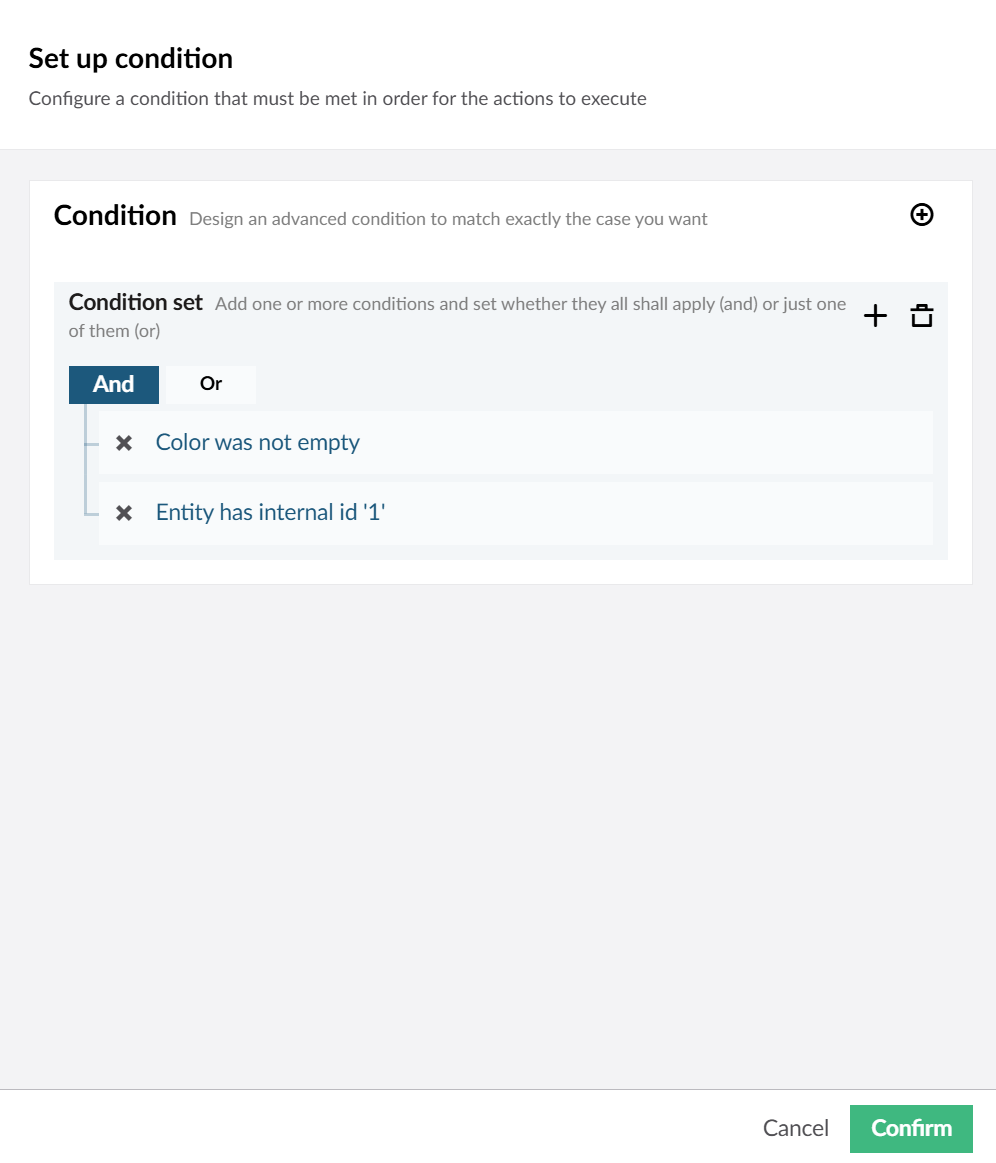
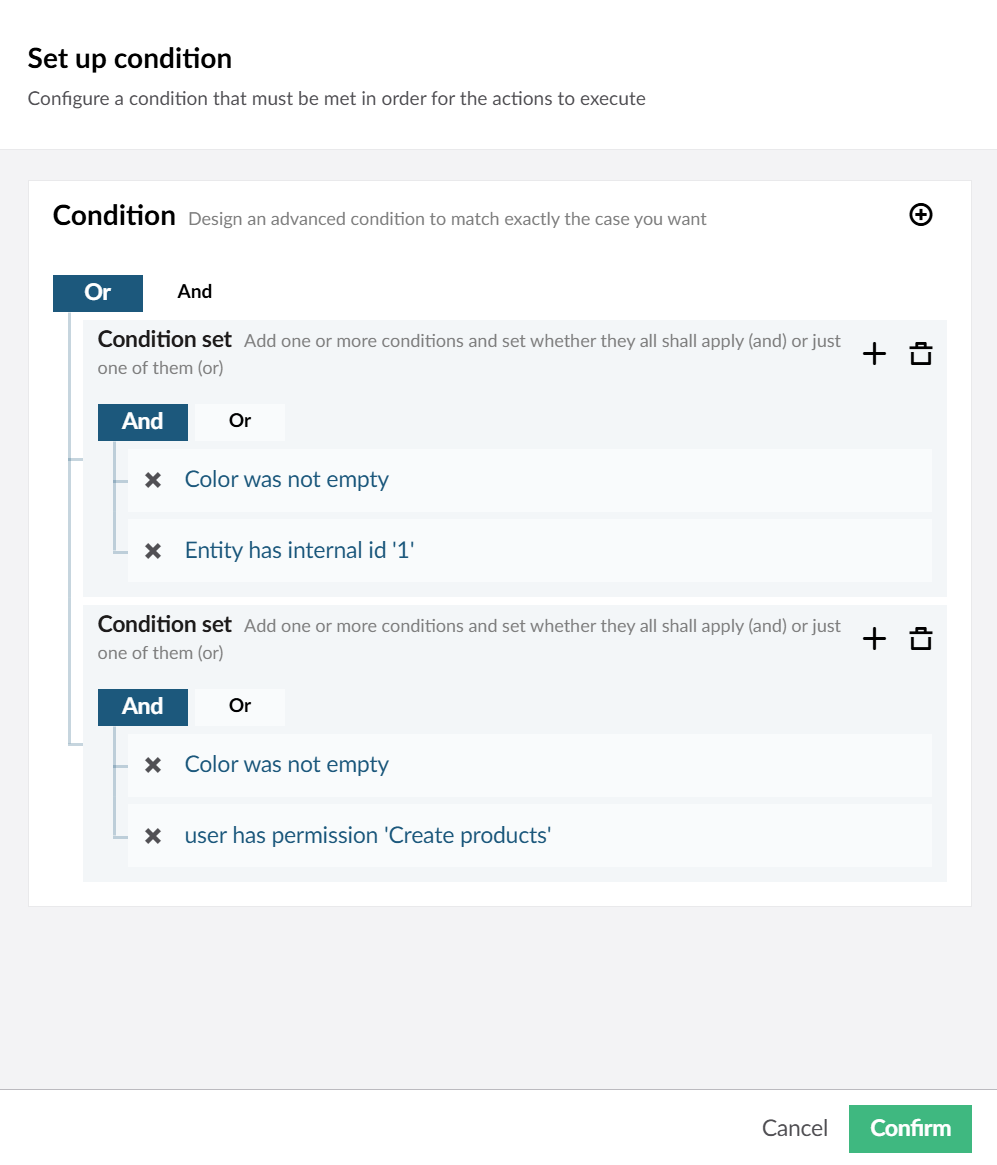
<div><figure><img src="https://3609403033-files.gitbook.io/~/files/v0/b/gitbook-x-prod.appspot.com/o/spaces%2FZJAMIKVcqchSDbt4A7DE%2Fuploads%2FWxyiTfua0OpFBEhklJIP%2Fimage.png?alt=media&amp;token=10aa65ad-141f-48e4-b91f-212572b8d6b8" alt="" width="375"><figcaption><p>A condition set with 1 condition</p></figcaption></figure> <figure><img src="https://3609403033-files.gitbook.io/~/files/v0/b/gitbook-x-prod.appspot.com/o/spaces%2FZJAMIKVcqchSDbt4A7DE%2Fuploads%2FHzpPMAR2Jj69RsX6JZKX%2FScreenshot%202025-01-10%20112725.png?alt=media&amp;token=4cdd99eb-14b9-435b-8334-e465b74d963c" alt="" width="375"><figcaption><p>A condition set with 2 conditions</p></figcaption></figure></div>

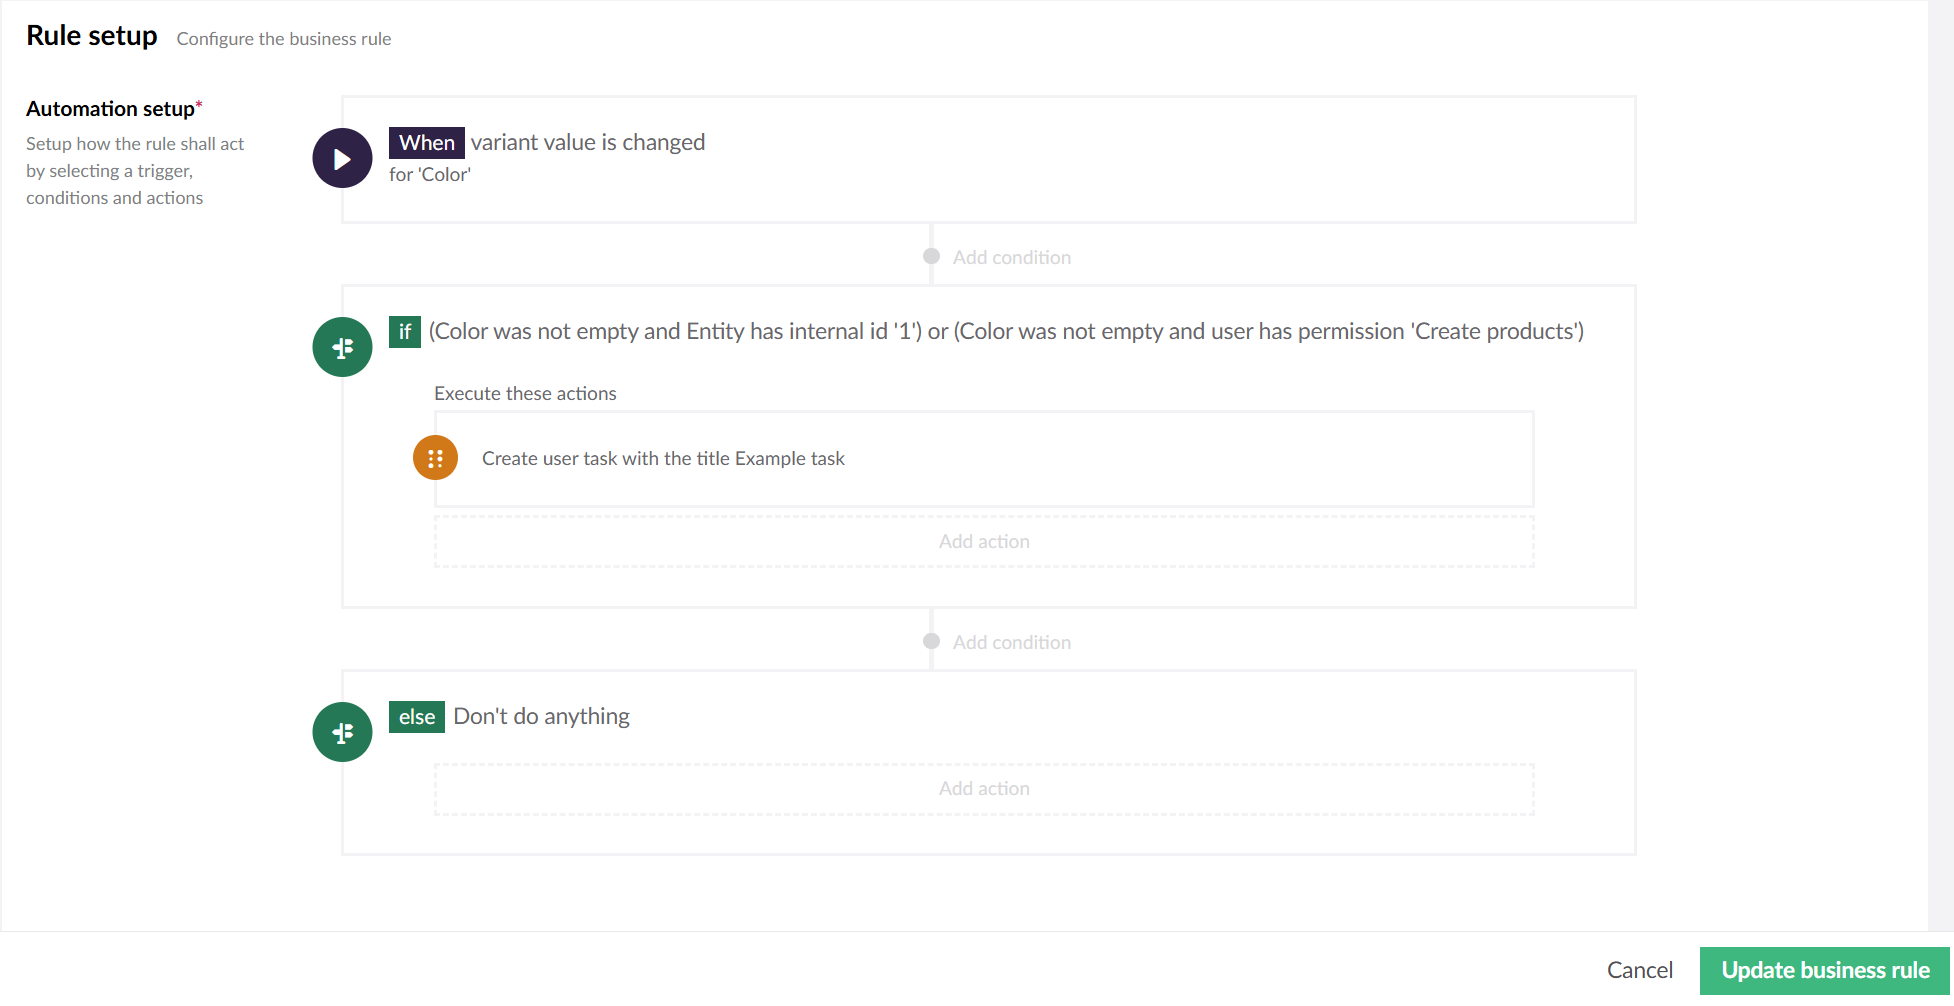
If you wish to add just one [condition](/pim3/reference/product-model-setup/business-rules/business-rule-details/conditions/condition-details) you can click "Confirm". This will add the [condition](/pim3/reference/product-model-setup/business-rules/business-rule-details/conditions/condition-details) to your business rule.\
\
You can also add more conditions to your condition set. If you wish to do so, you have to choose how they relate to each other. You can choose between "And" or "Or".\
\
"Or" requires only one [condition](/pim3/reference/product-model-setup/business-rules/business-rule-details/conditions/condition-details) to be met for the condition set to be fulfilled.\
\
"And" requires all of the[ conditions](/pim3/reference/product-model-setup/business-rules/business-rule-details/conditions/condition-details) to be met. \
\
You can also choose to add another condition set by clicking the ![](https://3609403033-files.gitbook.io/~/files/v0/b/gitbook-x-prod.appspot.com/o/spaces%2FZJAMIKVcqchSDbt4A7DE%2Fuploads%2FQIxWFiJ61DLfYaLftBfV%2Fimage.png?alt=media\&token=e43796e4-6880-492a-9994-0b325e388775)  symbol.&#x20;

<figure><img src="https://3609403033-files.gitbook.io/~/files/v0/b/gitbook-x-prod.appspot.com/o/spaces%2FZJAMIKVcqchSDbt4A7DE%2Fuploads%2FAHcj47W3qq7tseRVbZHO%2FScreenshot%202025-01-10%20112848.png?alt=media&amp;token=d795e215-b3bf-4392-b7b6-c2eee0a5b5c4" alt="" width="375"><figcaption><p>Condition setup page</p></figcaption></figure>

Condition sets relate to each other in the same way [conditions](/pim3/reference/product-model-setup/business-rules/business-rule-details/conditions/condition-details) within a condition set do.

Once you are satisfied with your [condition](/pim3/reference/product-model-setup/business-rules/business-rule-details/conditions/condition-details), click "Confirm".

&#x20;

<figure><img src="https://3609403033-files.gitbook.io/~/files/v0/b/gitbook-x-prod.appspot.com/o/spaces%2FZJAMIKVcqchSDbt4A7DE%2Fuploads%2FtUvUCRYsSOwnVVeDZJ3u%2Fimage.png?alt=media&amp;token=3607eac8-c480-43c0-a05f-f9067525a500" alt="" width="563"><figcaption><p>Business rule setup page</p></figcaption></figure>

Having added a [condition](/pim3/reference/product-model-setup/business-rules/business-rule-details/conditions/condition-details), there are now 2 boxes that contains[ actions](/pim3/reference/product-model-setup/business-rules/business-rule-details/actions/action-details). One will execute if the [condition](/pim3/reference/product-model-setup/business-rules/business-rule-details/conditions/condition-details) is met and one will execute if the [condition](/pim3/reference/product-model-setup/business-rules/business-rule-details/conditions) is *not* met.\
\
Note that the task, that was previously in Execute has been moved into the [condition](/pim3/reference/product-model-setup/business-rules/business-rule-details/conditions/condition-details) we just added. You can add more [conditions](/pim3/reference/product-model-setup/business-rules/business-rule-details/conditions/condition-details) by clicking "Add condition" above or under the "if" box.&#x20;

<figure><img src="https://3609403033-files.gitbook.io/~/files/v0/b/gitbook-x-prod.appspot.com/o/spaces%2FZJAMIKVcqchSDbt4A7DE%2Fuploads%2FyZ6UJEqtImKfDCtpiHWh%2FScreenshot%202025-01-10%20114118.png?alt=media&amp;token=6e40b5b5-1690-40e4-b010-7f65748c310a" alt=""><figcaption><p>Business rule setup page</p></figcaption></figure>

These [conditions](/pim3/reference/product-model-setup/business-rules/business-rule-details/conditions/condition-details) will be checked sequentially from top to bottom, and if one [condition](/pim3/reference/product-model-setup/business-rules/business-rule-details/conditions) is met the rest will not be checked.

So in this example, if the variant is using the product structure 'Non-food' it will not check anything else, since that is the first [condition](/pim3/reference/product-model-setup/business-rules/business-rule-details/conditions/condition-details) to be checked.


# How to set up business rules to trigger other business rules

A guide to setup and configure a business rule to trigger other business rules

## When is it useful for a business rule to trigger other business rules?

There are several reasons you might want a business rule to trigger other business rules, also referred to as subrules.

Reasons why you might want to make a sub rule:

* You want to reuse parts of a rule so the same logic is used in multiple places.
* You want to take actions on an entity that is related to the triggering entity.
* You want actions to be taken asynchronously.

## Setting up the sub rule

Start by creating your sub rule and choosing an action trigger.

<div><figure><img src="https://3609403033-files.gitbook.io/~/files/v0/b/gitbook-x-prod.appspot.com/o/spaces%2FZJAMIKVcqchSDbt4A7DE%2Fuploads%2FVpEjaI7GpLkIlTcBUA8h%2Fimage.png?alt=media&amp;token=67c99e91-c309-4ffa-9e4b-abc725f17437" alt="" width="563"><figcaption><p>Business rules setup page</p></figcaption></figure> <figure><img src="https://3609403033-files.gitbook.io/~/files/v0/b/gitbook-x-prod.appspot.com/o/spaces%2FZJAMIKVcqchSDbt4A7DE%2Fuploads%2FO1qOdSB0BYIQplyQhjJ8%2Fimage.png?alt=media&amp;token=ceb35439-219d-4768-8ea7-72903f2333e8" alt="" width="375"><figcaption><p>Select trigger</p></figcaption></figure></div>

When choosing a [trigger](/pim3/reference/product-model-setup/business-rules/business-rule-details/triggers/trigger-details) you will need to choose the type of entity the rule needs to act on.\
\
After you have picked the [trigger](/pim3/reference/product-model-setup/business-rules/business-rule-details/triggers/trigger-details), setup the rest of the rule as normal. (Remember to click "Create Business rule" to save the rule).

## Setting up the business rule that triggers your sub rule

Open the business rule you want to [trigger](/pim3/reference/product-model-setup/business-rules/business-rule-details/triggers/trigger-details) the sub rule.

Add an [action](/pim3/reference/product-model-setup/business-rules/business-rule-details/actions/action-details) and choose "Trigger sub rule". Choose the same entity that you chose on your sub rule for "Entities to execute for" and select the sub rule for "Rule to execute".

{% hint style="warning" %}
**Note** If you choose a different entity to what triggered the original rule, it will run the rule for all related entities which might make the sub rule run more than once.
{% endhint %}

If you wish to execute the rule asynchronously toggle the "Execute async" check.

{% hint style="success" %}
**Note** If your sub rule applies to more than one entity it is highly recommended that you run it asynchronously to optimize the execution time.
{% endhint %}

<div><figure><img src="https://3609403033-files.gitbook.io/~/files/v0/b/gitbook-x-prod.appspot.com/o/spaces%2FZJAMIKVcqchSDbt4A7DE%2Fuploads%2FOMXkhEubhaAxkzmZj3fo%2Fimage.png?alt=media&amp;token=fffdd938-6d96-4a82-b1e9-0fc7b47b0a13" alt="" width="375"><figcaption><p>Select action</p></figcaption></figure> <figure><img src="https://3609403033-files.gitbook.io/~/files/v0/b/gitbook-x-prod.appspot.com/o/spaces%2FZJAMIKVcqchSDbt4A7DE%2Fuploads%2FwdERwxm4x30ZhPvECFn0%2Fimage.png?alt=media&amp;token=c8f1e44d-83d3-4425-8fa7-7eaeab99ec62" alt="" width="375"><figcaption><p>Configure action</p></figcaption></figure></div>

## Pitfalls when using sub rules

When using sub rules there are some pitfalls you should be aware of:

* Your sub rule can [trigger](/pim3/reference/product-model-setup/business-rules/business-rule-details/triggers/trigger-details) other rules either directly or by taking an [action](/pim3/reference/product-model-setup/business-rules/business-rule-details/actions/action-details) that [triggers](/pim3/reference/product-model-setup/business-rules/business-rule-details/triggers/trigger-details) a rule. This can cause a loop where rules [trigger](/pim3/reference/product-model-setup/business-rules/business-rule-details/triggers/trigger-details) themselves. To avoid this Struct PIM only allows a rule to [trigger](/pim3/reference/product-model-setup/business-rules/business-rule-details/triggers/trigger-details) 10 times per original [action](/pim3/reference/product-model-setup/business-rules/business-rule-details/actions/action-details).&#x20;
* Changing a sub rule will change behavior wherever it is used, so be cautious of all the places a rule is used before changing it.


# How to automatically set release status

Business rules can allow you to automatically track when a product is ready to be released by tracking enrichment insights

<figure><img src="https://3609403033-files.gitbook.io/~/files/v0/b/gitbook-x-prod.appspot.com/o/spaces%2FZJAMIKVcqchSDbt4A7DE%2Fuploads%2FashbQ11jPHPRUm09msaq%2Fimage.png?alt=media&amp;token=b19965c1-54cd-404b-b2b0-fc1e01ba93a2" alt=""><figcaption><p>Business rule setup page</p></figcaption></figure>

First you should choose the "product enrichment insight is changed" trigger.

<figure><img src="https://3609403033-files.gitbook.io/~/files/v0/b/gitbook-x-prod.appspot.com/o/spaces%2FZJAMIKVcqchSDbt4A7DE%2Fuploads%2FapilsJXx4ynRY85mqqso%2Fimage.png?alt=media&amp;token=37e84ab7-9955-472a-8ebd-06780a53509c" alt="" width="375"><figcaption><p>Select trigger</p></figcaption></figure>

To configure, choose the [enrichment insight](/pim3/reference/product-model-setup/enrichment-insights) you want to track. In this example we choose "Ready for UK webshop". \
\
Then choose "When an insight target is reached" and "Equal to" "100%".&#x20;

<div><figure><img src="https://3609403033-files.gitbook.io/~/files/v0/b/gitbook-x-prod.appspot.com/o/spaces%2FZJAMIKVcqchSDbt4A7DE%2Fuploads%2Fk9wI7qetZUo7FLLykqGC%2Fimage.png?alt=media&amp;token=88460a65-438c-434f-ae3e-0f828dc4b0ec" alt="" width="375"><figcaption><p>Configure action</p></figcaption></figure> <figure><img src="https://3609403033-files.gitbook.io/~/files/v0/b/gitbook-x-prod.appspot.com/o/spaces%2FZJAMIKVcqchSDbt4A7DE%2Fuploads%2F8I2DE11MxGxKQsKpyXkE%2Fimage.png?alt=media&amp;token=efc0955b-e355-41f8-aa45-2f55f8090c38" alt="" width="375"><figcaption><p>Configure action</p></figcaption></figure></div>

When you have set up your [trigger](/pim3/reference/product-model-setup/business-rules/business-rule-details/triggers/trigger-details) you can add [actions](/pim3/reference/product-model-setup/business-rules/business-rule-details/actions/action-details) to make the [product](/pim3/fundamental-concepts/products-and-variants) ready. In this example set the [attribute](/pim3/fundamental-concepts/attributes) "Ready for web?" to "true" and change the [workflow state](/pim3/reference/product-model-setup/workflows/workflow-states) to "Awaiting approval"


# How to automatically calculate the size of a variant

An example of how to use the calculate action

To make a rule that will calculate the volume of a [variant](/pim3/fundamental-concepts/products-and-variants) based on the dimensions of that [variant](/pim3/fundamental-concepts/products-and-variants), make a [trigger](/pim3/reference/product-model-setup/business-rules/business-rule-details/triggers/trigger-details) that [triggers](/pim3/reference/product-model-setup/business-rules/business-rule-details/triggers/trigger-details) when any of the dimensions change.

<figure><img src="https://3609403033-files.gitbook.io/~/files/v0/b/gitbook-x-prod.appspot.com/o/spaces%2FZJAMIKVcqchSDbt4A7DE%2Fuploads%2FWOuTfgnJHO1SFqzNBE80%2Fimage.png?alt=media&amp;token=87478696-ba48-4099-bb21-7650299b1361" alt=""><figcaption><p>Business rule setup page</p></figcaption></figure>

Then add an [action](/pim3/reference/product-model-setup/business-rules/business-rule-details/actions/action-details) and choose "Calculate value". When configuring the [action](/pim3/reference/product-model-setup/business-rules/business-rule-details/actions/action-details) click "+Add math calculation" and choose "Add math operation".\
\
In this example we start by multiplying the height and width. That result is then multiplied with the length. Finally that result is multiplied with 0,001 to make sure the units are correct.&#x20;

<figure><img src="https://3609403033-files.gitbook.io/~/files/v0/b/gitbook-x-prod.appspot.com/o/spaces%2FZJAMIKVcqchSDbt4A7DE%2Fuploads%2F7jFGuqQmYkbyKKrsV7CA%2Fimage.png?alt=media&amp;token=fee25ebc-2532-4510-8fa4-259d6986369b" alt=""><figcaption><p>Configure action</p></figcaption></figure>

Finally choose what [attribute](/pim3/fundamental-concepts/attributes) the result should be written to.

{% hint style="info" %}
**Note** By clicking the operator between the values you can choose the operator (x,/,+,-).
{% endhint %}


# How to automate price conversion

Business rules allow you to automate price conversion between different currencies

When working with business rules you can change a specific localized value of an [attribute](/pim3/fundamental-concepts/attributes). This makes it possible to convert the local price to other currencies.

Start by making a Business rule that [triggers](/pim3/reference/product-model-setup/business-rules/business-rule-details/triggers/trigger-details) when the price [attributes](/pim3/fundamental-concepts/attributes) change.

<figure><img src="https://3609403033-files.gitbook.io/~/files/v0/b/gitbook-x-prod.appspot.com/o/spaces%2FZJAMIKVcqchSDbt4A7DE%2Fuploads%2FmgaNDvzCTkbjAgNAUvpU%2Fimage.png?alt=media&amp;token=2463ca25-2a88-45bd-8ff3-2857f06683ec" alt=""><figcaption><p>Business rule setup page</p></figcaption></figure>

Then make [conditions](/pim3/reference/product-model-setup/business-rules/business-rule-details/conditions/condition-details) to check if the price was set. This can be done by checking if the price was empty before.

<figure><img src="https://3609403033-files.gitbook.io/~/files/v0/b/gitbook-x-prod.appspot.com/o/spaces%2FZJAMIKVcqchSDbt4A7DE%2Fuploads%2FOPytquPi94GshA704opf%2Fimage.png?alt=media&amp;token=778aea8d-10e6-46a1-ac5d-eb7a493bb1de" alt=""><figcaption><p>Business rule setup page</p></figcaption></figure>

Within each [condition](/pim3/reference/product-model-setup/business-rules/business-rule-details/conditions/condition-details) you can then set up an [action](/pim3/reference/product-model-setup/business-rules/business-rule-details/actions/action-details) to convert the price. In this example the List Price (EUR) is converted to List Price (DKK).&#x20;

<figure><img src="https://3609403033-files.gitbook.io/~/files/v0/b/gitbook-x-prod.appspot.com/o/spaces%2FZJAMIKVcqchSDbt4A7DE%2Fuploads%2FWxxi6otKh9QnhU5aAluP%2Fimage.png?alt=media&amp;token=e5da6c9c-c924-4022-9534-ee1e11c28b75" alt=""><figcaption><p>Configure action</p></figcaption></figure>


# How to assign documents to a product when it is created

Business rules allow you to automatically attach existing images or pdf-files to newly created products depending on certain conditions.

Create a business rule with a "product is created"-[trigger](/pim3/reference/product-model-setup/business-rules/business-rule-details/triggers/trigger-details).  Then set up [conditions](/pim3/reference/product-model-setup/business-rules/business-rule-details/conditions/condition-details) that will check what kind of documents that should be attached.\
\
In this example the [attribute](/pim3/fundamental-concepts/attributes) "Article" is checked.&#x20;

<figure><img src="https://3609403033-files.gitbook.io/~/files/v0/b/gitbook-x-prod.appspot.com/o/spaces%2FZJAMIKVcqchSDbt4A7DE%2Fuploads%2FtZg3WZKW2X6SPWke5tlq%2Fimage.png?alt=media&amp;token=abe9e9bb-d2a3-4c07-a0c2-980835549684" alt="" width="563"><figcaption></figcaption></figure>

If the [attribute](/pim3/fundamental-concepts/attributes) is a type we know needs a document attached we can update that document using the "Update attribute"-action.\
\
In this case the Documents [attribute](/pim3/fundamental-concepts/attributes) is updated.

<figure><img src="https://3609403033-files.gitbook.io/~/files/v0/b/gitbook-x-prod.appspot.com/o/spaces%2FZJAMIKVcqchSDbt4A7DE%2Fuploads%2FQiWXzqu457qt9fuekfl0%2Fimage.png?alt=media&amp;token=a60ce5e9-9d85-4785-84d6-b39cd17f6ab8" alt="" width="563"><figcaption></figcaption></figure>

The "else"-case is left empty so if future products that does not fit into the other [conditions](/pim3/reference/product-model-setup/business-rules/business-rule-details/conditions/condition-details) are created they will not have documents attached to them.&#x20;


# How to manage product identifiers

Sometimes you will want to update the product identifier when attributes change, setting up a business rule to handle it can save time in the long run. To do so set up a rule with a "product is created or updated" trigger.  Then set up an action that updates the product identifier. In this example the action that is used is the Copy value action copying the General.ID attribute to the Product identifier.&#x20;

<figure><img src="https://3609403033-files.gitbook.io/~/files/v0/b/gitbook-x-prod.appspot.com/o/spaces%2FZJAMIKVcqchSDbt4A7DE%2Fuploads%2F3KYVwCUZ6PxvHvXiY8UF%2Fimage.png?alt=media&amp;token=dab6a87f-ee6d-4d09-80cd-ace78e8770ba" alt=""><figcaption></figcaption></figure>


# Example projects


# Segmentation


# Attribute scopes


# Workflow


# Rollback changes


# Working with the API

Get an introduction into working with the Struct PIM Api from Visual Studio and C#

### About the demo project

Use this demo project to get familiar with the Web API. This project shows examples of getting product-, variant and category data as well as how to create and update these.

Furthermore, examples are shown on how to search products and work with global lists through the API.

For full documentation of the API, view the [API reference](https://techdoc.struct.com/api-reference/)

### Getting started

The project is a complete Visual Studio solution, using the Struct.PIM.Api.Client, available in Nuget, to fetch data from a Struct PIM instance.

All you need to do, is unzip the downloaded project and set up the Url for your Struct PIM instance as well as an API key for that instance and you are good to go.

{% file src="/files/WO6TgadVGKy7o1mEX3kL" %}
Download demo project here
{% endfile %}

### Autogenerate C# classes

We provide a T4Template which, using the API, can autogenerate C# classes for you matching the models in Struct PIM, yielding strongly typed models for you to use with the API.

{% file src="/files/xTU8Lj35bLKmzvQhoCCX" %}
Download T4Template here
{% endfile %}

### TLS

Depending on the environment you are connecting to you may need to specify TLS.

For the application using the Struct.PIM.Api.Client, specify below:

```csharp
ServicePointManager.SecurityProtocol = SecurityProtocolType.Tls12
```


# Product viewer

The product viewer is a fully featured website showing product catalogues in Struct PIM with filters, product listings, product details.

### About the project

The product viewer is a website template showing product catalogues in Struct PIM with filters, product listings, product details etc. The source code for the platform is publicly available, allowing for easy branding of the site as well as customization of the standard functionality.

<figure><img src="https://3609403033-files.gitbook.io/~/files/v0/b/gitbook-x-prod.appspot.com/o/spaces%2FZJAMIKVcqchSDbt4A7DE%2Fuploads%2FY7GixPZKByTsQ154bsv5%2Fproductviewer-listing-1.png?alt=media&amp;token=0af575b6-d439-4199-a2d4-0c1c844046dd" alt=""><figcaption><p>Struct PIM product viewer listing</p></figcaption></figure>

The project is a separate website that uses the Struct PIM API to get product data, which is then indexed to an Elastic cluster, from where it is served to the website. The integration is built as a template demonstrating how to map data from Struct PIM for use at a website, with the Struct demo data set as the foundation.

The project is hosted in bitbucket and available to everyone.

{% embed url="<https://bitbucket.org/structdk/struct.pim.productviewer>" %}
See project on bitbucket
{% endembed %}


# Publications 3.15

Version 3.15 introduced new features like full screen editing, complete editor experience for all elements of template including header/footer.

### New and optimized experience building publication templates <a href="#new-and-optimized-experience-building-publication-templates" id="new-and-optimized-experience-building-publication-templates"></a>

Building a template for Publication can be quite complex with a lot of different features and ways of implementation to consider.

To simplify and accomodate this, only one template type exist. This template type can deliver any data output depending on how it is setup.

A template is now split in to main areas; Settings and Setup.

**Settings**

Settings contains all configuration of the template. All settings from description, reference, output, data input to advanced features like header/footer, table of contents and category pages.

These settings defines what input is possible for the template in design and what the final output of the template will be.

**Design**

The new and improved design of template supports building custom content, header/footer on all levels like product pages, table of content and category pages.

\
To improve performance especially around header/footer a new concept of elements have been introduced.

<figure><img src="https://3609403033-files.gitbook.io/~/files/v0/b/gitbook-x-prod.appspot.com/o/spaces%2FZJAMIKVcqchSDbt4A7DE%2Fuploads%2FfIAJQGEJiplU1DaNGewm%2Fscreenshot-2024-07-10-225333.png?alt=media&amp;token=b9e6a499-3fed-49dd-841f-a6e92f25632a" alt=""><figcaption><p>Elements</p></figcaption></figure>

This makes it possible to construct the content of the header/footer by placering any number of elements in its container.

These elements include text, html, image and background. The text element now supports full template conversion, using all data available through content. This can significantly improve performance as all elements, except html, can be directly drawn in the resulting PDF.

<figure><img src="https://3609403033-files.gitbook.io/~/files/v0/b/gitbook-x-prod.appspot.com/o/spaces%2FZJAMIKVcqchSDbt4A7DE%2Fuploads%2FexPy6JqazHfFF80XFtc5%2Fscreenshot-2024-07-10-230323.png?alt=media&amp;token=926f7a8a-1727-403b-954a-815d2f6b32c0" alt=""><figcaption><p>Element types</p></figcaption></figure>

Aside from performance improvement, all elements depending on data, now have full preview/data experience. This will make all work with elements like header/footer, table of content and category pages much easier, as actual data is available for the editor to see.

<figure><img src="https://3609403033-files.gitbook.io/~/files/v0/b/gitbook-x-prod.appspot.com/o/spaces%2FZJAMIKVcqchSDbt4A7DE%2Fuploads%2FrPAZHCJ4VNuNDgM66tqP%2Fscreenshot-2024-07-10-225347.png?alt=media&amp;token=c12629c9-d150-4427-9bbb-c8318fb7946b" alt=""><figcaption><p>Data</p></figcaption></figure>

### Direct integration with EasyCatalogue <a href="#direct-integration-with-easycatalogue" id="direct-integration-with-easycatalogue"></a>

Through the new Prints in Publication you can connect to Struct PIM directly from EasyCatalogue.

Download example template [here](https://techdoc.struct.com/media/fbofalnz/easy-catalogue-base.json) and import into your Struct PIM instance.

Notice when constructing a template for Easy Catalogue it is important to use below tag structure.

<figure><img src="https://3609403033-files.gitbook.io/~/files/v0/b/gitbook-x-prod.appspot.com/o/spaces%2FZJAMIKVcqchSDbt4A7DE%2Fuploads%2FqTQacklKwTEnJL4R2oyC%2Fscreenshot-2024-10-29-085447.png?alt=media&amp;token=49b53f79-7b60-4813-957f-67ce7a3af3fa" alt=""><figcaption><p>EasyCatalogue</p></figcaption></figure>

"Type"-property with "Product" identify where the initial rows start for EasyCatalogue to read.

"type"-property can be used for describing complex structures. Currently two types are supported:

* Complex\
  This enables EasyCatalogue to see this element as a complex object where below tags will be individual properties.
* Table\
  This enables EasyCatalogue to see this element as a table where below tags are individual rows.


# Integrate with Struct PIM


# Web API

Struct PIM ships with a standard REST Api, that allows for any interaction with Struct PIM resources. Use this to integrate your applications with Struct PIM

### About the API <a href="#about-the-api" id="about-the-api"></a>

The REST Api ships with every installation of Struct PIM. Access to the API is restricted by API keys issued within the Struct PIM application.

Newer versions of the API may include new features, but a major version (eg. v.3.) is always backwards compatible.

### C# API client

We provide a C# API client, available in the official Nuget feed (**Struct.PIM.Api.Client**). We recommend using this, if you are working in C#, as it gets you going a lot faster compared to wrapping the API yourself.

Find our demo projects [here](/pim3/tutorials/example-projects/working-with-the-api).

### API documentation <a href="#id-54383696" id="id-54383696"></a>

If you are implementing your integration using .NET and C#, we recommend having a look at our Demo project, which shows examples on how to get data through the Api and how to insert data using the Api. When you start implementing your integration to Struct PIM, you might want to go over the detailed [API documentation](https://techdoc.struct.com/api-reference).

### Performance

The API is build for updating and reading large amounts of data in short time. All areas has extended support for batching data together to make the updating as smooth as possible.

We do not recommend using the API as a direct source for presentation if performance is the main focus. \
You should always transfer the data needed for presentation, from the API, to a fast read and search friendly  cache layer.

This ensures optimal performance at all times.&#x20;


# Webhooks

Struct PIM offers support for webhooks for external messaging in response to events in the system

### Implementing webhook endpoint <a href="#implementing-webhook-endpoint" id="implementing-webhook-endpoint"></a>

When you implement your webhook endpoint, you have to make sure that your endpoint responds on the url you have set up. Webhook requests are all POST requests and uses header information to tell your endpoint what kind of request you are receiving, whereas the request body contains the actual payload of the request.

<table><thead><tr><th width="227">Request header key</th><th>	Description</th></tr></thead><tbody><tr><td>X-Event-Key</td><td>This header contains an identification of the event type, which can be products.created, products.updated, products.deleted, variants.created, variants.updated, variants.deleted, category.created, category.updated, category.deleted, globallistvalue.created, globallistvalue.updated, globallistvalue.deleted</td></tr><tr><td>X-Hook-UID</td><td>Contains the unique id of the webhook you have configured in StructPIM</td></tr><tr><td>X-Request-UID</td><td>Contains a unique id identifying this particular webhook request</td></tr></tbody></table>

### Setting up webhooks <a href="#setting-up-webhooks" id="setting-up-webhooks"></a>

You can manage webhooks in the Settings -> Webhooks page. Here you can set up as many webhooks as needed. Each webhook is set up to point to an address, to which an http request is be made, when an event happens in Struct PIM. You can activate or deactivate each webhook and select which events to send to the endpoint.

<figure><img src="https://3609403033-files.gitbook.io/~/files/v0/b/gitbook-x-prod.appspot.com/o/spaces%2FZJAMIKVcqchSDbt4A7DE%2Fuploads%2FsqLJU0ZR4CQul6Qr8aAe%2Fwebooks1.png?alt=media&amp;token=2e61c37e-aef2-431a-8199-7d844a0015a4" alt=""><figcaption><p>Setting up webhooks</p></figcaption></figure>

### Advanced settings <a href="#advanced-settings" id="advanced-settings"></a>

The Products updated, Variants updated and Categories updated webhook events supports setting up advanced settings when enabled.

<figure><img src="https://3609403033-files.gitbook.io/~/files/v0/b/gitbook-x-prod.appspot.com/o/spaces%2FZJAMIKVcqchSDbt4A7DE%2Fuploads%2FhtsPhXHtzclqnWvptG54%2Fwebhooks-advanced-settings.png?alt=media&amp;token=c438f740-1f13-4b6c-81ae-6ea877edcf7a" alt=""><figcaption><p>Webhooks advanced settings</p></figcaption></figure>

#### Conditional triggering

In the advanced settings dialog, you can select between conditional triggering and non-conditional triggering

**Conditional triggering disabled**

When conditional triggering is disabled, all events of the selected type are propagated as webhook events

**Conditional triggering enabled**

When conditional triggering is enabled, you can select the type of changes on the entity that shall make the webhook event trigger.

For the product updated event, the following conditions can be controlled in the advanced settings of the webhook

* **Category updates** - Only trigger when the product classifications have changed
* **Product structure updates** - Only trigger when the product structure has changed
* **Variation definition updates** - Only trigger when the variation definition has changed
* **Archiving status update** - Only trigger when the product archiving status has changed
* **Attribute updates**
  1. *Do not fire -* Do not trigger on attribute updates at all
  2. *Fire on all attribute updates* - Trigger the webhook whenever an attribute value is updated
  3. *Fire on specific attribute updates* - Only trigger when the selected attributes are updated

#### Data mode

Besides conditional triggering, you can select between two data modes in advanced settings.

**Default data mode**

When default is selected, the entity (product, variant or category) ids are sent in the payload along with the transaction uid

**Include changeset mode**

When Include changeset mode is selected, information on what changes have happened are sent as payload in the webhook along with the ids of the entities

### Viewing webhook requests <a href="#viewing-webhook-requests" id="viewing-webhook-requests"></a>

At each webhook you can view the latest requests made to the webhook endpoint by clicking the *icon* at the right side of the webhook header.

<figure><img src="https://3609403033-files.gitbook.io/~/files/v0/b/gitbook-x-prod.appspot.com/o/spaces%2FZJAMIKVcqchSDbt4A7DE%2Fuploads%2FO0zl8GCbwSZBKx8UYLZg%2Fwebooks2.png?alt=media&amp;token=07f4390e-e390-4821-a31b-88acad5a5c1c" alt=""><figcaption><p>Webhook logs</p></figcaption></figure>

Click **View details** to see details on a specific request

<figure><img src="https://3609403033-files.gitbook.io/~/files/v0/b/gitbook-x-prod.appspot.com/o/spaces%2FZJAMIKVcqchSDbt4A7DE%2Fuploads%2FlsEPEaNZh7wHB1UFeEgC%2Fwebooks3.png?alt=media&amp;token=82e4d9ef-1464-4ebf-a9ad-6661103b49fb" alt=""><figcaption><p>View webhook request</p></figcaption></figure>

While developing and testing handling of webhooks, [webhook.site](https://webhook.site/) can also be a valuable resource. Go to the site, copy the unique webhook link and paste it into the relevant webhook settings in Struct PIM.&#x20;

Upon triggering the webhook in Struct PIM, webhook.site is live updated for you to examine the request and e.g. copy it into Postman for testing on a local machine. As it is a free service, the link will only work for a given number of requests after which you will have to generate a new link.


# Media format

Struct PIM supports formatting media directly through its media module based on querystring parameters.

The media module delivering assets provides methods to perform various manipulation functions on a given image or file based on querystring parameters.

### Supported query parameters

<table><thead><tr><th width="138.99993896484375" valign="top">Parameter</th><th>Description</th><th data-hidden>Usage</th></tr></thead><tbody><tr><td valign="top">width</td><td><p>For mode Pad passing just one dimension will automatically preserve the aspect ratio of the original image.</p><p>For mode BoxPad when upscaling an image the image pixels themselves are not resized, rather the image is padded to fit the given dimensions. If downscaling it will behave the same as Pad. </p><pre class="language-xml"><code class="lang-xml">?width=100
</code></pre></td><td></td></tr><tr><td valign="top">height</td><td><p>For mode Pad passing just one dimension will automatically preserve the aspect ratio of the original image.</p><p>For mode BoxPad when upscaling an image the image pixels themselves are not resized, rather the image is padded to fit the given dimensions. If downscaling it will behave the same as Pad. </p><pre><code>?height=10
</code></pre></td><td></td></tr><tr><td valign="top">format</td><td><p>Converts current asset to a new image format.</p><p></p><p>Supported image formats: jpg, png, webp, gif</p><p>Supported file to image formats: pdf, psd, eps </p><pre><code><strong>?format=webp
</strong></code></pre></td><td></td></tr><tr><td valign="top">mode</td><td><p>The following modes are supported:</p><ul><li>Pad<br>Passing a single dimension will automatically preserve the aspect ratio of the original image. If the requested aspect ratio is different then the image will be padded to fit. Widths and heights can optionally also be passed as a ratio<br>This is default.</li><li>BoxPad<br>When upscaling an image the image pixels themselves are not resized, rather the image is padded to fit the given dimensions. When downscaling the image is resized using the rules defined by Pad</li><li>Crop<br>Resizes the image to the given dimensions. If the set dimensions do not match the aspect ratio of the original image then the output is cropped to match the new aspect ratio.</li></ul><pre><code>&#x26;mode=boxpad
</code></pre></td><td></td></tr><tr><td valign="top">quality</td><td><p>Alters the output quality of the current image. This method will only effect the </p><p>output quality of images that allow lossy processing. </p><pre class="language-html"><code class="lang-html">&#x26;quality=90
</code></pre></td><td></td></tr><tr><td valign="top">anchor</td><td><p>Anchor positions supported:</p><ul><li>center</li><li>top</li><li>right</li><li>bottom</li><li>left</li><li>topleft</li><li>topright</li><li>bottomleft</li><li>bottomright</li></ul><p>Center is default.</p><pre class="language-html"><code class="lang-html">&#x26;mode=crop&#x26;anchor=top
</code></pre></td><td></td></tr><tr><td valign="top">bgcolor</td><td><p>When padding applied and or image includes transparency, it is possible to set the color of the padding/baggrund. </p><pre><code>&#x26;bgcolor=ffffff
</code></pre></td><td></td></tr></tbody></table>

### Examples

<figure><img src="https://3609403033-files.gitbook.io/~/files/v0/b/gitbook-x-prod.appspot.com/o/spaces%2FZJAMIKVcqchSDbt4A7DE%2Fuploads%2FnK3773NIlz2ud6Vnpgnk%2Fpexels-photo-414837.jpeg?alt=media&amp;token=e3418b08-9126-49a8-918f-ed5c4b2dde79" alt=""><figcaption><p>Original</p></figcaption></figure>

<figure><img src="https://3609403033-files.gitbook.io/~/files/v0/b/gitbook-x-prod.appspot.com/o/spaces%2FZJAMIKVcqchSDbt4A7DE%2Fuploads%2Fy1bPR8JgMloGlaLLMjPM%2Fpexels-photo-414837-width.jpeg?alt=media&amp;token=d827c4c1-c7ad-4e5d-9410-8401ec04868f" alt=""><figcaption><p>?width=250</p></figcaption></figure>

<figure><img src="https://3609403033-files.gitbook.io/~/files/v0/b/gitbook-x-prod.appspot.com/o/spaces%2FZJAMIKVcqchSDbt4A7DE%2Fuploads%2FLON9ZH3IECNSIk0yIpjf%2Fpexels-photo-414837-anchor.jpeg?alt=media&amp;token=22f40a35-89dc-40a7-b1c5-483393c546cb" alt=""><figcaption><p>?width=550&#x26;height=550&#x26;mode=crop&#x26;anchor=left</p></figcaption></figure>

<figure><img src="https://3609403033-files.gitbook.io/~/files/v0/b/gitbook-x-prod.appspot.com/o/spaces%2FZJAMIKVcqchSDbt4A7DE%2Fuploads%2FTFmy1XiL8Ymv9Rzi8SBs%2Fpexels-photo-414837-boxpad.jpeg?alt=media&amp;token=cdd4447f-335f-491e-9a65-cefe6986816c" alt="" width="563"><figcaption><p>?width=1100&#x26;height=1100&#x26;mode=boxpad&#x26;bgcolor=lightblue</p></figcaption></figure>


# How to use Struct PIM

Learn how to configure and use Struct PIM. This section contains information on everything from the simple things to the more complex configuration settings

<table data-card-size="large" data-view="cards"><thead><tr><th></th><th data-type="content-ref"></th><th data-type="content-ref"></th><th data-type="content-ref"></th><th data-type="content-ref"></th><th data-type="content-ref"></th><th data-hidden></th><th data-hidden></th><th data-hidden></th><th data-hidden data-card-target data-type="content-ref"></th></tr></thead><tbody><tr><td><strong>Data modelling</strong><br></td><td><a href="/pim3/reference/product-model-setup/product-structures">Product structures</a></td><td><a href="/pim3/reference/product-model-setup/attributes">Attributes</a></td><td><a href="/pim3/reference/product-model-setup/attribute-groups">Attribute groups</a></td><td><a href="/pim3/reference/product-model-setup/attribute-scopes">Attribute scopes</a></td><td><a href="/pim3/reference/global-lists">Global lists</a></td><td></td><td></td><td></td><td><a href="/pim3/reference/product-model-setup/product-structures">Product structures</a></td></tr><tr><td><strong>Products, Variant groups and Variants</strong>      </td><td><a href="/pim3/reference/search">Search</a></td><td><a href="/pim3/reference/product-catalogues">Product catalogues</a></td><td><a href="/pim3/reference/collections">Collections</a></td><td><a href="/pim3/reference/import">Import</a></td><td></td><td></td><td></td><td></td><td></td></tr><tr><td><strong>Track data</strong><br></td><td><a href="/pim3/reference/dashboard">Dashboard</a></td><td><a href="/pim3/reference/product-model-setup/enrichment-insights">Enrichment Insights</a></td><td><a href="/pim3/reference/tasks">Tasks</a></td><td></td><td></td><td></td><td></td><td></td><td></td></tr><tr><td><strong>Setup</strong><br></td><td><a href="/pim3/reference/settings/security">Security</a></td><td><a href="/pim3/reference/settings/languages">Languages</a></td><td><a href="/pim3/reference/settings/file-mappings">File mappings</a></td><td><a href="/pim3/reference/settings/ai-assistant">AI assistant</a></td><td></td><td></td><td></td><td></td><td></td></tr></tbody></table>


# Search

Find and manage entities in PIM. Use the fast search to find the entities required and reuse any search as a saved search for even faster access or link in your dashboard.

Using the search-page you can efficiently search for entities in the PIM. By adding columns and filtering on them you can find entities that match your exact needs. To learn how to utilize the search more efficiently read the [Search help-page](/pim3/reference/search/search-help).

### Select entity to search

1. Click dropdown "What to search for"
2. Select entity type from list

{% hint style="info" %}
Entity types supported in Search is

* Product
* Variant group
* Variant
* Category
  {% endhint %}

### Manage columns

1. Click "Columns"
2. Read more about how to manage columns here: [Manage columns](#manage-columns)

### Find entity

1. Click on any column header
2. Type value to search for

{% hint style="info" %}
**Tip** To read about how to search more effectively, read here: [Search help](/pim3/reference/search/search-help)
{% endhint %}

### Edit entity

1. Click on any value in the matched entity row&#x20;

### Copy entity

1. Select an entity
2. Click "Actions"-button
3. Click "Copy"
4. Click "Create copy"

### Bulk actions

1. Select one or more entities
2. Click "Actions"-button
3. Read more about available bulk actions [here](/pim3/reference/search/bulk-actions)

### Apply filter

1. Click "Filter"-icon&#x20;
2. Select field
3. Type values
4. Click "OK"

To remove filter again click "Remove"-icon on applied filter

### Apply saved search

1. Click "Saved searches"-dropdown
2. Choose an option

{% hint style="info" %}
**Note** Read about how to create saved searches here: [Saved searches](/pim3/reference/dashboard/saved-searches).
{% endhint %}

### Quick Export

Export all rows with selected columns as an .xlsx file

1. Click "Quick export"-icon

### Include Archived

This will include archived entities in search.

1. Click "Included archived"-icon

### Adjust page size

1. Click dropdown Page size

{% hint style="info" %}
Page sizes supported

* 10
* 25
* 50
* 100
* 500

Selected page size is stored in a cookie.
{% endhint %}


# Manage columns

Managing columns allow you to customize the data fields you see on the Search page, giving you a better experience when searching through entities.

You can manage columns on the Search page through [Search](/pim3/reference/search) > [Columns](/pim3/reference/search/manage-columns).

### Add column

1. Click "Add data field"
2. Select data field
3. Click "OK"

### Edit column

1. Click "Edit"-icon
2. Select data field
3. Click "OK"

### Remove column

1. Click "Delete"-icon
2. Click "OK"

### Apply view setting

1. Click "Choose view setting"-dropdown
2. Select view setting
3. Click "OK"

### Save view setting

1. Click "Save as"
2. Set Name
3. Click "Save"

### Edit view setting

1. Apply view setting
2. Modify columns
3. Click "Save"

### Delete view setting

1. Apply view setting
2. Click "Delete"-icon


# Bulk actions

Perform numerous bulk actions across your entities. Be guide through both bulk and mass editing abilities.

{% hint style="warning" %}
**Note** This page assumes you have already selected the product(s) you want to apply an action to and clicked the "Actions"-button.
{% endhint %}

### Bulk update

1. Click "Bulk update"
2. Select data field you wish to update
3. Click "Next"
4. Enter new value
5. Click "Confirm"

### Update sequentially

1. Click "Update sequentially"
2. Select the data field(s) to work with
3. Update data field(s)
4. Click "Save changes"

### Restore inheritance

1. Click "Restore inheritance"
2. Select the data field(s) to restore inheritance for
3. Click "Restore inheritance"

### Create task

1. Click "Create task"
2. Set Title and Responsible along with additional [details](/pim3/reference/tasks/task-details)
3. Click "Create task"

### Classify

1. Click "Classify"
2. Choose classification option
3. Click "Next"
4. Select one or more categories
5. Click "Next"
6. Click "Confirm"

### Merge

1. Click "Merge"
2. Select product structure to user after merge
3. Click "Confirm"

{% hint style="danger" %}
**Note** Merging of products cannot be undone.
{% endhint %}

### Export

1. Click "Export"
2. Select exporter
3. Configure export
4. Click "Download"

### Archive

1. Click "Archive"
2. Select archive reason
3. Confirm you understand the consequences of archiving
4. Click "Archive X Products"

### Add to workbench

1. Click "Add to workbench"
2. Select workbench
3. Click "Confirm"

### Export publication

1. Click "Export publication"
2. Set Template, Size, Language(s) and Segments to use for rendering
3. Click "Next"
4. Set Product catalogue
5. Click "Build"

### Change product structure

1. Click "Change product structure"
2. Set Product structure
3. Click "Next"
4. Click "Confirm"

### Delete

1. Click "Delete"
2. Tick confirmation box
3. Click "Confirm"


# Search help

Searches in Struct PIM can be highly customized by using specific syntax.

{% hint style="info" %}
By default the system searches for results that starts with the value you have written in the search box. You are able to refine the search in different ways described below.
{% endhint %}

## Operators

A number of different search operators can be used to make complex queries.

<table><thead><tr><th width="231">If you search for:</th><th>Search will return:</th></tr></thead><tbody><tr><td><strong>struct</strong></td><td>all items where the value starts with <strong>struct</strong></td></tr><tr><td><strong>*struct</strong></td><td>all items where the value contains <strong>struct</strong></td></tr><tr><td><strong>"struct"</strong></td><td>all items where the value equals exactly <strong>struct</strong></td></tr><tr><td><strong>!struct</strong></td><td>all items where the value does not start with <strong>stuct</strong></td></tr><tr><td><strong>!*struct</strong></td><td>all items where the value does not contain <strong>struct</strong></td></tr><tr><td><strong>!"struct"</strong></td><td>all items where the value is not equal to <strong>struct</strong></td></tr><tr><td><strong>""</strong></td><td>all items where this value is empty</td></tr><tr><td><strong>!""</strong></td><td>all items where this value is not empty</td></tr><tr><td><strong>*&#x3C;</strong></td><td>all items where the value contains the character &#x3C;</td></tr></tbody></table>

## Numeric fields

<table><thead><tr><th width="230">If you search for:</th><th>Search will return:</th></tr></thead><tbody><tr><td><strong>>5</strong></td><td>all items where the value is larger than 5</td></tr><tr><td><strong>&#x3C;5</strong></td><td>all items where the value is less than 5</td></tr><tr><td><strong>>5&#x26;&#x26;&#x3C;10</strong></td><td>all items where the value is <strong>larger than 5 and less than 10</strong></td></tr></tbody></table>

## Date/date time fields

For date or datetime fields you can search for distances from the current date in the following ways

<table><thead><tr><th width="230">If you search for:</th><th>Search will return:</th></tr></thead><tbody><tr><td><strong>>-30d</strong></td><td>all items where the date is larger than now - 30 days</td></tr><tr><td><strong>&#x3C;30d</strong></td><td>all items where the date is smaller than now + 30 days</td></tr></tbody></table>

{% hint style="info" %}
y = years, M = months, w = weeks, d = days, h = hours and m = minutes
{% endhint %}

## Multiple searches in same field

The system supports following boolean operators for making multiple queries in the same field

<table><thead><tr><th width="230">If you search for:</th><th>Search will return:</th></tr></thead><tbody><tr><td><strong>[query1]&#x26;&#x26;[query2]</strong></td><td>all items where the value is included in both query1 and query2</td></tr><tr><td><strong>[query1]||[query2]</strong></td><td>all items where the value is included either in query1 or query2</td></tr></tbody></table>


# Tasks

Get every team member on the same page with the easy-to-use task management with user assignment and product attachment capabilities

### View task

Tasks are shown directly in the Tasks tab. Click on a task to view information about it.

### Filter tasks

Tasks can be filtered by five different options:

* Assigned to me
* All assigned to me
* Open tasks I have created
* All tasks I have created
* All tasks

### Find task

1. Click column header for Title, Status, Deadline, Responsible, Created or Unread comments
2. Type value to search for

{% hint style="info" %}
**Tip** When searching in text it defaults to a "Contain" search. If exact match is required wrap the search text in quotes like "text to search for".

Searching in numeric values supports less or greater than like <5 or >10.
{% endhint %}

### Add a new task

1. Click "Create task"
2. Set Title and Responsible along with additional [details](/pim3/reference/tasks/task-details)
3. Click "Create task"

### Edit task

1. Click "Edit"-icon
2. Modify the task [details](/pim3/reference/tasks/task-details)
3. Click "Update task"

### Delete task

1. Click "Delete"-icon
2. Confirm delete

### Bulk update tasks

1. Select the tasks you wish to bulk update
2. Click the icon corresponding to the property you wish to edit
3. Set a new value
4. Click "Set property"

### Bulk delete tasks

1. Select the tasks you wish to bulk delete
2. Click the appearing "Trash can"-icon
3. Click "OK" on the confirmation dialog

### Pin a task to the sidebar

1. Click the "Pin"-icon of the task you wish to pin


# Task details

Details that define and describe the task.

You can add or update tasks through [Tasks](/pim3/reference/tasks)

### Title

The title of the task

### Description

The description for the task

### Responsible

One or more users or user groups who are responsible for the task

### Deadline

The date of the deadline

### Attached entities

Entities attached to the task for the responsible to work with

### File attachment

Uploaded files relevant to the task


# Global lists

Global lists are used to create predefined lists of entities that can be referenced on products, variants, categories or even other global lists.

You can add or update global lists through [Global lists](/pim3/reference/global-lists).

### View global list

Global lists are shown directly in the Global lists page.

### Find global list

1. Click column header for Name or Alias
2. Type value to search for

{% hint style="info" %}
**Tip** To read about how to search more effectively, read here: [Search help](/pim3/reference/search/search-help)
{% endhint %}

### Add a new global list

1. Click "Create new global list"
2. Set Alias, Backoffice name and Data type along with additional [details](/pim3/reference/global-lists/global-list-details)
3. Click "Save global list configuration"

### Edit global list

1. Click "Edit"-icon
2. Modify the global list [details](/pim3/reference/global-lists/global-list-details)
3. Click "Save global list configuration"

### Delete global list

1. Click "Delete"-icon
2. Confirm delete

### View values of global list

1. Click on a global list

### Create folder

1. Right-click Global list menu
2. Click "Create folder"
3. Set Name of the folder
4. Click "Create"

{% hint style="info" %}
Read more about Global lists here: [Global lists](/pim3/fundamental-concepts/global-lists).
{% endhint %}


# Global list details

Details that define and describe the global list.

You can add or update global lists through [Global lists](/pim3/reference/global-lists).

### Alias

A unique alias to the global list, which can be used to reference the list elsewhere in the system.

### Backoffice name

The name the global list will be displayed by within the backoffice.

### Backoffice description

Description to display along with the global list when shown in the backoffice.

### Display name

A display name to use when this global list is displayed in any channel outside of PIM. The display name is localized.

### Data type

The date type of the attribute. The chosen datatype will reveal additional [details](/pim3/reference/product-model-setup/attributes/attribute-details/data-type-details).

### Key definition

The subattribute(s) to use as key in the global list. If left empty, all subattributes are considered as key.

### Key is case insensitive

Determines whether key should act as case insensitive. By default keys are case sensitive.

### Requires sorting

Determines whether values must be sorted upon creation. If true, the user must sort the item when creating.

### Localize data

Determines whether data for this attribute is localized.

### View permission

Determines whether a permission is required in order to see this global list.

### Create permission

Determines whether a permission is required in order to create values in this global list.

### Edit permission

Determines whether a permission is required in order to edit values in this global list.

### Delete permission

Determines whether a permission is required in order to delete values in this global list.


# Product catalogues

Catalogues can be used for many purposes such as managing different assortments, sales channel specific structures etc.

You can add or update product catalogues through Product catalogues.

{% hint style="info" %}
**Guide** See a short walkthrough of how product catalogues can be used in Struct PIM [here](/pim3/tutorials/helpful-guides/how-to-use-product-catalogues).
{% endhint %}

### Add a new product catalogue

1. Click "Create new catalogue" on Product catalogues page
2. Set Alias and Label along with additional [details](/pim3/reference/product-catalogues/product-catalogue-details)
3. Click "Display settings"
4. Set Catalogue display name and pattern
5. Click "Create catalogue"

{% hint style="info" %}
To create a new product catalogue a single attribute must be added to select in "Display settings". See [Product catalogue details](/pim3/reference/product-catalogues/product-catalogue-details).
{% endhint %}

### Edit product catalogue

1. Click "Edit"-button
2. Modify the product catalogue [details](/pim3/reference/product-catalogues/product-catalogue-details)
3. Click "Save changes"

### Delete product catalogue

1. Click "Delete"-icon
2. Confirm delete

### Sort product  catalogues

1. Right-click the "Product catalogue"-tab in the navigation drawer
2. Click "Sort catalogues"
3. Drag and drop catalogues to sort them
4. Click "Save sorting"

{% hint style="info" %}
Read more about catalogues and categories here: [Catalogues & categories](/pim3/fundamental-concepts/catalogues-and-categories).
{% endhint %}


# Product catalogue details


# General settings

Add alias and label to the catalogue.

### Alias

A unique name for the catalogue.

### Label

The name of the catalogue that will be used when displaying the catalogue in the PIM.


# Data model

Set up tabs, sections and properties for categories in the catalogue


# Tab types

Tab types for product catalogues.

### Attribute management

Allows users to add attributes to the category which shall be available to products placed within this category.

### Dynamic tab

Allows users to add [sections](/pim3/reference/product-catalogues/product-catalogue-details/data-model/section-types).

### External tab

Allows users to embed a website into the tab.


# Tab details

Additional details when adding a tab to a Product catalogue.

## Settings

### Label

A label for the tab.

### Show Sidebar

Determines if the product information sidebar is shown in the product catalogue.

### External URL

The external URL for the external tab. To have parameters with PIM values in the URL, put the alias in curly brackets such as {alias}. The PIM internal ID is referred to by {PIM\_id}.

{% hint style="info" %}
Different settings are available depending on the chosen [tab type](/pim3/reference/product-catalogues/product-catalogue-details/data-model/tab-types).
{% endhint %}

## Security

### Create a new permission

1. Click the '+'-icon on the 'View permission- or 'Edit permission'-selector
2. Set Permission group, Name and Description
3. Click 'Create Permission'

### View permission

Determines if a permission is required in order to see this tab.

### Edit permission

Determinues if a permission is required in order to edit values in this tab.


# Section types

Section types for product catalogues.

### Dynamic section

Allows users to add [properties](/pim3/reference/product-catalogues/product-catalogue-details/data-model/property-types) of their choice.

### Notes section

Allows the user to add notes.


# Section details

Additional details when adding sections to a tab.

## Settings

### Headline

The headline used for the section

### Description

A description for the section

### Collapse

Determines if a section is expanded or collapsed by default when loading the entity. If this option is checked the section is collapsed, if left unchecked the section is expanded by default.

{% hint style="info" %}
Different settings are available depending on the chosen [section type](/pim3/reference/product-catalogues/product-catalogue-details/data-model/section-types).
{% endhint %}

## Security

### Create a new permission

1. Click the '+'-icon on the 'View permission- or 'Edit permission'-selector
2. Set Permission group, Name and Description
3. Click 'Create Permission'

### View permission

Determines if a permission is required in order to see this section.

### Edit permission

Determines if a permission is required in order to edit values in this section.


# Property types

Property types for product catalogues.

### Attribute

Allows the user to manage the values of an attribute. For more information, see: [Attributes](/pim3/fundamental-concepts/attributes).

### Created

Displays the creation time and date of the category.

### Entity references

Displays a list of entities referencing this category.

### Internal Id

Displays the internal id of the category.

### Last modified

Displays the time and date of the last modification to the category.

### Workflow state selector

Allows the user to manage the workflow state of the category.


# Property details

Additional details when adding a property to a section.

## Attribute settings

### Attribute

The attribute to add to the section.

### Read only

Determines if the attribute shall be read only on this configuration.

### Mandatory

Determines if the attribute shall be mandatory on this configuration.

### Unchangeable

Determines if the value is unchangeable once it has been set.

## Entity references settings

### Property label

The label to show for the property in the backoffice.

### Property description

The description to show for the property in the backoffice.

### Referencing item type

The item type of the referencing items to show.

### Referencing attribute

The attribute to show references for.

## Security

### Create a new permission

1. Click the '+'-icon on the 'View permission- or 'Edit permission'-selector
2. Set Permission group, Name and Description
3. Click 'Create Permission'

### View permission

Determines if a permission is required in order to see this property.

### Edit permission

Determines if a permission is required in order to edit values in this property.


# Workflow

Setup a creation wizard to use when creating a new category in this catalogue.

### Add a creation wizard to the product catalogue

1. Click "Create wizard" on the Workflow page
2. Click "Save changes"

### Delete creation wizard

1. Click "Delete"-icon on
2. Click "Save changes"

### Add steps to the creation wizard

1. Click "+ Add step" on the Workflow page
2. Set headline and description
3. Click "Submit"
4. Add properties to the step
5. Click "Save changes"

### Edit creation wizard step

1. Click "Edit"-button
2. Change the attributes you wish to edit
3. Click "Submit"
4. Click "Save changes"

### Delete creation wizard step

1. Click "Delete"-button
2. Click "Save changes"

### Add properties to steps

1. Click "+ Add property to step" on the Workflow page
2. Select an attribute
3. Check the "Mandatory"-toggle if the attribute is mandatory
4. Click "Submit"
5. Click "Save changes"

### Edit properties of steps

1. Click the property you want to edit
2. Change the attributes you wish to edit
3. Click "Submit"
4. Click "Save changes"

{% hint style="info" %}
To create a new creation wizard it must have at least one step. In addition that step must have at least one property.
{% endhint %}


# Display settings

Display settings determine how a category is named in the PIM. The naming consists of a name pattern and one or more properties.

### Name attributes

The attributes used to display the naming in PIM.

### Name pattern

Name pattern dictates how property values should be used to render the name. Use {0}, {1}, {2} etc. to indicate in the pattern where you want attributes you choose to be rendered.


# Identifiers

Add  identifiers to categories in the catalogue

### Add an identifier to product catalogues

1. Click "Add category identifier" on the Identifiers page
2. Set alias, pattern and properties
3. Click "Save changes"

### Edit identifiers on product catalogues

1. Change the alias, pattern or properties value of the identifier you wish to edit
2. Click "Save changes"

### Delete identifiers on product catalogues

1. Click the "Trash can"-icon on the Identifiers page
2. Click "Save changes"

{% hint style="info" %}
Read more about Identifiers here: [Identifiers](/pim3/fundamental-concepts/identifiers).
{% endhint %}


# Identifier details

Additional details when adding an identifier

### Alias

The alias of the identifier.

### Pattern

Pattern dictates how property values should be used to render the identifier. Use {0}, {1}, {2} etc. to indicate in the pattern where you want attributes you choose to be rendered.

### Properties

The properties whose value are used to render the identifier.


# Catalogues (Temp)

You can create or sort categories through [Product catalogues](/pim3/reference/product-catalogues) > [Catalogues](/pim3/reference/product-catalogues/catalogues-temp)

### Copy product catalogue

1. Right-click the catalogue you want to copy in the navigation drawer
2. Click "Copy catalogue" in the appearing menu
3. Set Alias, Label and choose whether to include products
4. Click "Copy catalogue"

### Create category

1. Right-click the catalogue you wish to add a category to
2. Choose between [Standard category](/pim3/fundamental-concepts/catalogues-and-categories#standard-category) and [Dynamic category](/pim3/fundamental-concepts/catalogues-and-categories#dynamic-category)
3. Click "Start creation"
4. Set the required attributes
5. Click "Create category"

### Sort categories

1. Right-click the catalogue which categories you wish to sort
2. Click "Sort categories"
3. Drag and drop categories to sort them
4. Click "Save sorting"


# Categories

You can manage categories through [Product catalogues](/pim3/reference/product-catalogues) > [Catalogues](/pim3/reference/product-catalogues/catalogues-temp) > [Categories](/pim3/reference/product-catalogues/catalogues-temp/categories)

### Edit category

1. Right-click the category you wish to edit
2. Make the changes you wish to edit
3. Click "Save changes"

### Create sub category

1. Right-click the category you wish to add a sub category to
2. Click "Create sub category"
3. See [Create category](/pim3/reference/product-catalogues/catalogues-temp#create-category)

### Delete category

1. Right-click the category you wish to delete
2. Click "Delete category"
3. Click "Delete category" to confirm deletion

### Copy category

1. Right-click the category you wish to copy
2. Set Include products if it is a standard category
3. Click "Copy category"

### Move category

1. Right-click the category you wish to move
2. Click the catalogue or category you wish to move the category to
3. Click "Move category"

### Sort items in category

1. Right-click the category you wish to sort
2. Click "Sort items in category"
3. Drag and drop items to sort them
4. Click "Save sorting"

### Export items sort order

1. Right-click the category for which you want to export the items sort order
2. Click "Export items sort order"
3. Click "Export"

### Import items sort order

1. Right-click the category for which you want to import items sort order
2. Click "Import items sort order"
3. Select your file with sort orders
4. Click "Next"
5. Approve changes
6. Click "Commit import"

### Create new product

1. Right-click the category you want to create a new product in
2. Select a product structure
3. Click "Start creation"
4. Set required attributes
5. Click "Create product"

### Edit classification query

1. Right-click the dynamic category for which you want to edit the classification query
2. Edit the ruleset as you wish, see [details](/pim3/reference/product-catalogues/catalogues-temp/categories/classification-query)
3. Click "Save rule setup"

{% hint style="info" %}
Editing classification query is only available on a dynamic category.
{% endhint %}


# Classification query

You can add or update rulesets through [Product catalogues](/pim3/reference/product-catalogues) > [Catalogues](/pim3/reference/product-catalogues/catalogues-temp) > [Categories](/pim3/reference/product-catalogues/catalogues-temp/categories) > Classification Query

### Add a ruleset

1. Click the "Circled plus"-icon
2. Set the condition(s) of the ruleset
3. Click "Save rule setup"
4. Review changes
5. Click "Confirm"

### Edit ruleset

1. Change the element(s) of the condition(s) of the ruleset you wish to edit
2. Click "Save rule setup"
3. Review changes
4. Click "Confirm"

### Delete ruleset

1. Click the "Trash can"-icon of the ruleset you wish to delete
2. Click "Save rule setup"
3. Review changes
4. Click "Confirm"

### Preview result of query

1. Click the "Eye"-icon


# Collections

Collections are dynamic categories, which associate products or variants based on a search query.

You can add or update collections through [Collections](/pim3/reference/collections).

### Add a new folder

1. Right-click the Collections-folder or a subfolder
2. Click "Create folder"
3. Set Name
4. Click "Save"

### Move folder

1. Right-click the folder you wish to move
2. Choose the folder you wish to move the folder to
3. Click "Move folder"

### Delete folder

1. Right-click the folder you wish to delete
2. Click "Delete folder"
3. Click "OK" to confirm deletion

### Add a new collection

1. Right-click the folder you wish to add the collection to
2. Click "Create collection"
3. Set Alias and Search definition
4. Click "Save"

### Edit collection

1. Right-click the collection you wish to edit
2. Modify Alias and/or Search definition
3. Click "Save"

### Move collection

1. Right-click the collection you wish to move
2. Click "Move collection"
3. Choose the folder you wish to move the collection to
4. Click "Move collection"

### Delete collection

1. Right-click the collection you wish to delete
2. Click "Delete collection"
3. Click "OK" to confirm deletion

{% hint style="info" %}
Read more about Collections here: [Collections](/pim3/fundamental-concepts/collections).
{% endhint %}


# Background tasks

Background tasks are tasks Struct PIM is performing behind the curtains for you.

### View background tasks

Background tasks are shown directly on the Background tasks page.

### Filter background tasks

Background tasks can be filtered by two different options:

* My background tasks
* All background tasks

### Show background task log

1. Click "Log"-icon

### Restart background task

1. Click "Restart"-icon

{% hint style="info" %}
You can only restart background tasks that failed.
{% endhint %}

### Download background task result

1. Click filepath under the Task information column

### Review AI translations

1. Click the arrow to the right of the status column
2. Approve or decline translations
3. Click "Save approved translation"

### Review AI text generation

1. Click the arrow to the right of the status column
2. Approve or decline generated text
3. Click "Save approved translations"


# Publications

The publications module of Struct PIM allows building autogenerated PDF's based on predefined templates in the system or XML exports of product data InDesign productions.

### Prints

Publication prints defines a set of data available for import into Indesign productions. For ease of use directly integrated with EasyCatalogue.

Customize the data easily through the use of print templates.

### Templates

Publication templates are predefined templates, which can be used to generate an automatic PDF-publication (both single or multipaged) or supply data for Indesign productions.

[See details for templates](/pim3/reference/publications/templates)


# Prints

Publication prints defines a set of data available for import into Indesign productions. For ease of use directly integrated with EasyCatalogue

You can add or update print publications through [Publications](/pim3/reference/publications) > [Prints](/pim3/reference/publications/prints).

### View publication print

Publication prints are shown directly in the publication print page.

### Find publication print

1. Select column header for Name, Category or Active
2. Type value to search for

### Add a new publication print

1. Click "Add new print publication"
2. Set Name, Active and Category along with additional [details](/pim3/reference/publications/prints/print-details)
3. Click "Create print publication"

### Edit publication print

1. Click "Edit"-icon
2. Modify publication print [details](/pim3/reference/publications/prints/print-details)
3. Click "Update print publication"

### Copy publication print

1. Click "Copy"-icon
2. Set Name and modify [details](/pim3/reference/publications/prints/print-details) as you wish
3. Click "Copy print publication"

### Delete publication print

1. Click "Delete"-icon
2. Confirm delete


# Print details

You can add or update print publications through [Publications](/pim3/reference/publications) > [Prints](/pim3/reference/publications/prints).

### Name

The name to present the print with.

### Active

Determines whether the print publication is currently active and selectable.

### Category

The category containing the products to be part of this publication.

### Data template

The template to be used to define the format of this publication.

### Language

The language for this publication.

### Dimension

The segment to get data for.

### Product filter

An optional filter to the products in this publication.

### Variant group filter

An optional filter to the variant groups in this publication.

### Variant filter

An optional filter to the variants in this publication.

{% hint style="info" %}
**Note** When creating or editing a print, a segment must be chosen for all dimensions added to the PIM.
{% endhint %}


# Templates

Templates are the blueprints for publications. A template defines what is included in a publication, like headers, footers, table of contents and how the publication is presented visually.

You can add or update templates through [Publications](/pim3/reference/publications) > [Templates](/pim3/reference/publications/templates).

### Add a new template

1. Click "Add template" on Templates page
2. Set Type and Name
3. Click "Create template"

### Copy template

1. Click the "Copy"-icon of the template you wish to copy
2. Set Name and optionally External reference
3. Click "Copy template"

### Edit template

1. Click anywhere on the template you wish to edit
2. Modify the template [details](/pim3/reference/publications/templates/edit-template)
3. Click "Update template"

### Delete template

1. Click "Delete"-icon
2. Confirm delete

### Export template

Click the "Export"-icon of the template you wish to export.

### Import template

1. Click "Import template" on Templates page
2. Click "Choose file" in the appearing dialog
3. Choose the template you wish to import
4. Click "Import template"


# Edit template

You can add or update templates through [Publications](/pim3/reference/publications) > [Templates](/pim3/reference/publications/templates).

### Settings

The settings tab will allow you to modify the general settings for the publication.

{% content-ref url="/pages/A4LX9NMSDwYcPDpidwtZ" %}
[Template settings details](/pim3/reference/publications/templates/edit-template/template-settings-details)
{% endcontent-ref %}

### Design

In the design tab you will be able to modify the content, images and background of your publication in great detail. Additionally you are able to preview the publication.

{% content-ref url="/pages/UTNxomRjemc8BUYQ5aSG" %}
[Template design](/pim3/reference/publications/templates/edit-template/template-design)
{% endcontent-ref %}


# Template settings details

The general details that define and describe the template.

You can add or update templates through [Publications](/pim3/reference/publications) > [Templates](/pim3/reference/publications/templates).

### Type

The type of template, PDF or XML.

### Name

The name to present the template with.

### Description

The description for the template.

### External reference

An external reference for the template.

### Enable

Determines if the publication template is able to be used in PIM.

### Allow multiple pages

Determines if additional pages are allowed to be included in the rendered publication.

### Combine as single publication

Determines whether to combine multiple products as single publication.

### Enable header

Determines whether to allow rendering of header.

### Enable footer

Determines whether to allow rendering of footer.

### Enable table of contents

Determines whether to allow setup of table of contents.

### Enable category pages

Determines whether to allow setup of multi level category pages.

### Page orientation

Default page orientation for publication. Defaults to Portrait if not set.

### Page size

Default page size for publication. Defaults to A4 if not set.

### Use fallback language

Determines whether to allow rendered value in PIM data to use fallback language value. Only rendered value in data is affected.

### Item limit

Limit for how many items can be generated in a single batch with this template.

### Render engine

Engine to use for rendering. Supported engines are Razor (MVC like syntax), XLST (XML stylesheet), Liquid (Shopify like template language). Defaults to XLST if not set.

### Use real PDF size for rendering

Determines whether to avoid scaling when converting html to PDF.

### Disable base url

Determines whether to disable base url for rendering PDF. This needs to be disabled to use internal anchor in PDF. When disabled relative urls cannot be resolved and needs to be set as absolute.


# Template design

Template design allows you to modify the design of the publication to your liking.

You can add or update templates through [Publications](/pim3/reference/publications) > [Templates](/pim3/reference/publications/templates).

### Edit content main

1. Click "Content"
2. Choose "Main"
3. Modify HTML
4. Click "Update template"

### Edit content header

1. Click "Content"
2. Choose "Header"
3. Add [elements](/pim3/reference/publications/templates/edit-template/template-design/header-footer-elements)
4. Click "Update template"

### Edit content footer

* Click "Content"
* Choose "Footer"
* Add [elements](/pim3/reference/publications/templates/edit-template/template-design/header-footer-elements)
* Click "Update template"

### Edit table of contents

1. Click "Table of Contents"
2. Modify HTML
3. Click "Update template"

### Edit Category

1. Click "Category"
2. Modify HTML
3. Click "Update template.

### Edit Preview settings

1. Click "Settings"
2. Modify Product and language along with additional [details](/pim3/reference/publications/templates/edit-template/template-design/template-preview-settings)

### Download preview

1. Click "Download"-button


# Header/Footer elements

Elements that define the header and/or footer of the publication.

| TextElement |                                    |
| ----------- | ---------------------------------- |
| Font        | The font used to display the text. |
| Color       | The color of the text.             |
| Size        | The size of the text in pixels.    |
| Text        | The text to display.               |

| ImageElement |                                                                                |
| ------------ | ------------------------------------------------------------------------------ |
| Image        | The image to include.                                                          |
| Width        | The max width of element in pixels. If not set full width will be used.        |
| Height       | The max height of elements in pixels. If not set the full height will be used. |

| HtmlElement |                     |
| ----------- | ------------------- |
| Html        | The html to render. |

| BackgroundElement |                                                                              |
| ----------------- | ---------------------------------------------------------------------------- |
| Background color  | The color used for background.                                               |
| Width             | The max width of element in pixels. If not set full width will be used.      |
| Height            | e max height of elements in pixels. If not set the full height will be used. |

### Positional horizontal

The horizontal position of element. If not set element will be placed at the left as default.

### Position vertical

The vertical position of element. If not set the element will be placed at the top as default.

### Padding

The left, right, top and bottom padding for elements in pixels.


# Template preview settings

Settings that determine what to include when rendering the preview.

You can edit template preview settings in [Publications](/pim3/reference/publications) > [Templates](/pim3/reference/publications/templates) > [Template design](/pim3/reference/publications/templates/edit-template/template-design).

### Product

The product to use for the template preview.

### Language

The language to use for the template preview.

### Segments

The segments to use for the template preview.

### Product catalogue

The product catalogue to use for the template preview.

### Size

The size to render. Defaults to selected template size if not selected. If selected template size is not set either it will default to A4.

### Custom data

Custom data to be included in 'CustomValues' in Data.


# Product model setup

Create custom data models for each unique product type in your business. Manage all your Attributes, Scopes, Business rules, Enrichment insights and workflows from here.


# Product structures

Product structures are the blueprints for products and variants in the system. A product structure defines tabs, sections and attributes that are available using that product structure.

You can add or update product structures through [Product model setup](/pim3/reference/product-model-setup) > [Product structures](/pim3/reference/product-model-setup/product-structures).

{% hint style="info" %}
**Guide** See a short walkthrough of how product modelling is used in Struct PIM [here](/pim3/tutorials/helpful-guides/how-to-use-product-models).
{% endhint %}

### Add a new product structure

1. Click "Create new product structure" on Product structures page
2. Set Alias and Label along with additional [details](/pim3/reference/product-model-setup/product-structures/product-structure-details)
3. Click "Display settings"
4. Set Product display name and pattern
5. Click "Create product structure"

{% hint style="info" %}
To create a new Product Structure a single attribute must be added to select in "Display Settings". See [Product structure details](/pim3/reference/product-model-setup/product-structures/product-structure-details).
{% endhint %}

### Copy product structure

### Edit product structure

1. Click "Edit"-icon on Product structures page
2. Modify the product structure [details](/pim3/reference/product-model-setup/product-structures/product-structure-details)
3. Click "Save changes"

### Delete product structure

1. Click "Delete"-icon
2. Click "Ok" to confirm

{% hint style="info" %}
It is not possible to delete a product structure that has products using the structure.
{% endhint %}


# Product structure details

Set up configuration of the product structure


# General settings

Add alias and label to the product structure.

### Alias

A unique name for the product structure.

### Label

The name of the product structure that will be used when displaying the product structure in the PIM.

### Has variants

If the product exists in multiple variants, check here to be able to set up a variant model.

### Has variant groups

Check if you want to allow creating groups for variants using this product structure.

### Disable revision logging

Revision logging takes some time each time an item is saved. If revisions are not used at all, disable revision logging for improved performance.


# Data model

Set up tabs, sections and properties for entities in the product structure


# Tab types

Tab types for data models.

### Dynamic tab

Allows users to add [sections](/pim3/reference/product-catalogues/product-catalogue-details/data-model/section-types).

### External tab

Allows users to embed a website into the tab.


# Tab details

Additional details when adding a tab to a data model.

## Settings

### Label

A label for the tab.

### Show Sidebar

Determines if the information sidebar is shown when editing the entity.

### External URL

The external URL for the external tab. To have parameters with PIM values in the URL, put the alias in curly brackets such as {alias}. The PIM internal ID is referred to by {PIM\_id}.

{% hint style="info" %}
Different settings are available depending on the chosen [tab type](/pim3/reference/product-catalogues/product-catalogue-details/data-model/tab-types).
{% endhint %}

## Security

### Create a new permission

1. Click the '+'-icon on the 'View permission- or 'Edit permission'-selector
2. Set Permission group, Name and Description
3. Click 'Create Permission'

### View permission

Determines if a permission is required in order to see this tab.

### Edit permission

Determines if a permission is required in order to edit values in this tab.


# Section types

Section types for data models.

### Dynamic section

Allows users to add [properties](/pim3/reference/product-catalogues/product-catalogue-details/data-model/property-types) of their choice.

### Notes section

Allows the user to add notes.


# Section details

Additional details when adding sections to a tab.

## Settings

### Headline

The headline used for the section

### Description

A description for the section

### Collapse

Determines if a section is expanded or collapsed by default when loading the entity. If this option is checked the section is collapsed, if left unchecked the section is expanded by default.

{% hint style="info" %}
Different settings are available depending on the chosen [section type](/pim3/reference/product-catalogues/product-catalogue-details/data-model/section-types).
{% endhint %}

## Security

### Create a new permission

1. Click the '+'-icon on the 'View permission- or 'Edit permission'-selector
2. Set Permission group, Name and Description
3. Click 'Create Permission'

### View permission

Determines if a permission is required in order to see this section.

### Edit permission

Determines if a permission is required in order to edit values in this section.


# Property types

Property types for data models.

### Attribute

Allows the user to manage the values of an attribute. For more information, see: [Attributes](/pim3/fundamental-concepts/attributes).

### Created

Displays the creation time and date of the entity.

### Entity references

Displays a list of entities referencing this entity.

### Internal Id

Displays the internal id of the entity.

### Last modified

Displays the time and date of the last modification to the entity.

### Workflow state selector

Allows the user to manage the workflow state of the entity.


# Property details

Additional details when adding a property to a section.

## Attribute settings

### Attribute

The attribute to add to the section.

### Read only

Determines if the attribute shall be read only on this configuration.

### Mandatory

Determines if the attribute shall be mandatory on this configuration.

### Unchangeable

Determines if the value is unchangeable once it has been set.

## Entity references settings

### Property label

The label to show for the property in the backoffice.

### Property description

The description to show for the property in the backoffice.

### Referencing item type

The item type of the referencing items to show.

### Referencing attribute

The attribute to show references for.

## Security

### Create a new permission

1. Click the '+'-icon on the 'View permission- or 'Edit permission'-selector
2. Set Permission group, Name and Description
3. Click 'Create Permission'

### View permission

Determines if a permission is required in order to see this property.

### Edit permission

Determines if a permission is required in order to edit values in this property.


# Variation definitions

Add variation definitions and defining attributes for variants of a product

### Add variation definition

1. Click "Add variation definition"
2. Set Alias and Display name along with additional [details](/pim3/reference/product-model-setup/product-structures/product-structure-details/variation-definitions/variation-definition-details)
3. Click "Submit"
4. Click "Save changes"

### Edit variation definition

1. Click the variation definition you wish to edit
2. Modify Alias and Display name along with additional [details](/pim3/reference/product-model-setup/product-structures/product-structure-details/variation-definitions/variation-definition-details)
3. Click "Submit"
4. Click "Save changes"

### Delete variation definition

1. Hover over the variation definition you wish to delete
2. Click the "Delete"-icon
3. Click "Save changes"

### Sort variation definitions

1. Click "Sort"-button in the top-right corner of variation definitions
2. Drag to sort
3. Click "Save changes"

{% hint style="info" %}
**Note** First variation definition is default
{% endhint %}


# Variation definition details

Additional details when adding variation definition and defining attributes for variants of a product

## Variation definitions

### Alias

An alias for this variation definition. The alias must not contain special characters or whitespaces.

### Display name

A display name for this variation definition.

### Defining properties

The properties whose values define one variant from other variants of the same product.

### Name properties

The properties you want to include in the name.

### Name pattern

Use the name pattern to dictate how property values should be used to render the name. Use {0}, {1}, {2} etc. to indicate in the pattern where you want the attributes you choose to be rendered.

## Defining attributes

### Defining attributes to always show

Defining attributes are by default only available to variants using a variation definition containing that specific defining attribute. If you want a defining attribute to always be available no matter if it is part of the variation definition, select it here.


---

[Next Page](/llms-full.txt/1)